

1. Introduction
1.1 About This Guide
This guide is designed for end users, sales representatives, managers, and administrators who use 360 InstantDocs on a daily basis. It provides step-by-step instructions for every feature of the application, from template management to bulk document generation and email delivery.
For installation and initial setup instructions, please refer to the 360 InstantDocs Installation & Setup Guide.
Related Documentation:
- 360 InstantDocs Installation & Setup Guide — Step-by-step instructions for installing the package, configuring OAuth, assigning permissions, and creating buttons.
- 360 InstantDocs Word Add-In User Guide — Detailed instructions for building templates in Microsoft Word, including fields, conditions, views, images, and tag syntax.
- 360 InstantDocs Excel Add-In User Guide — Detailed instructions for building templates in Microsoft Excel, including fields, conditions, views, images, and tag syntax
1.2 Navigating the 360 InstantDocs App
360 InstantDocs is a Salesforce Lightning app accessible from the App Launcher. To open the app:
Once open, you will see six tabs in the navigation bar:
| Tab | Purpose | Who Uses It |
|---|---|---|
| Home | Contains 360 InstantDocs Dashboard (document generation activity, recent generations, status summaries) and 360 FileSync Dashboard (file sync activity, storage usage) | All users |
| Getting Started | Interactive setup guide and onboarding wizard with step-by-step instructions | Admins (initial setup) |
| InstantDocs App Config | Configuration hub for license sync, permission sets, object configuration, button management, and File Sync Setup | Admins |
| InstantDocs Templates | View, create, and manage document templates | Admins, template designers |
| InstantDocs | View all generated document records and their status. | All users |
2. App Navigation
2.1 Home Tab
The Home tab is the default landing page when you open the 360 InstantDocs app. It provides two key dashboards in a single view:
- 360 InstantDocs Dashboard — Displays an overview of document generation activity, recent document generations, status summaries, and key metrics for your org.
- 360 FileSync Dashboard — Displays file synchronization activity, sync status across connected cloud storage providers, and storage usage metrics.
2.2 Getting Started Tab
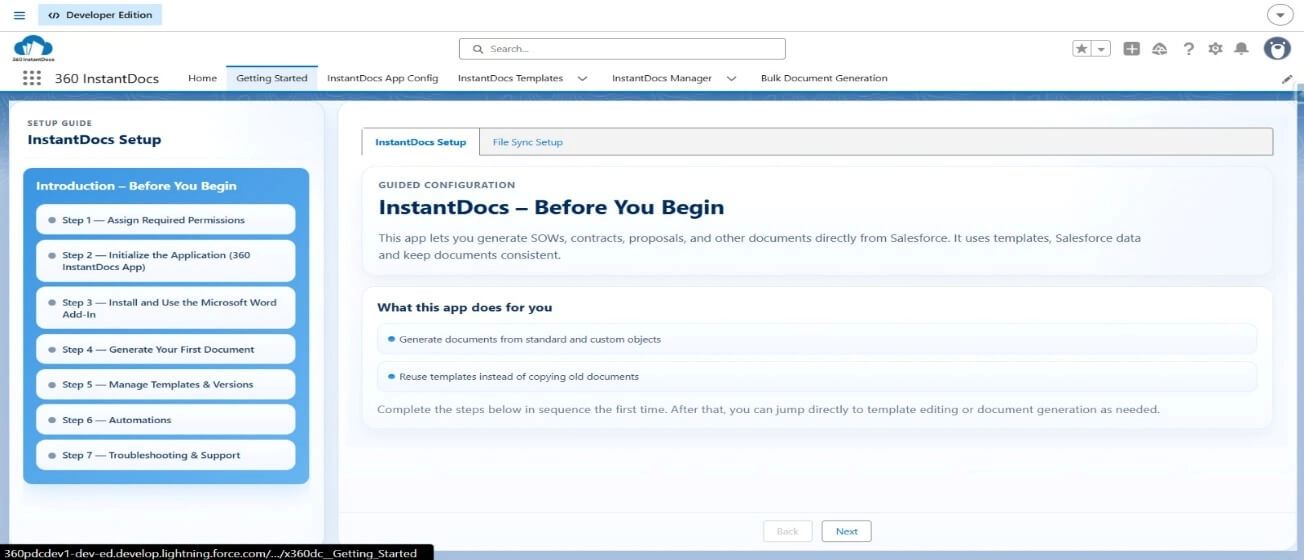
The Getting Started tab provides a comprehensive, interactive setup guide to help administrators configure 360 InstantDocs step by step. It features a left sidebar menu with expandable sections and a main content panel on the right.
The “Introduction – Before You Begin” section contains the following two tabs:
InstantDocs Setup
- Step 1: Assign Required Permissions
- Step 2: Initialize the Application (360 InstantDocs App)
- Step 3: Install and User the Microsoft Word/Excel Add-In
- Step 4: Generate Your First Document
- Step 5: Manage Templates & Versions
- Step 6: Automations
- Step 7: Troubleshooting & Support
File Sync Setup
- Step 1: Assign Required Permissions
- Step 2: Initialize the Application (360 InstantDocs App)
- Step 3: Select Default (Primary) Storage
- Step 4: Storage Setup and Integration
- Step 5: Object Setup
- Step 6: File Sync Component Configuration
- Step 7: Upload and Sync Your First File
- Step 8: Automatic File Deletion After Sync
- Step 9: Advanced Configurations
- Step 10: Support & Troubleshooting
Use the Back and Next buttons at the bottom to navigate sequentially, or click any section in the sidebar to jump directly to it.
2.3 360 InstantDocs Config Tab
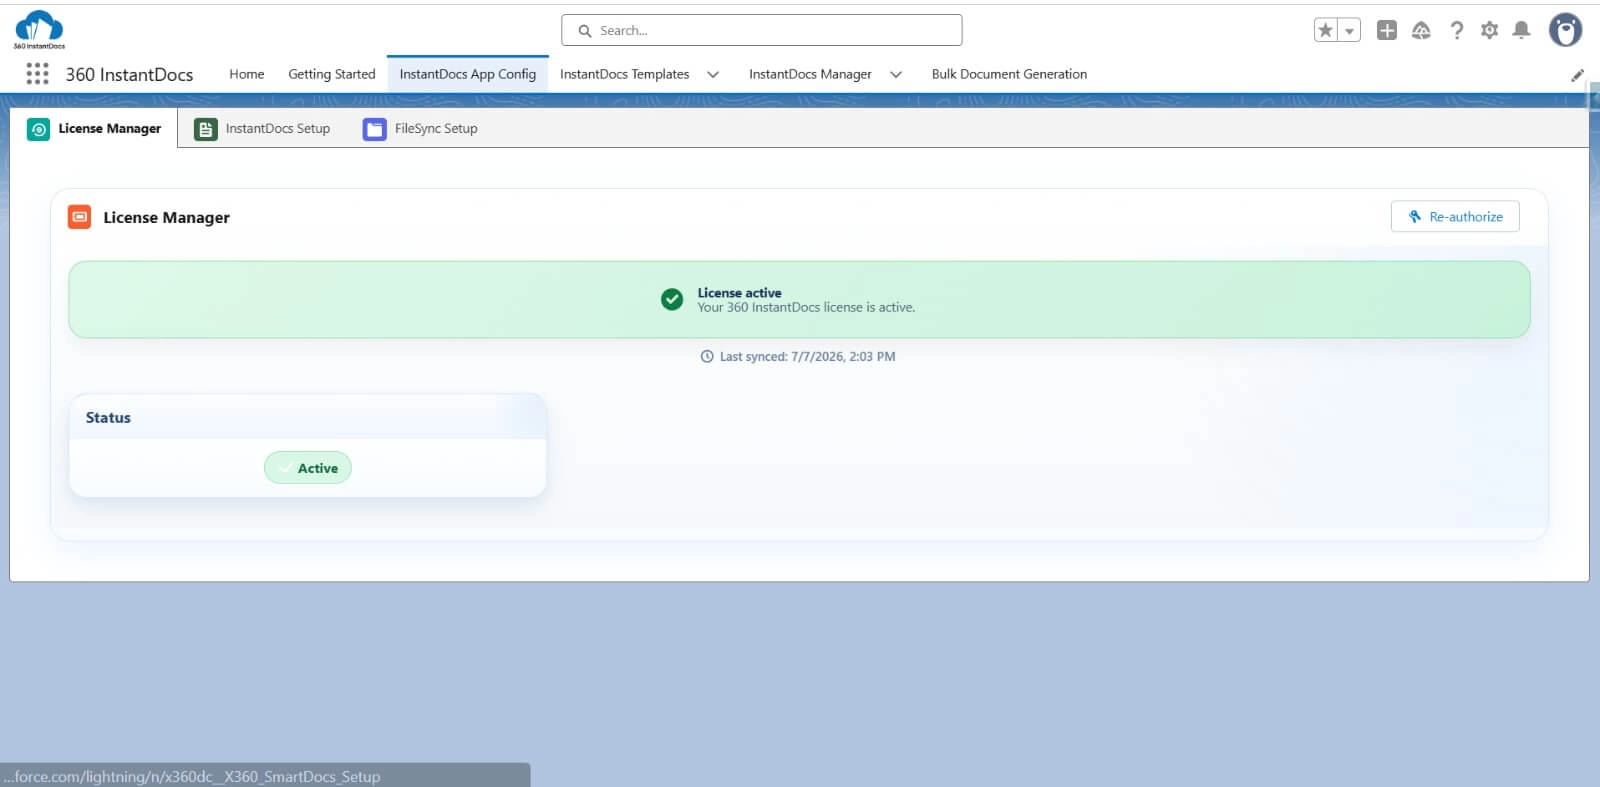
The 360 InstantDocs Config tab is the central configuration hub for administrators. The InstantDocs Config tab contains the following three sub-tabs:
- License Manager — Activate and sync your InstantDocs license, view license status, InstantDocs credits, and FileSync credits details
- InstantDocs Setup — Sidebar navigation with: Permission Set Assignment; Configuration (Step 1: Salesforce Object Support; Step 2: Manage Buttons)
- File Sync Setup — Used to configure and manage file sync settings.
2.4 InstantDocsTemplates Tab
The InstantDocsTemplates tab displays a list view of all Template records in your org. From here, you can:
- View all templates with their names, associated objects, document types, and active status
- Click on a template to open its detail page
- Click “New” to create a new template
- Use list view filters to find specific templates
X360_InstantDocs_User permission set do not have “View All” access on Template__c. They will only see templates that have been shared with them via Sharing Rules. As an admin, you must configure Sharing Rules on the Template__c object to grant read access to the appropriate user groups. Without this step, end users will see an empty template list when generating documents.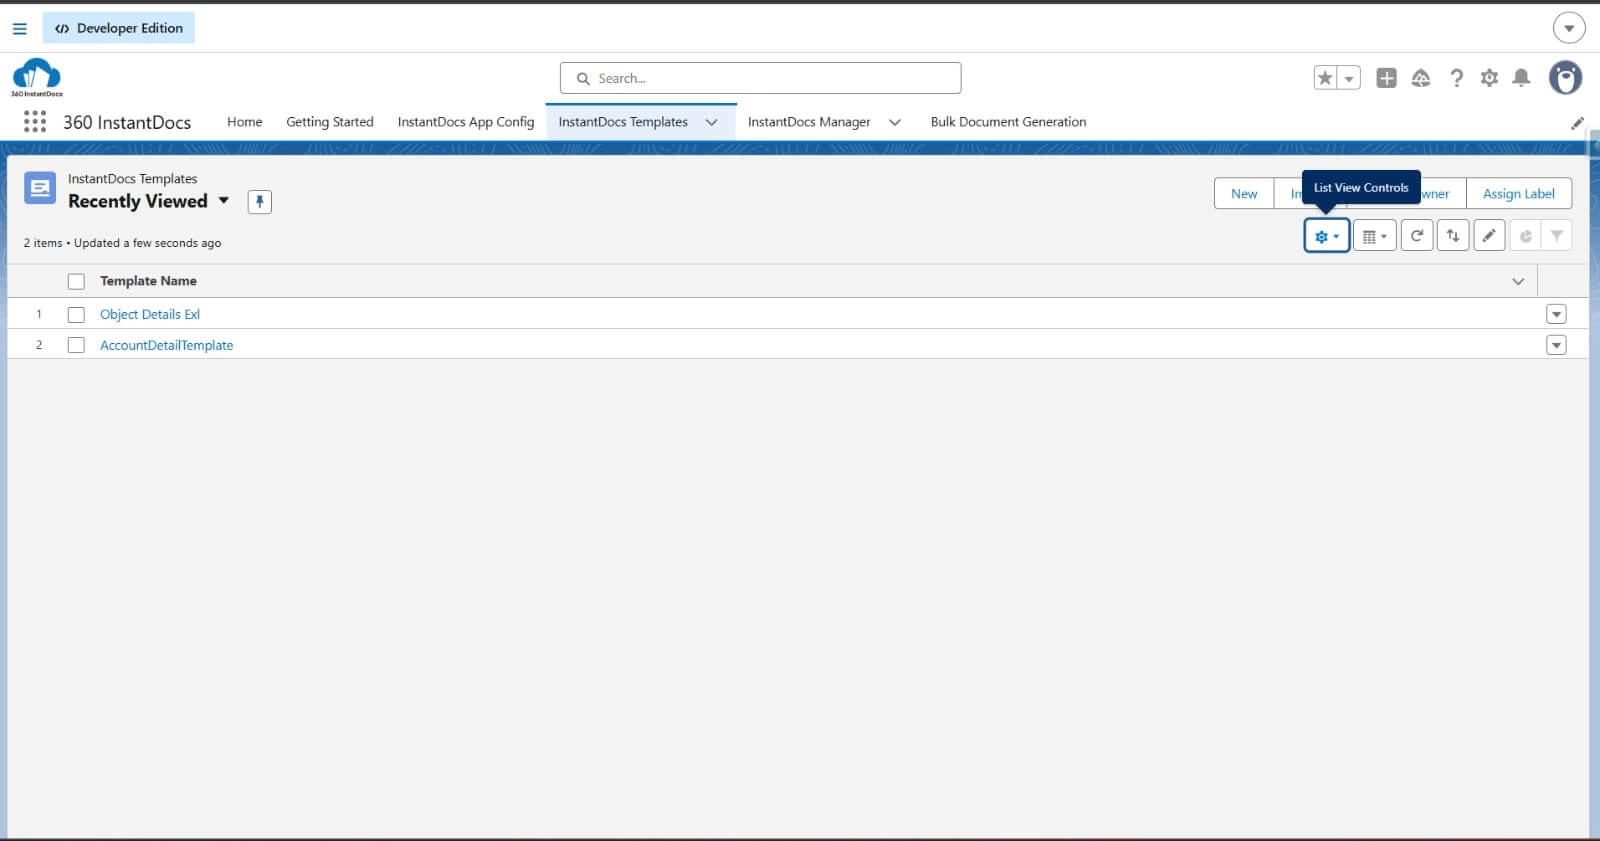
2.5 InstantDocs Manager Tab
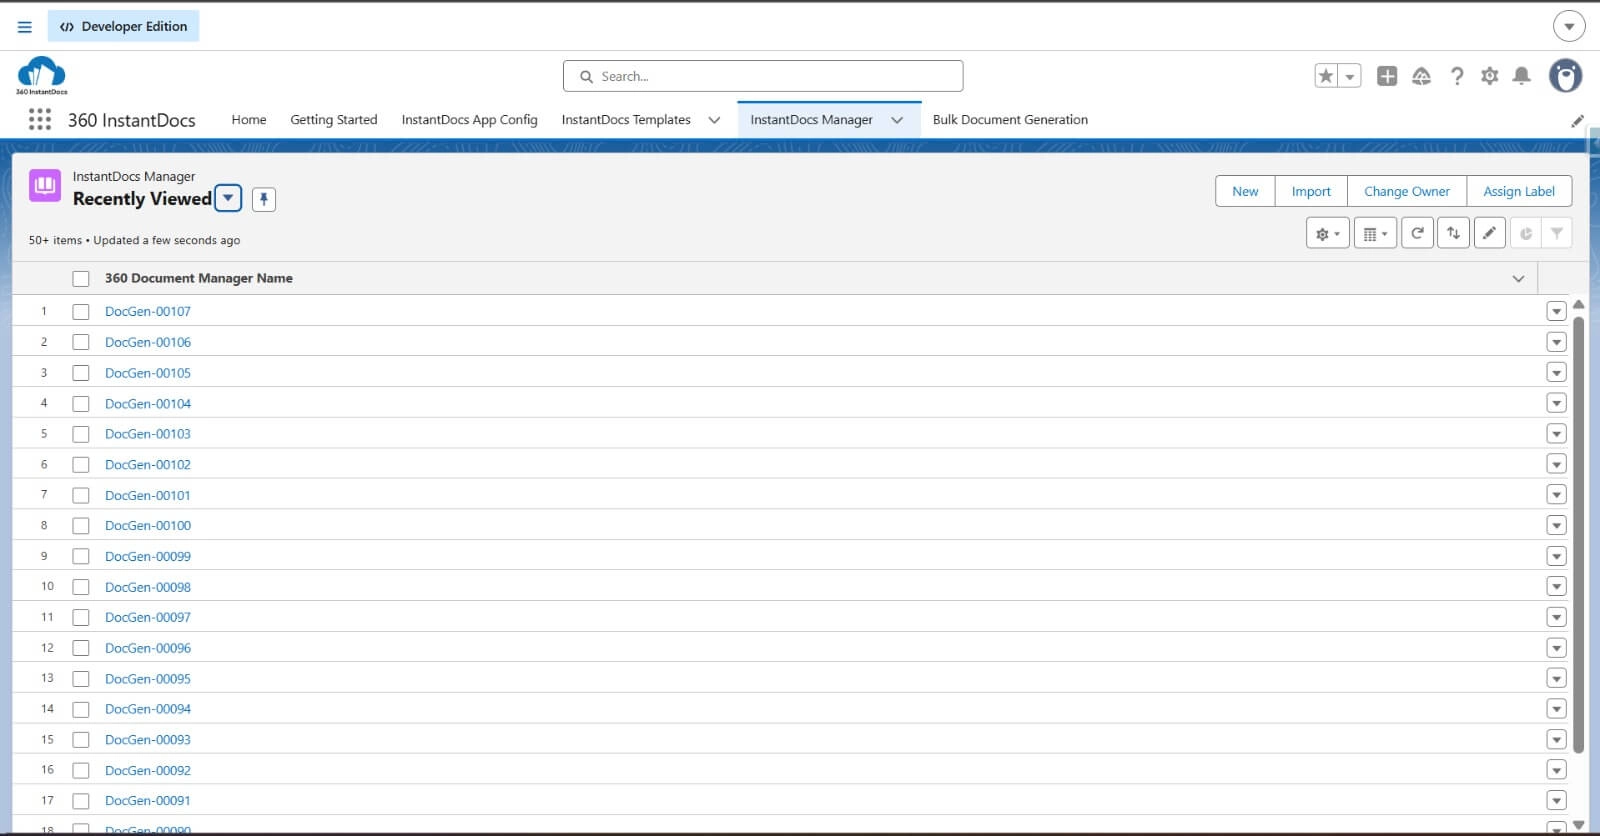
The InstantDocs Manager tab shows a list view of all x360dc_x360_Document_Manager__c records — each representing a generated document or a document generation request. You can:
- View the status of all document generations (Completed, In Progress, Failed, etc.)
- Click on a record to see its details, including the parent record, template used, and the generated file
- Use list view filters to find specific document records
2.6 Bulk Document Generation Tab
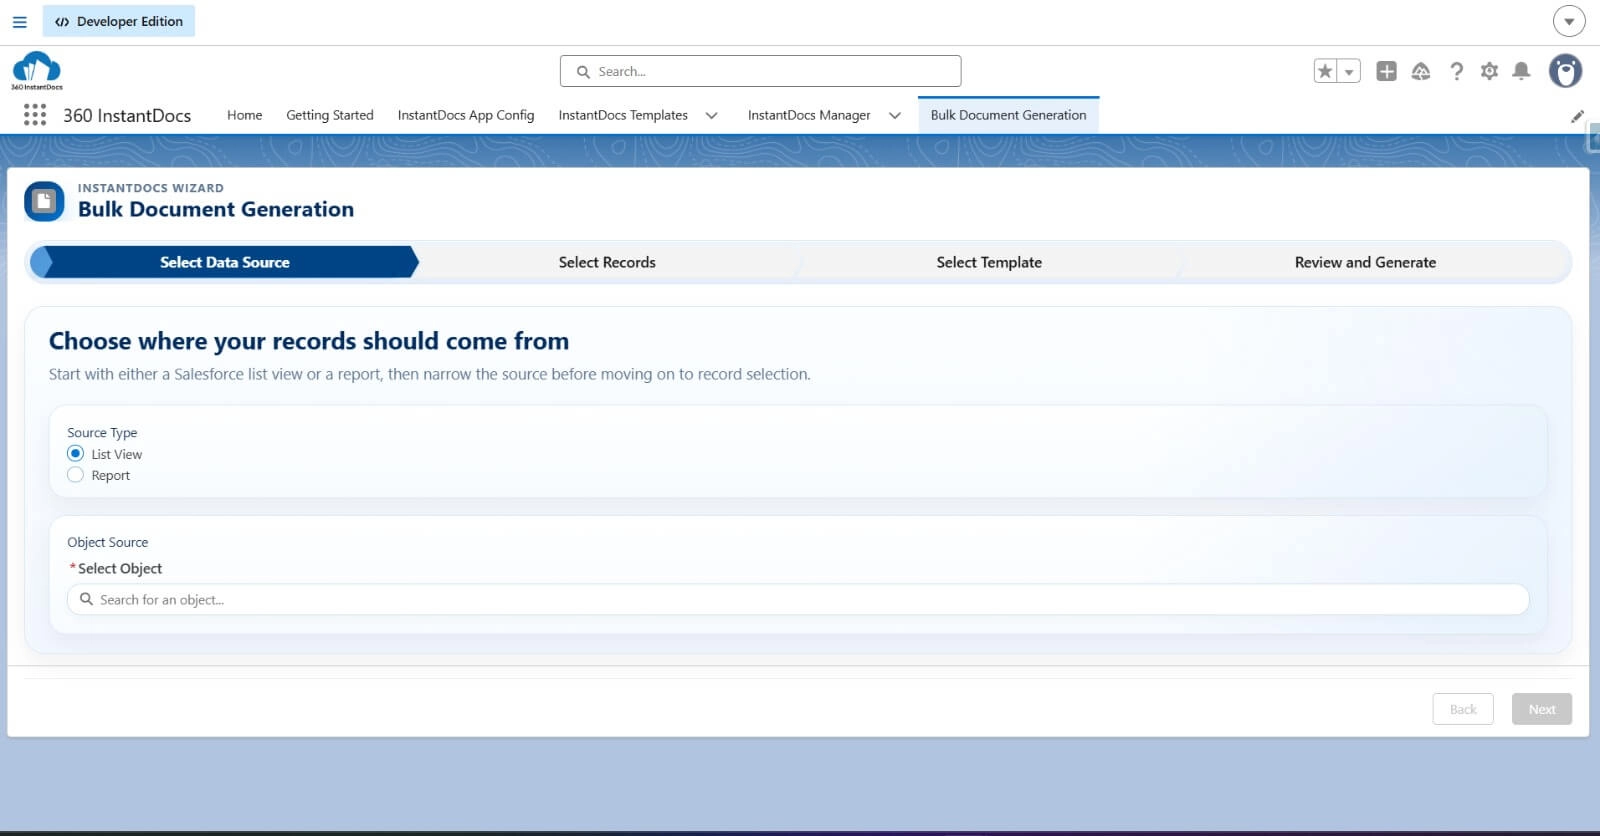
The Bulk Document Generation tab opens a multi-step wizard for generating documents for multiple records at once. The wizard guides users through selecting a data source, choosing records, picking a template, and generating documents in bulk.
3. Template Management
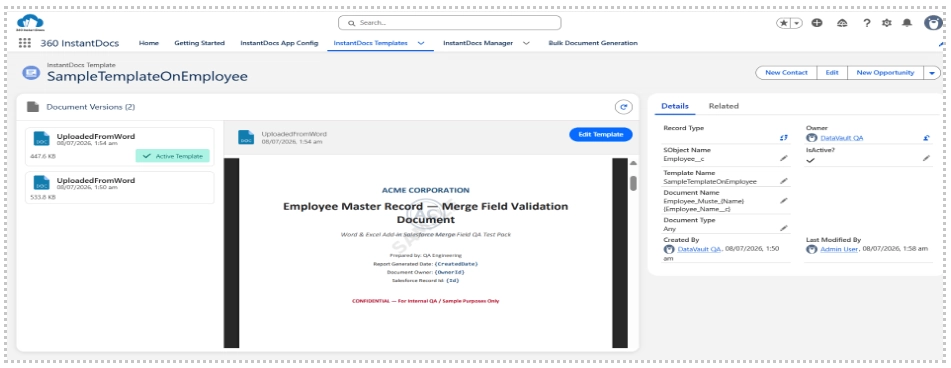
Templates are the foundation of 360 InstantDocs. A template is a Microsoft Word (.docx) or Microsoft Excel (.xlsx) file containing dynamic merge fields (tokens) that are replaced with actual Salesforce data when a document is generated.
3.1 Viewing Templates
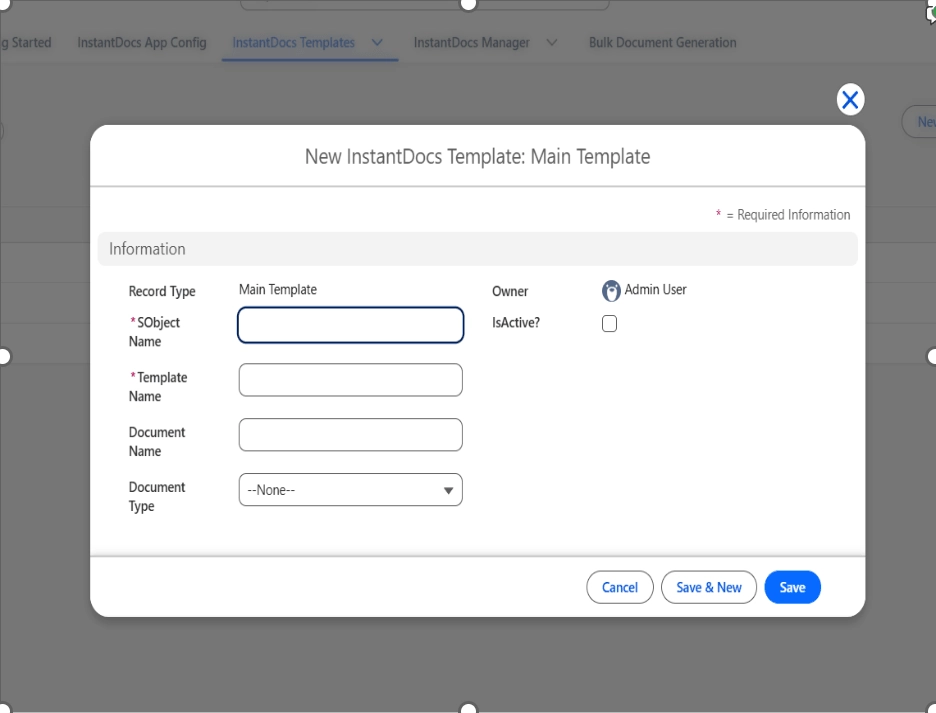
3.2 Creating a New Template
3.3 Uploading Template Files
After creating a template record, you need to upload the actual Word document (.docx) or Excel Sheet (.xlsx) file that serves as the template.
3.4 Activating and Deactivating Templates
Only active templates appear in the template selection dropdown during document generation.
Using the Preview Attached Files Component (Recommended)
3.5 Using the Preview Attached Files Component
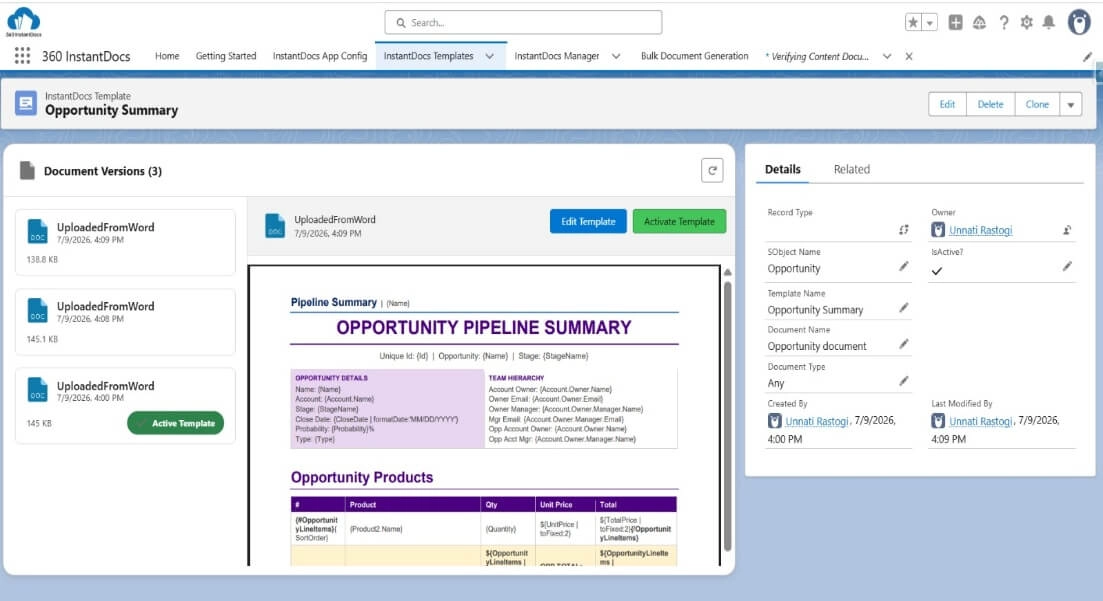
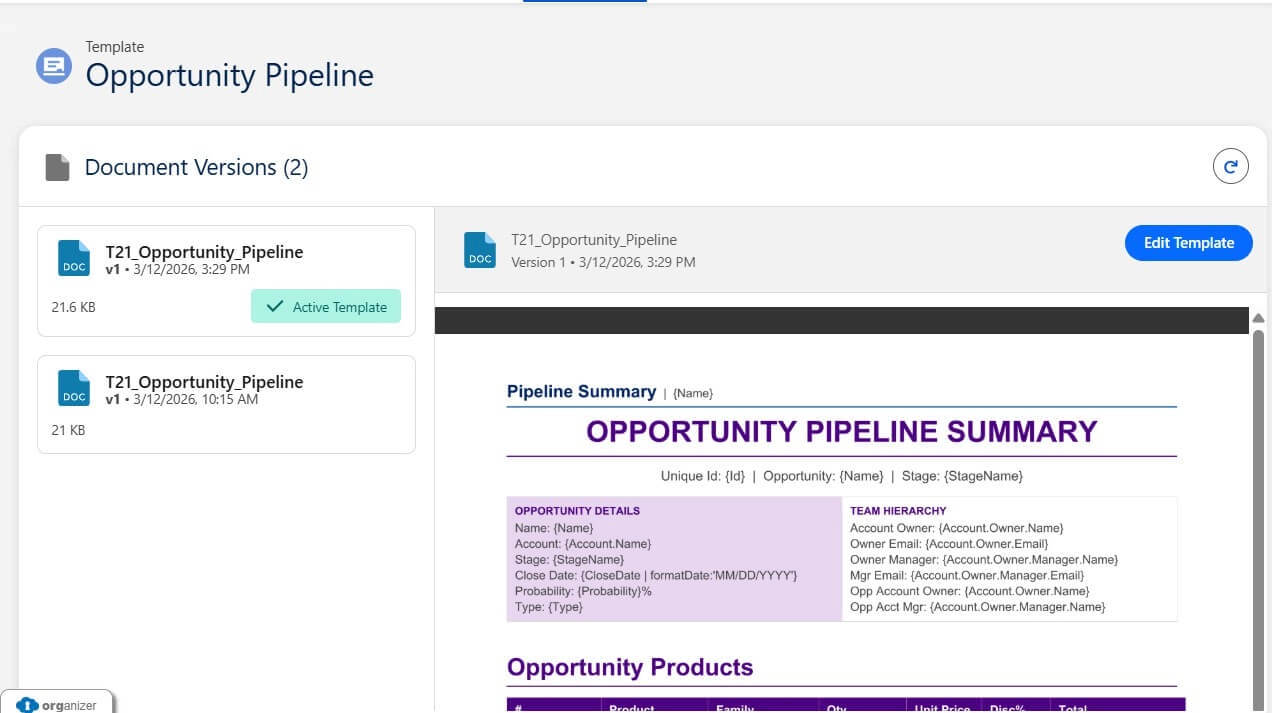
The Preview Attached Files component is a two-panel interface available on every template record page:
Left Panel — File List
- Displays all uploaded file versions as clickable cards
- Each card shows: file icon, file title, version number, last modified date, file size
- Active version displays a green “Active Template” badge
- Click a card to select it and see its preview in the right panel
Right Panel — Preview & Actions
- Header: Shows the selected file name and version info
- Edit Template — Opens the template in the Word/Excel Add-In for editing
- Activate Template — Sets the selected version as the active template
- Preview Area: Shows a rendered preview of the document in an iframe
- Refresh button in the top-right corner to reload the file list
4. Microsoft Word/Excel Add-In
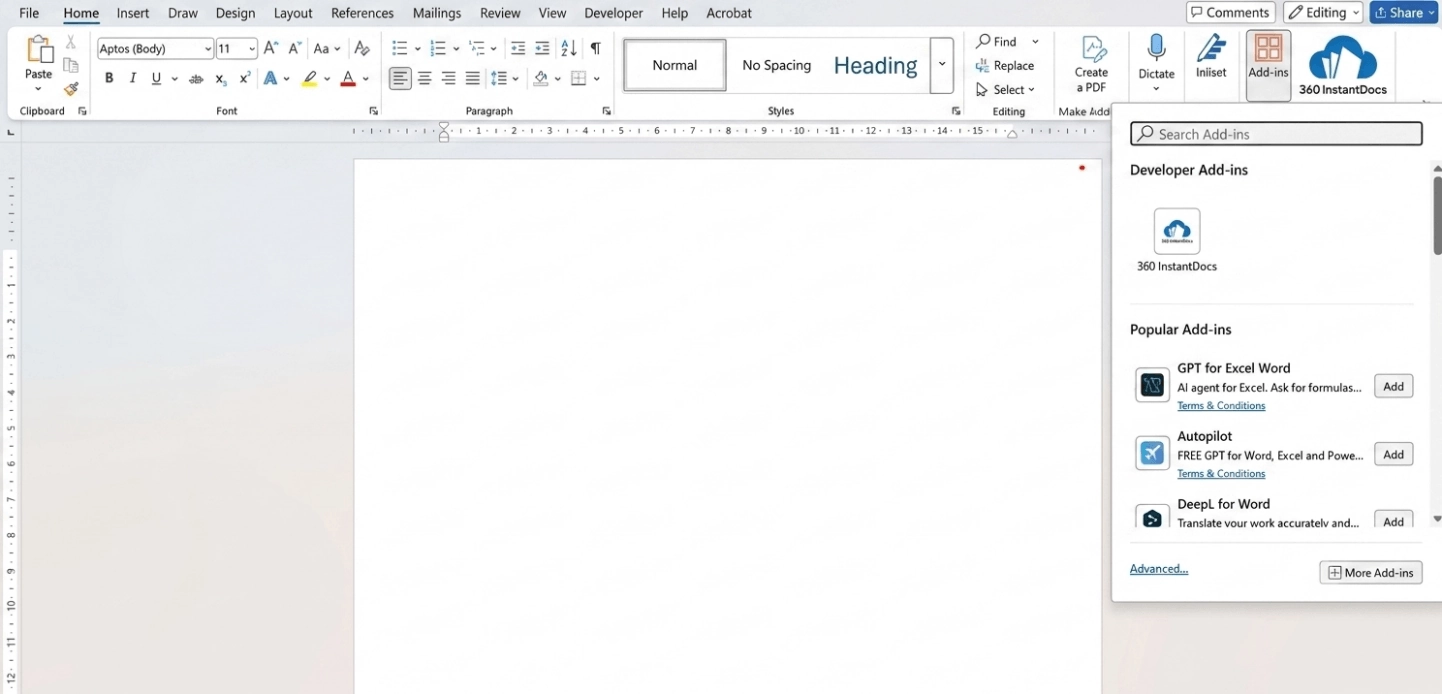
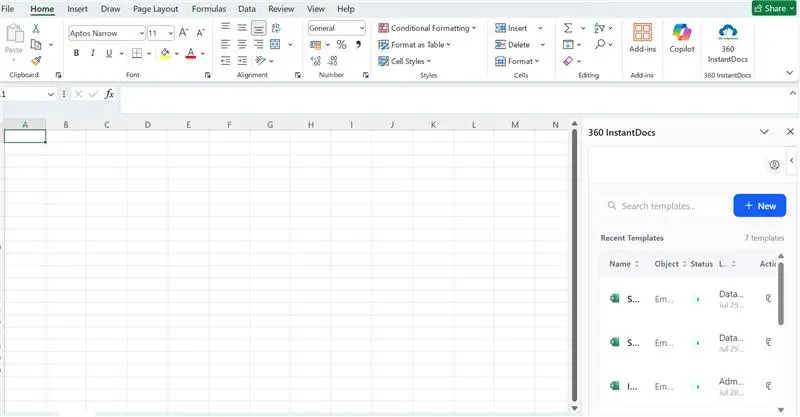
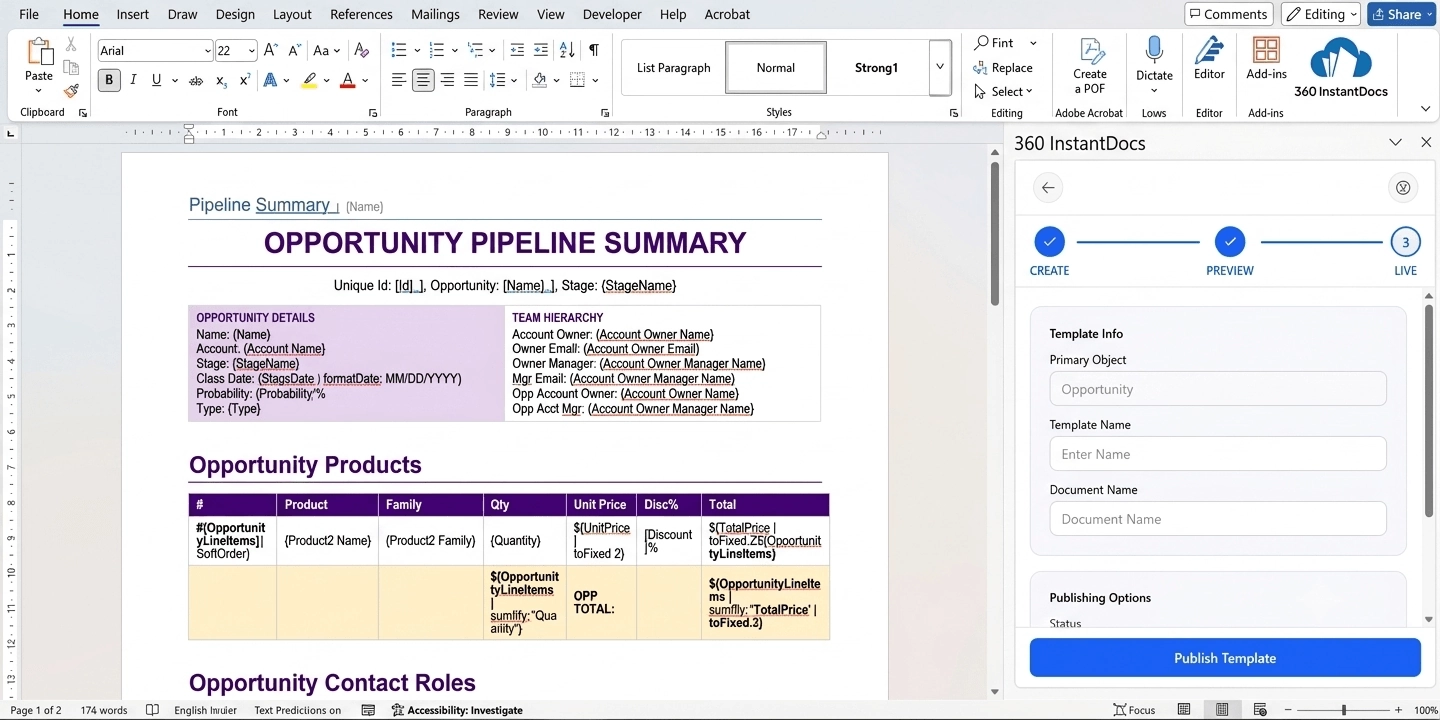
The 360 InstantDocs Word/Excel Add-In allows you to design and edit document templates visually in Microsoft Word/Excel. It provides a sidebar within Word/Excel for browsing Salesforce objects and fields, inserting merge tokens, previewing documents, and saving templates directly back to Salesforce.
- Create — Design your template by inserting merge fields and formatting the document layout
- Preview — Preview the document with actual Salesforce data to verify the output before publishing
- Live — Save and activate the template in Salesforce, making it available for document generation
4.1 Installing the Add-In
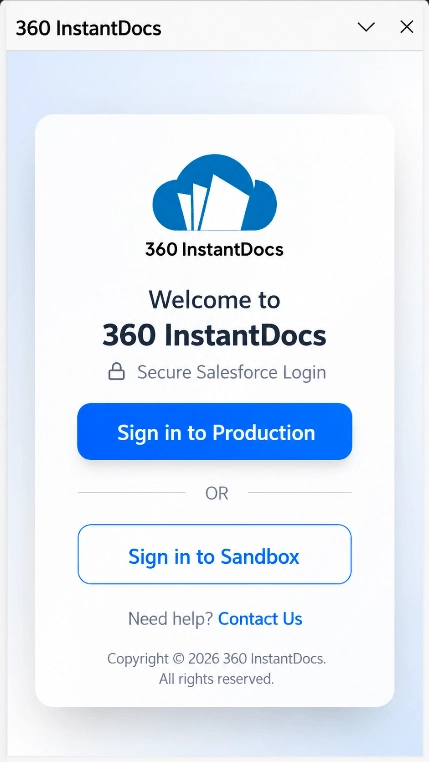
4.2 Connecting to Salesforce
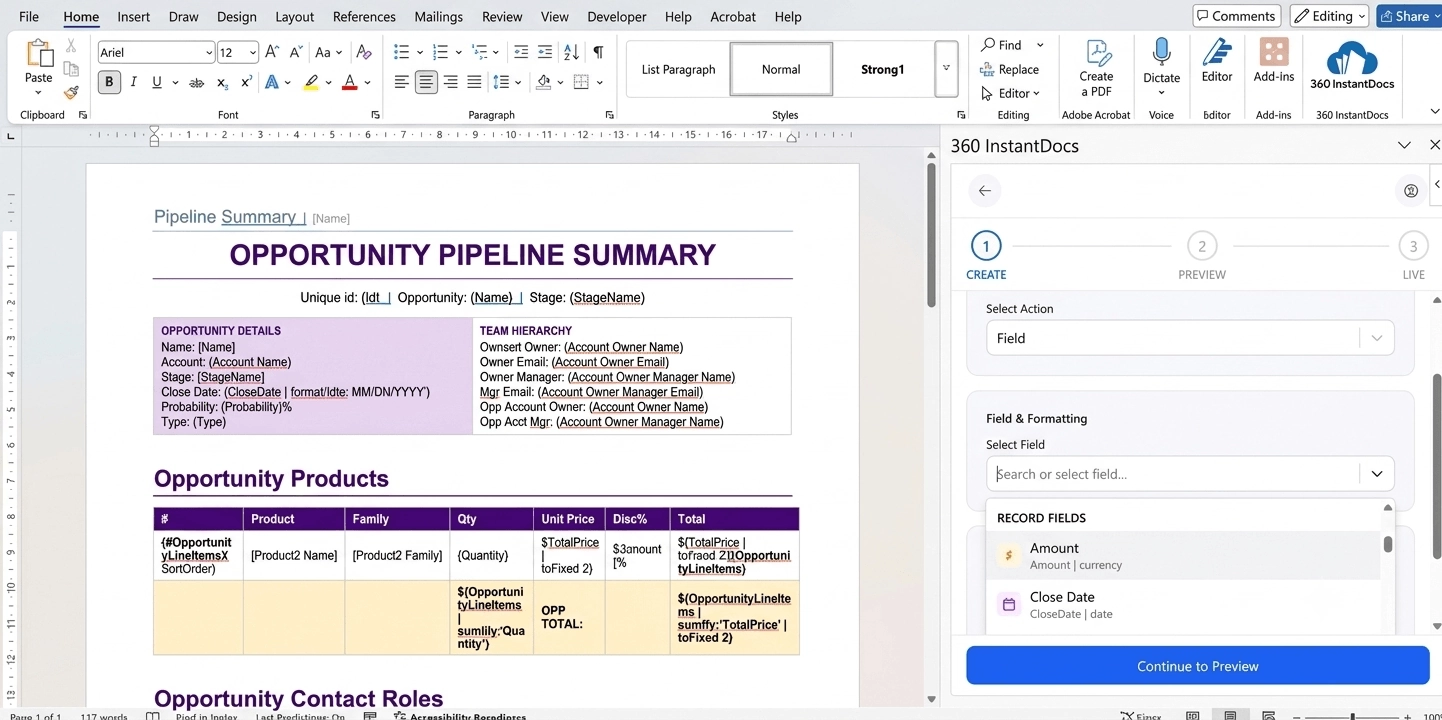
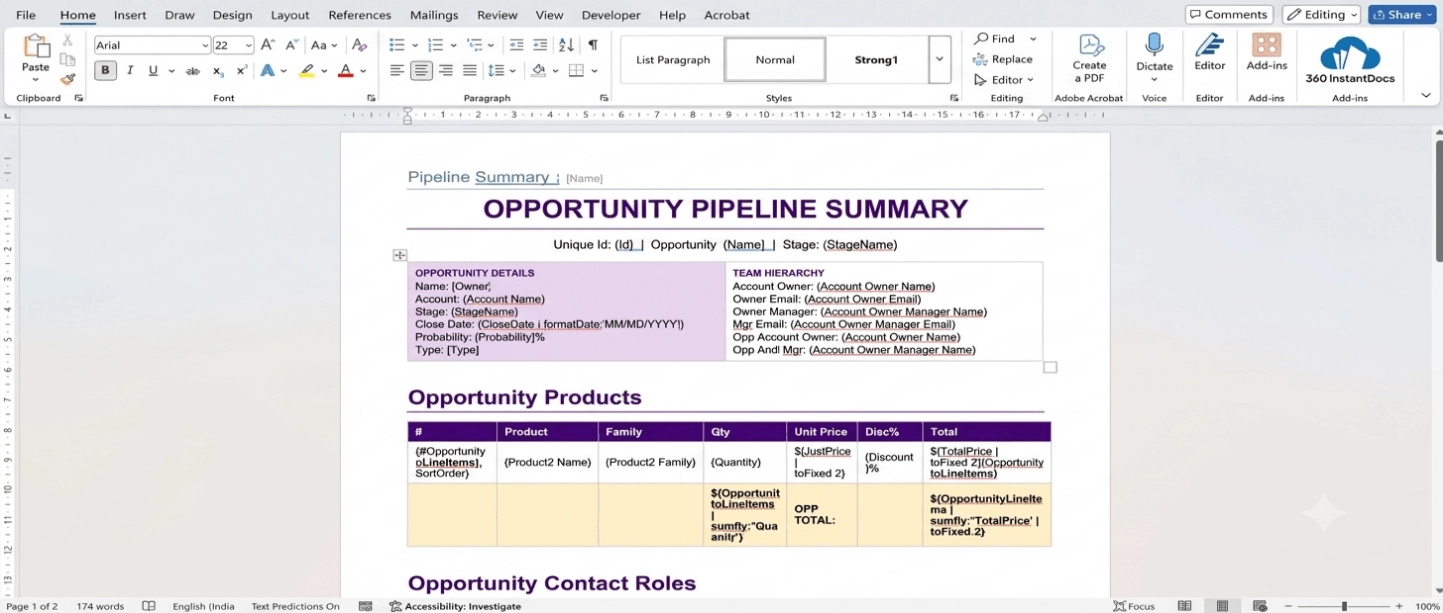
4.3 Inserting Merge Fields / Tokens
Merge fields (tokens) are placeholders in your Word/Excel template that get replaced with actual Salesforce data during document generation.
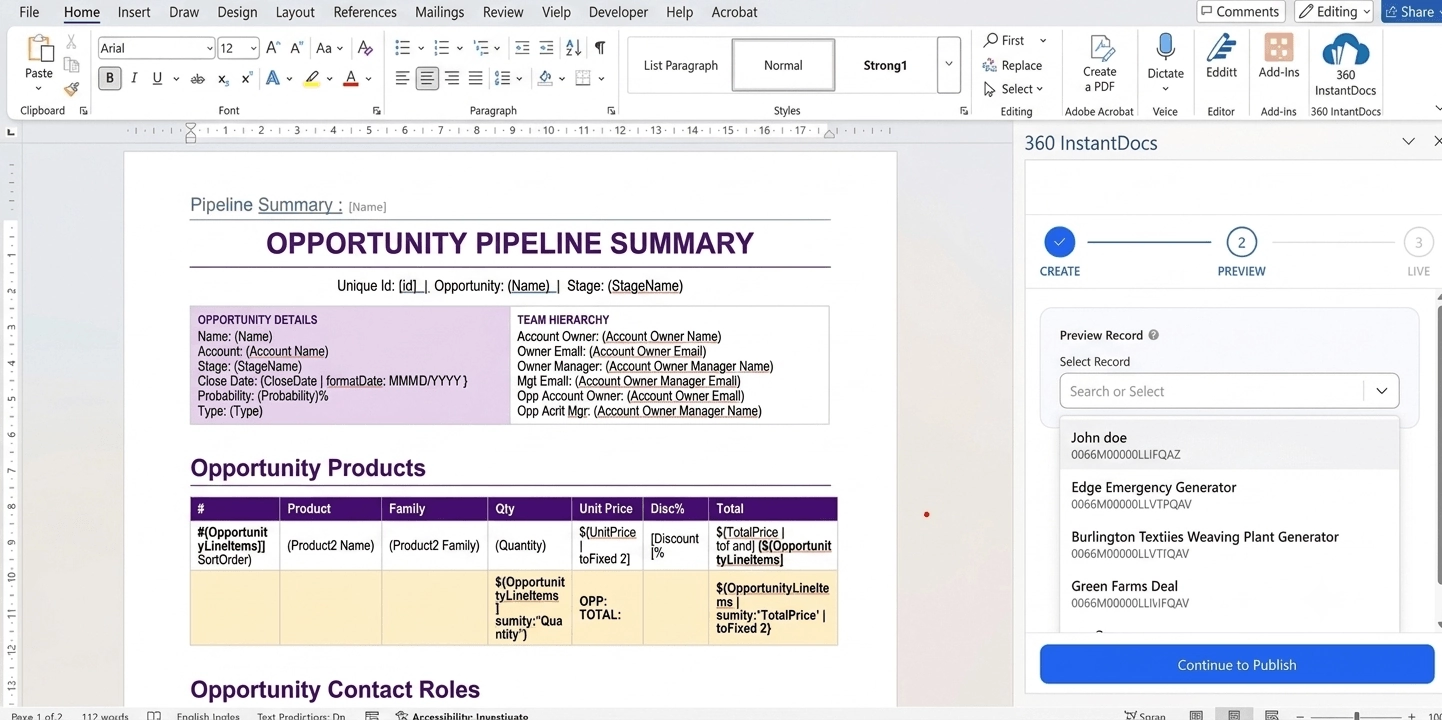
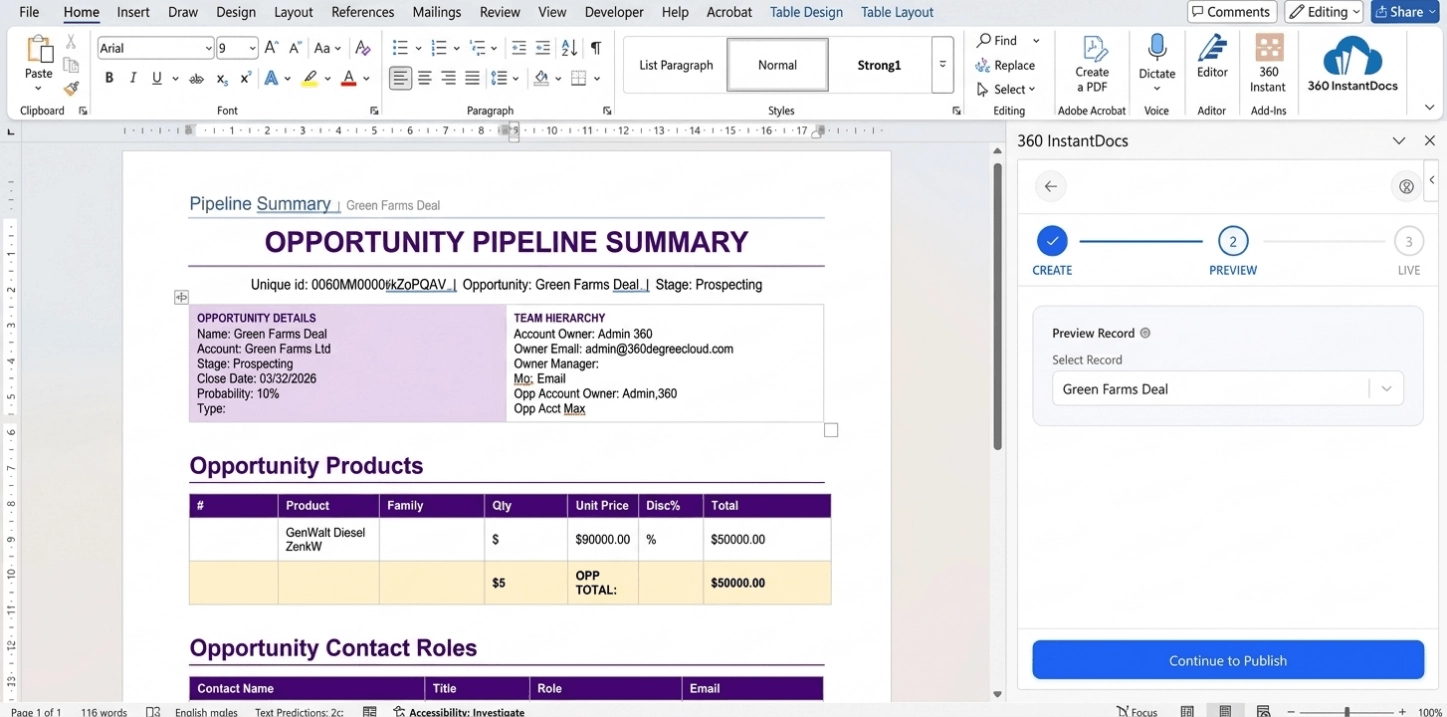
4.4 Previewing the Document
Before saving your template to Salesforce, you can preview the document to see how it will look with actual Salesforce data merged in.
4.5 Saving Templates Back to Salesforce
5. Single Document Generation
Single document generation creates a document from one Salesforce record using a selected template. There are two ways to trigger it: via a Quick Action or via a URL Button.
When to Use Single Document Generation:
- Generating a proposal or SOW for a specific Opportunity during a sales meeting
- Creating a contract or agreement for a single Account that is ready for signing
- Producing an invoice or quote for one customer order
- Generating a personalized welcome letter for a new Contact
5.1 Generating via Quick Action
5.2 Generating via URL Button
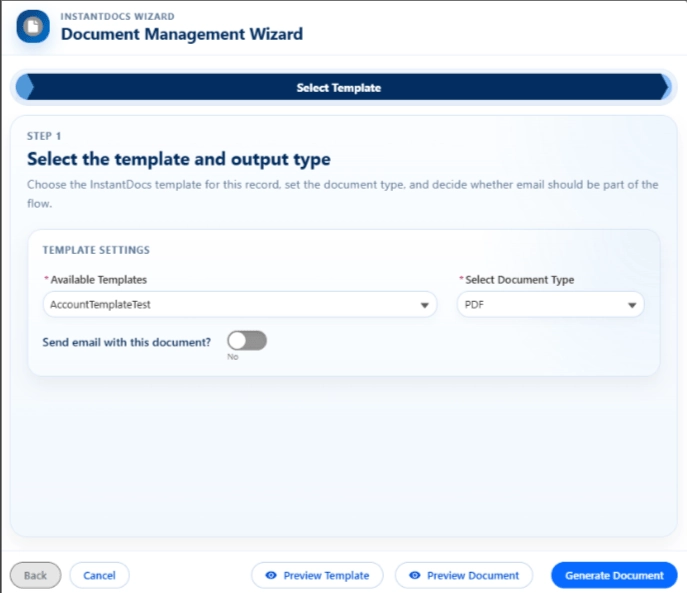
5.3 The Document Generation Wizard
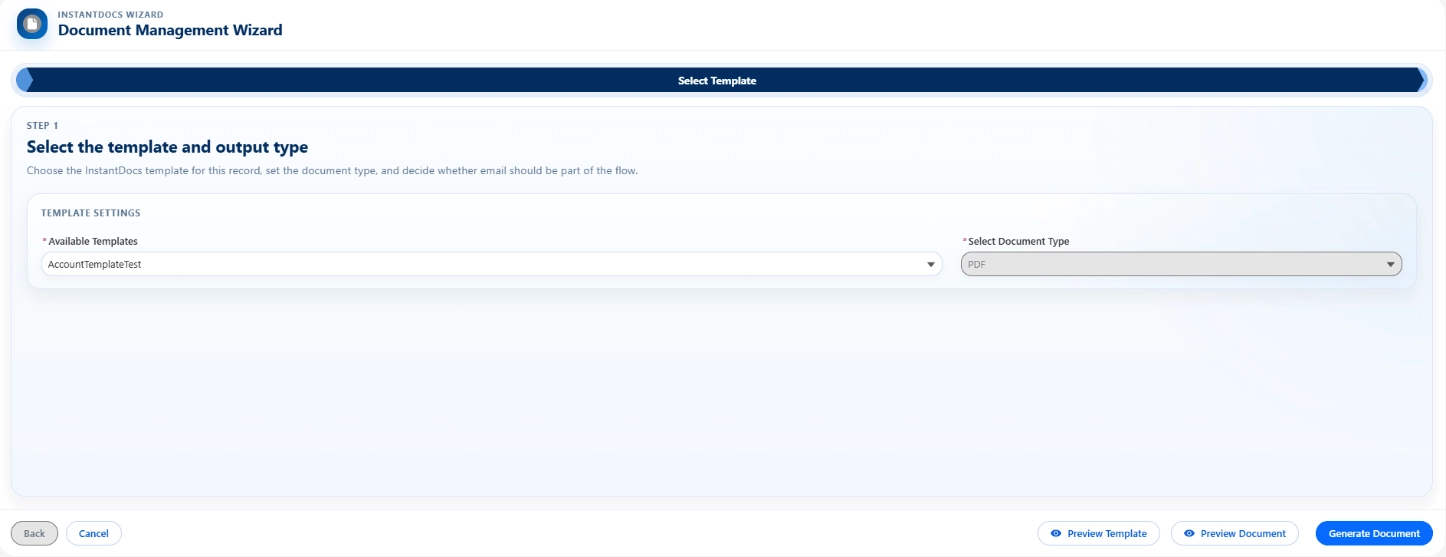
The Document Generation Wizard guides you through the document creation process with a visual progress path showing each step.

5.3.1 Step 1: Select Template
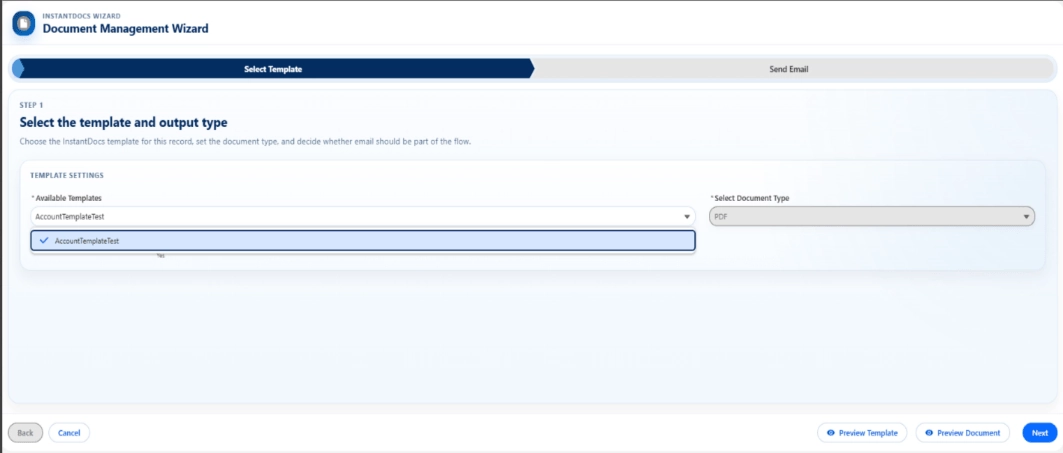
5.3.2 Step 2: Send Email (Optional)
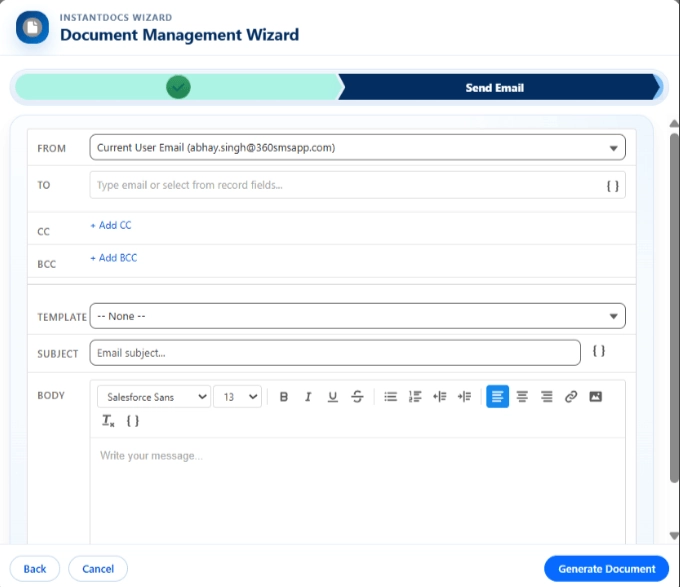
If email sending was enabled, the Email Composer appears after document creation. The Email Composer allows you to configure From, To, CC, BCC, Subject, Body, and email templates before sending the generated document as an attachment.
5.4 Processing and Status Tracking
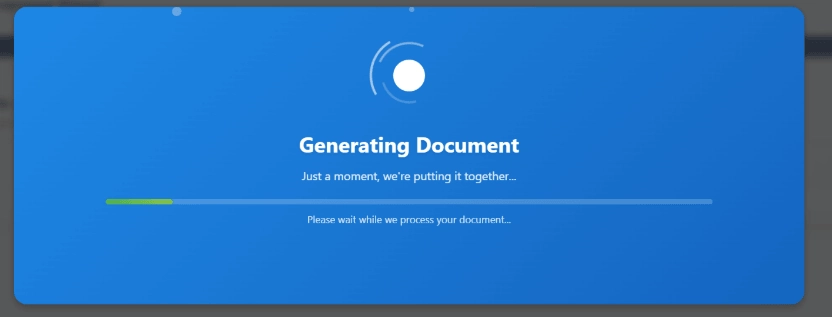
After clicking “Generate Document”, the wizard transitions to a processing screen:
- An animated progress indicator shows that document generation is in progress
- A status message updates as the process moves through stages
- Once complete, it will redirect you to the record detail page with a success message.
- The generated document will be attached to the record under the related files section.
- If the generation fails, an error message is displayed with details about what went wrong
6. Bulk Document Generation
Bulk Document Generation allows you to create documents for multiple records at once, using data from a Salesforce Report or a List View.
When to Use Bulk Document Generation:
- Monthly invoicing — Generate invoices for all customers with outstanding balances at month-end
- Batch contract generation — Create renewal contracts for all Opportunities closing this quarter
- Mail merge campaigns — Produce personalized letters or proposals for a targeted list of Accounts or Contacts
- Compliance documents — Generate standardized compliance or audit documents for all records matching specific criteria
6.1 Accessing Bulk Document Generation
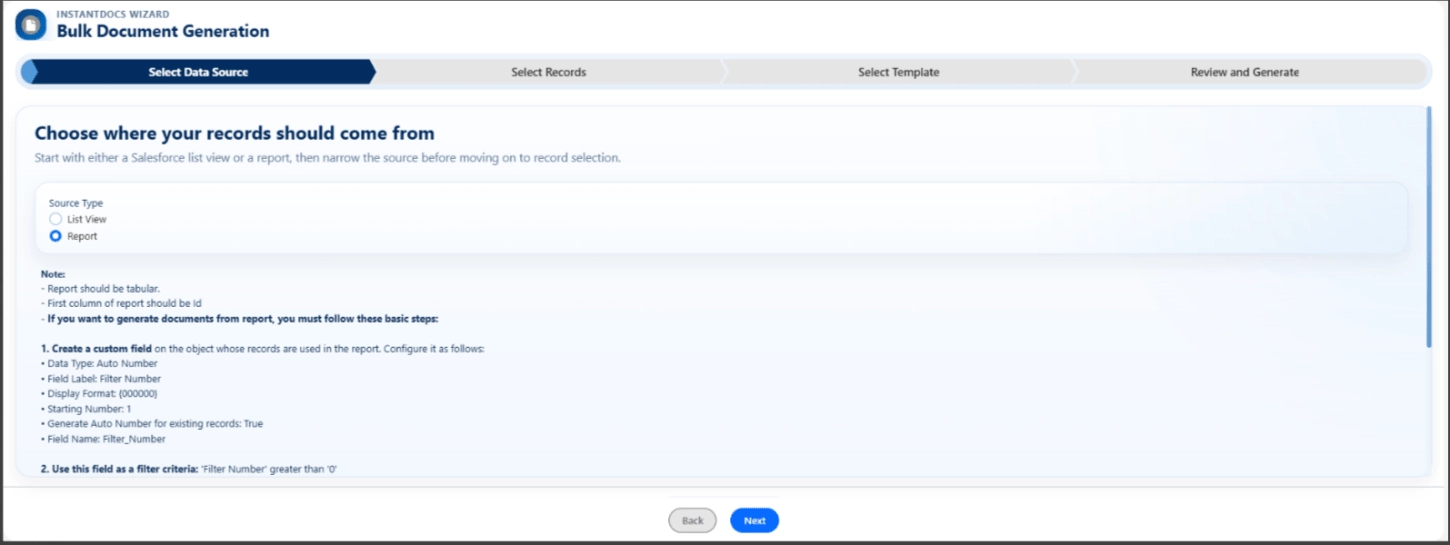
6.2 Step 1: Select Data Source
Choose where the records for bulk generation will come from:
- Report — Use records from a Salesforce report
- List View — Use records from a specific object’s list view
If you selected “List View”: Select the Object from the object dropdown (e.g., Opportunity), then select a List View for that object.
If you selected “Report”: A Search Reports field appears. Type to search for a report by name, then select a report from the dropdown.
- Report should be tabular.
- First column of report should be Id.
- If you want to generate documents from report, you must follow these basic steps:
- Create a custom field — Data Type: Auto Number | Field Label: Filter Number | Display Format: {000000} | Starting Number: 1 | Generate Auto Number for existing records: True | Field Name: Filter_Number
- Use this field as a filter criteria: Filter Number greater than 0.
- Add this field to the report column and sort it by Ascending.
6.3 Step 2: Select Records
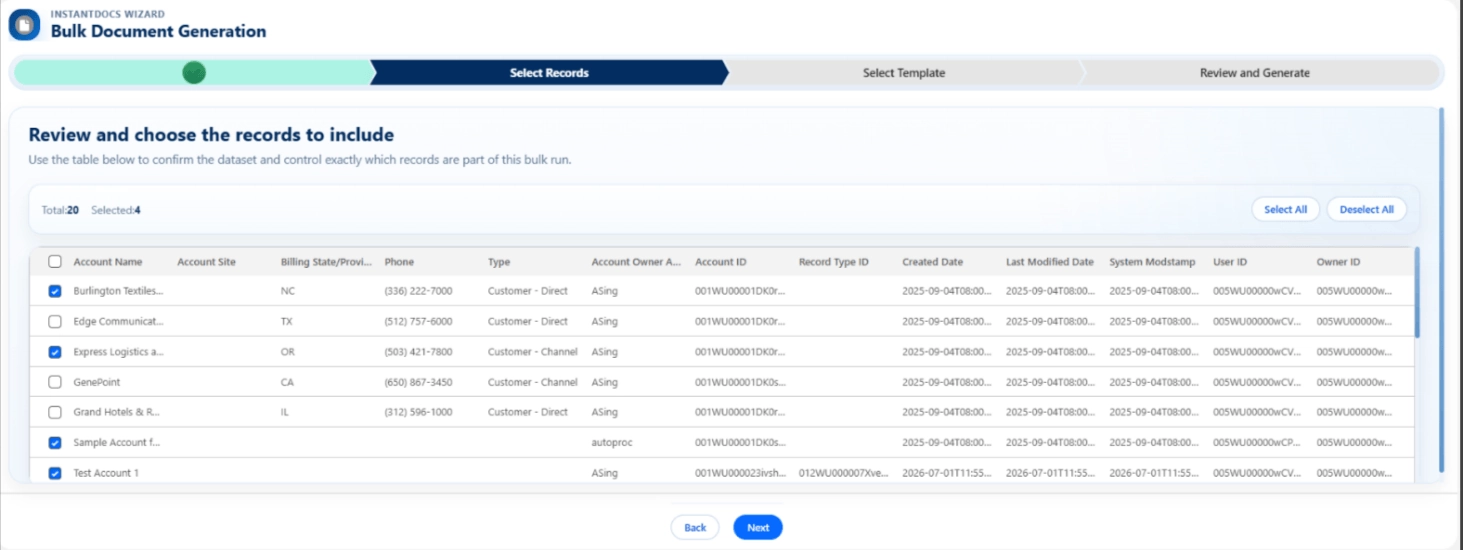
Review the loaded records and select which ones should have documents generated:
6.4 Step 3: Select Template
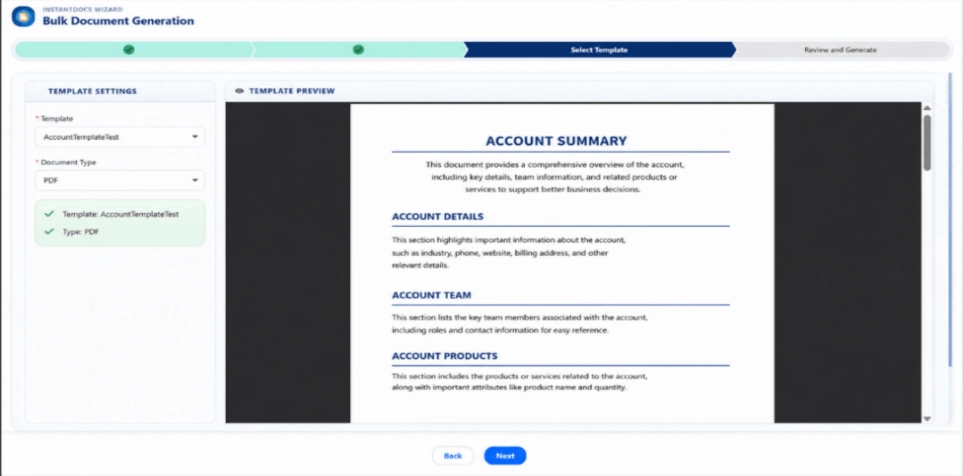
Choose the template and document type for bulk generation:
- Left panel (Template Settings): Template dropdown and document type selector
- Right panel (Template Preview): Live preview of the selected template in an iframe
6.5 Step 4: Review & Generate
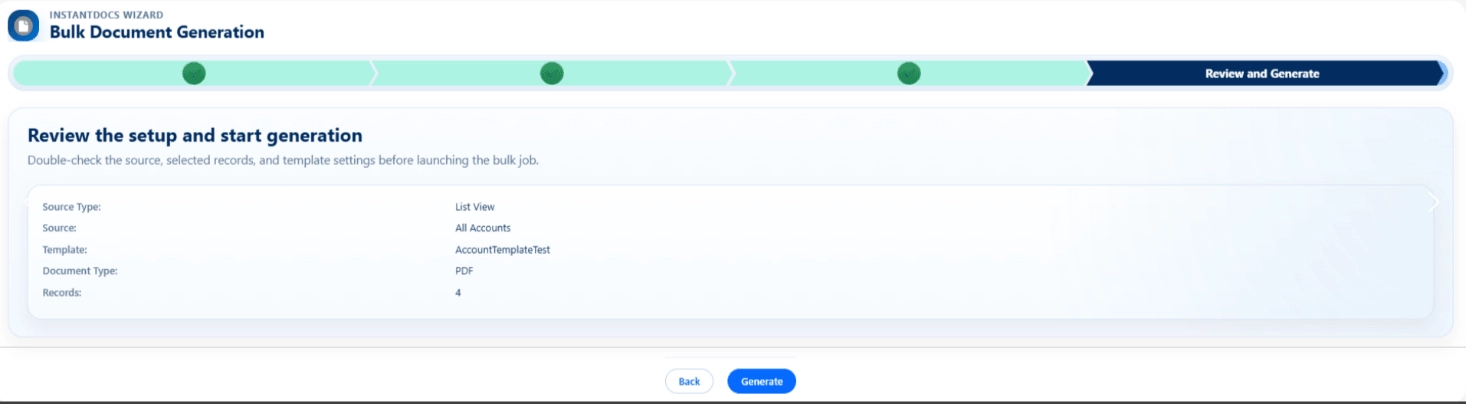
Confirm your selections before starting bulk generation:
- Source Type: Report or List View
- Source: The name of the report or list view selected
- Template: The template name
- Document Type: DOC or PDF or XLSX
- Records: Total number of records selected for generation
6.6 Status Tracking and Progress
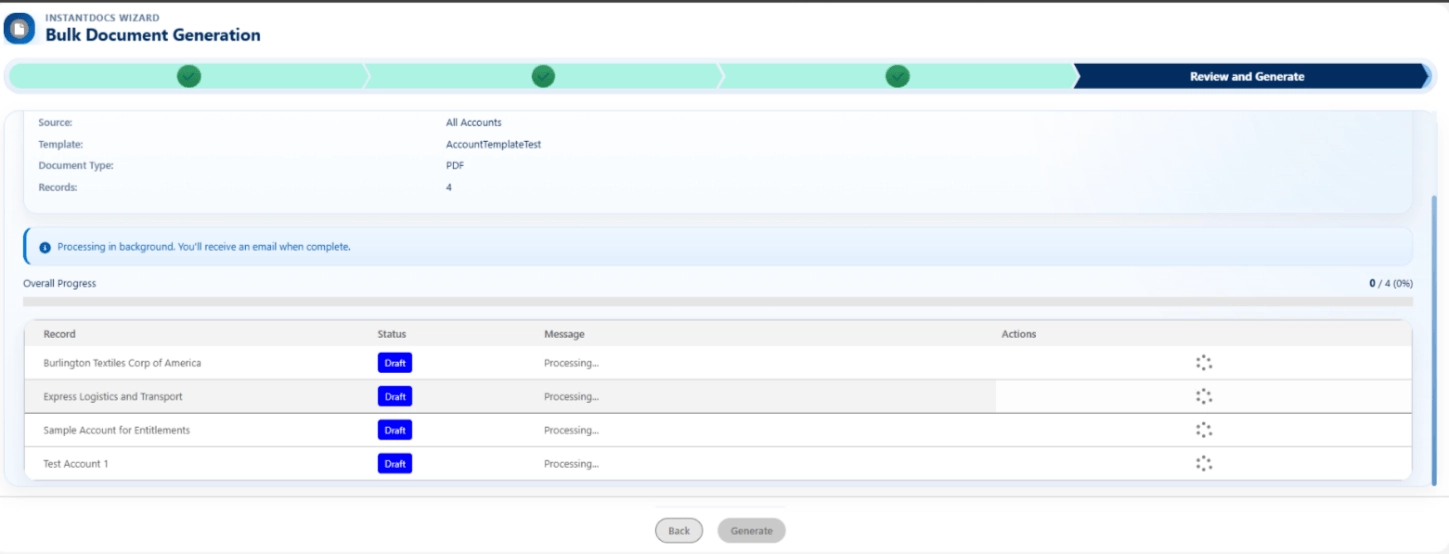
After clicking “Generate”, the wizard transitions to a status tracking view:
- A progress bar shows the overall completion percentage
- A status table shows each record’s individual status: Completed, Processing, Pending, or Failed
- Message — Success confirmation or error details
- Actions — Links to view the parent record or the Document Manager record
6.7 Using List View Buttons
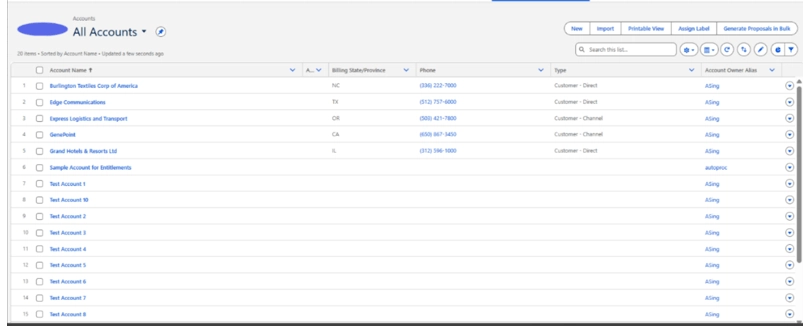
If your administrator has set up a List View Button for an object, you can also trigger bulk generation directly from the object’s list view:
6.8 Field Access Validation
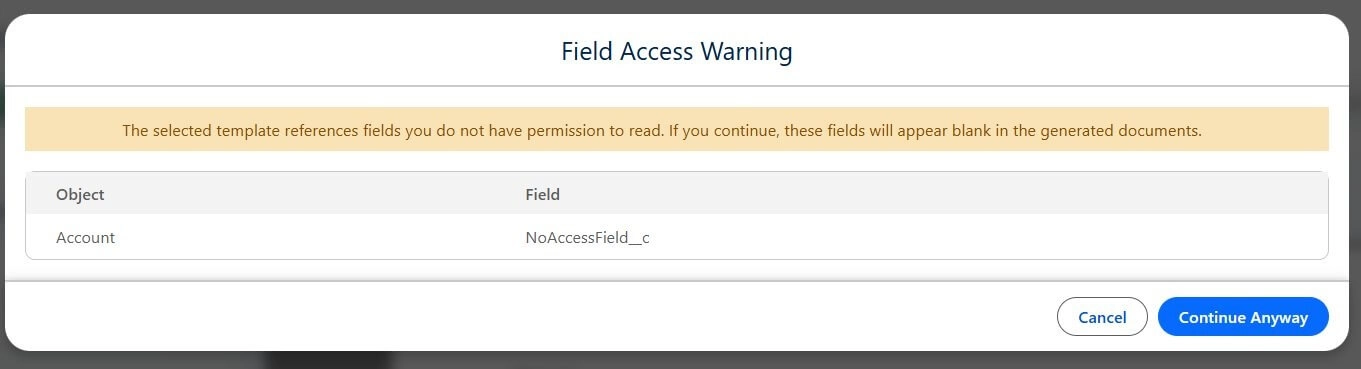
Whenever a template is selected for document generation, the system automatically performs a Field-Level Security (FLS) check. It inspects all fields referenced in the template’s queries and verifies that the current user has read permission on each field.
If one or more fields are not accessible, a Field Access Warning screen is displayed. The warning screen includes:
- A warning banner explaining that the selected template references fields the user does not have permission to read
- A table listing every inaccessible field with: Query Type, Object, and Field API name
- “Cancel” — Stops the generation process and returns the user to the previous step
- “Continue Anyway” — Proceeds with document generation. Inaccessible fields will appear blank in the generated documents
7. Custom Related List Component
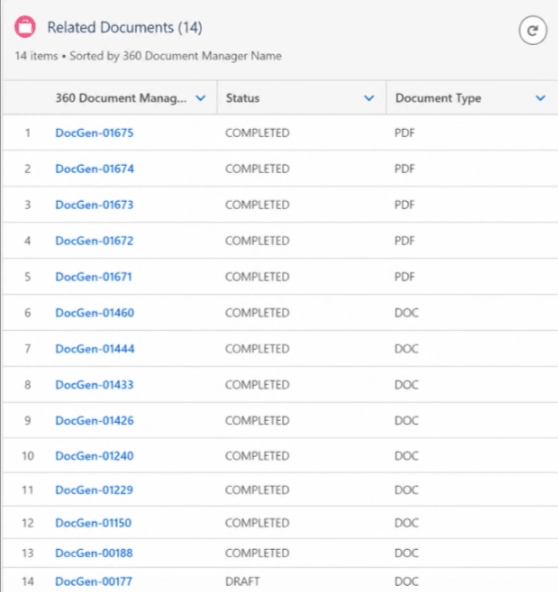
The Custom Related List component displays document generation history (or any related records) directly on a Salesforce record page. It provides a rich data table with sorting, infinite scrolling, and navigation capabilities.
7.1 Adding to Record Pages
7.2 Configuration Properties
After placing the component on the page, configure the following properties:
| Property | Description | Example Value |
|---|---|---|
| iconName | SLDS icon for the component header | standard:document |
| pNoteObjectApiName | API name of the child object to display | x360InstantDocs__X360_Document_Manager__c |
| pRelatedListTitle | Display title for the related list header | Generated Documents |
| pLookupField | The lookup/reference field on the child object that points to the parent record | x360InstantDocs__Parent_Record_Id__c |
| pLinkField | The field to make clickable for navigation | Name |
| pNotesFields | Comma-separated list of field API names to display as columns | Name,x360InstantDocs__Document_Type__c,x360InstantDocs__Status__c |
| showNewButton | Whether to show a New button | false |
| pDefaultSortedBy | Default sort field | CreatedDate |
| pDefaultSortDirection | Default sort direction | desc |
| pPageSize | Records per page (1-200) | 50 |
8. End-to-End Example: Generating a Document from an Opportunity
This section walks through the complete workflow from start to finish, using an Opportunity record as an example.
Step 1: Design the Template in Microsoft Word/Excel
Step 2: Generate a Document from an Opportunity Record
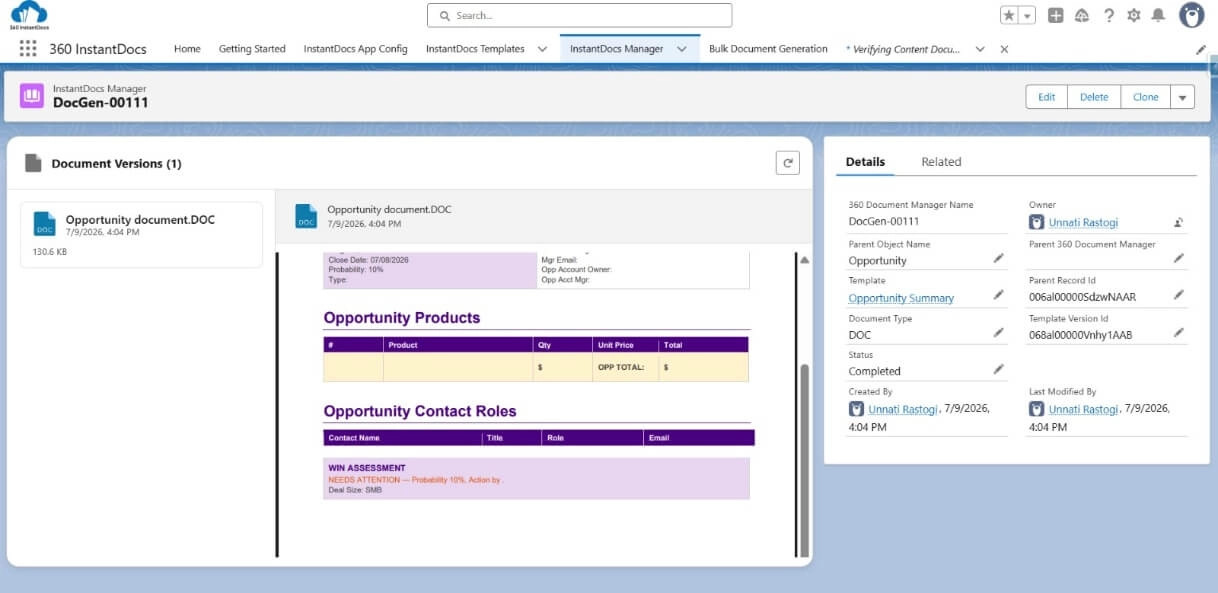
Step 3: Review the Generated Document
9. 360 Document Manager Records
9.1 Understanding Document Manager Records
Every document generation — whether single, bulk, or automated — creates an x360dc_x360_Document_Manager__c record. This record tracks the generation process, stores references to the template and generated file, and provides a complete audit trail.
The record name follows an auto-number pattern: DocGen-00001, DocGen-00002, etc.
9.2 Key Fields Reference
| Field | Description |
|---|---|
| Name | Auto-generated record name (e.g., DocGen-00042) |
| Template | Lookup reference to the Template record used for generation |
| Template Version Id | The specific template file version used at the time of generation |
| Document Type | The output format: Doc (DOCX) or Excel (XLSX) Pdf (PDF) |
| Status | Draft / In Progress / Merging / Finalizing / Completed / Failed |
| Parent Record Id | The Salesforce record ID of the parent record (e.g., the Opportunity this document was generated from) |
| Parent Object Name | The API name of the parent object (e.g., Opportunity, Account) |
| Document Version Id | The ContentVersion ID of the generated output file |
| Created From | “Detail Page Button”, “List View”, “Report”, “Flow/Apex” |
| Batch Job Id | For bulk generations, the Salesforce batch job ID (useful for tracking and troubleshooting) |
| Transaction Id | Unique request identifier for tracing through logs |
9.3 Viewing Generated Documents
10. Error Logs
10.1 Accessing Error Logs
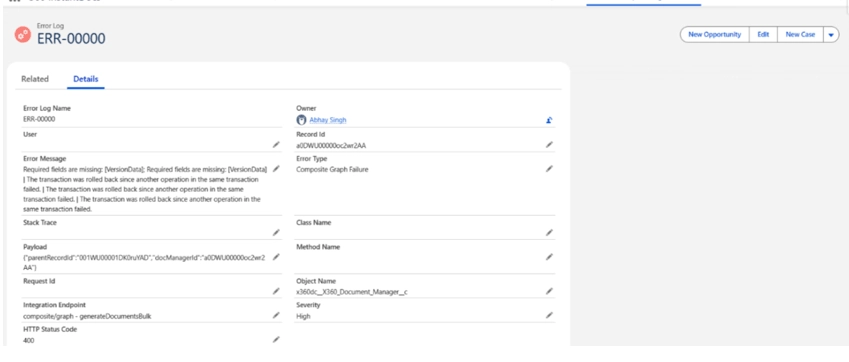
Error logs provide detailed information about any failures that occur during document generation, template processing, or system operations.
10.2 Understanding Error Log Fields
| Field | Description |
|---|---|
| Error Type | The category of error (e.g., DmlException, HttpException, ValidationException) |
| Error Message | A human-readable description of what went wrong |
| Severity | How critical the error is: Low, Medium, High, or Critical |
| Class Name | The Apex class where the error originated |
| Method Name | The specific method that encountered the error |
| Stack Trace | The full technical stack trace (useful for developer troubleshooting) |
| Record Id | The Salesforce record associated with the error (if applicable) |
| Object Name | The Salesforce object involved |
| User | The user whose action triggered the error |
| Transaction Id | Unique identifier for correlating errors across batch operations |
| Batch Job Id | The batch job ID if the error occurred during bulk generation |
10.3 Common Errors and Resolutions
| Error | Likely Cause | Resolution |
|---|---|---|
| “Insufficient privileges” or CRUD/FLS error | User lacks required permissions on an object or field | Verify the user has the correct permission set (X360_SmartDocs_Admin or X360_SmartDocs_User) assigned. Check field-level security for any custom fields. |
| “Package is not active” error | The InstantDocs license is inactive or expired | Navigate to InstantDocs Setup → License Details and click “Sync” to refresh the license status. |
| HTTP callout error / Server unreachable | The document generation server cannot be reached | Check the Remote Site Setting for x360InstantDocs in Salesforce Setup. Verify your network allows outbound connections. |
| “Template not found” or “No active version” | The template record is missing, inactive, or has no active file version | Open the template record and ensure: (1) IsActive is checked, (2) A file version is uploaded, (3) The file version is activated via the Preview component. |
| No templates visible in wizard (empty template list) | End user does not have visibility to Template__c records — Sharing Rules not configured | Create Sharing Rules on Template__c in Salesforce Setup → Sharing Settings to grant read access to end users. |
| Batch job failure with partial completion | A batch chunk encountered an error | Check the Document Manager records for “Failed” status. Review the Error Log for the batch job ID. Re-generate only the failed records. |
| Merge field not resolved (shows raw token in output) | The merge field references a field that doesn’t exist or the user lacks access | Verify the merge field syntax matches the object and field API names. Ensure the user has read access to the referenced fields. |
11. Creating Buttons on Any Object
This section provides complete instructions for creating InstantDocs buttons on any Salesforce object. Three types of buttons are supported, each suited for different use cases.
11.1 URL Button Setup
Sub-step: Add to Layout
11.2 Quick Action Setup
Sub-step: Add to Layout
11.3 List View Button Setup
Sub-step: Add to Search Layouts
12. Flow and Apex Integration
360 InstantDocs provides an Invocable Action that can be called from Salesforce Flows, Process Builder, or Apex code. This enables automated document generation as part of your business processes.
When to Use Flow/Apex Integration:
- Auto-generate welcome letters when new Accounts or Contacts are created
- Trigger contract generation automatically when an Opportunity stage changes to “Closed Won”
- Generate approval documents as part of an approval process flow
- Schedule recurring document generation via scheduled flows (e.g., weekly status reports)
12.1 Using the Invocable Action in Flow
12.2 Input / Output Parameters
Input Parameters
| Parameter | Required | Type | Description |
|---|---|---|---|
| templateId | Yes | Id (Text) | The record ID of the x360dc_Template__c record to use for document generation |
| parentRecordId | Yes | Id (Text) | The record ID of the parent Salesforce record |
| parentObjectName | Yes | Text | The API name of the parent object (e.g., “Opportunity”, “Account”, “Custom_Object__c”) |
| documentType | Yes | Text | The output format: “Doc” (DOCX) or “Pdf” (PDF). |
Output Parameters
| Parameter | Type | Description |
|---|---|---|
| documentManagerId | Id (Text) | The record ID of the created X360_Document_Manager__c record |
| isSuccess | Boolean | true if the document generation was initiated successfully, false otherwise |
| errorMessage | Text | Error details if isSuccess is false. Empty string if successful. |
13. Introduction to 360 File Sync
The Complete Solution — 360 FileSync integrates SharePoint, AWS S3, Google Drive, OneDrive and SFTP into Salesforce with centralized file and document management. Enabling seamless file access, reducing storage costs, and enhancing team collaboration.
360 File Sync was built to solve the exact challenges organizations face with Salesforce storage. It’s more than a storage tool — it’s a comprehensive file management ecosystem that helps you regain control of your documents without compromising on cost, speed, or structure.
14. Setting Up Drive Sync
Follow these steps to sync your Drive with Salesforce:
15. Setting Up an Object for Sync
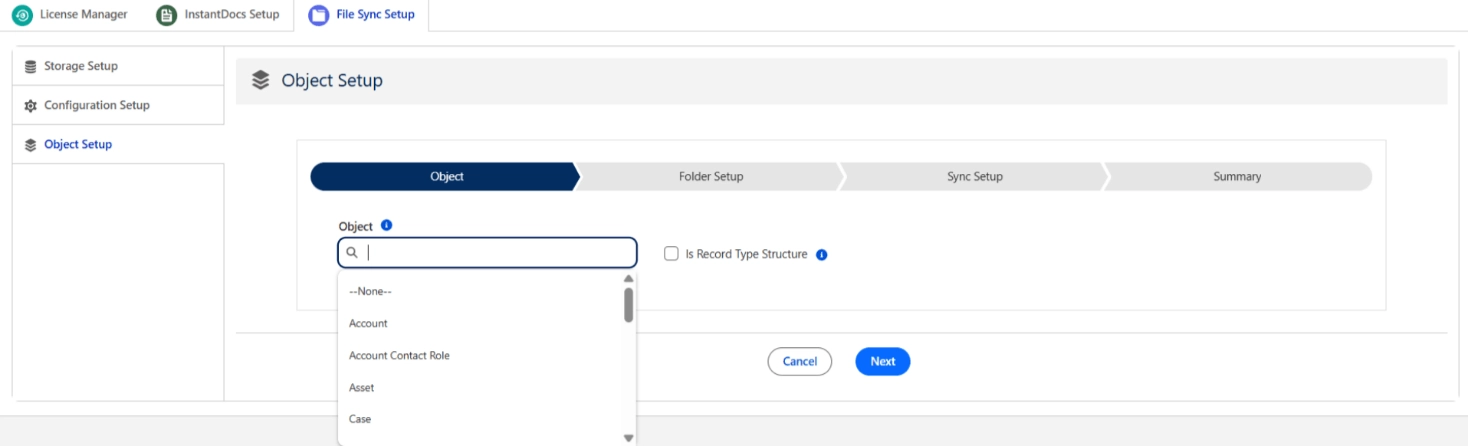
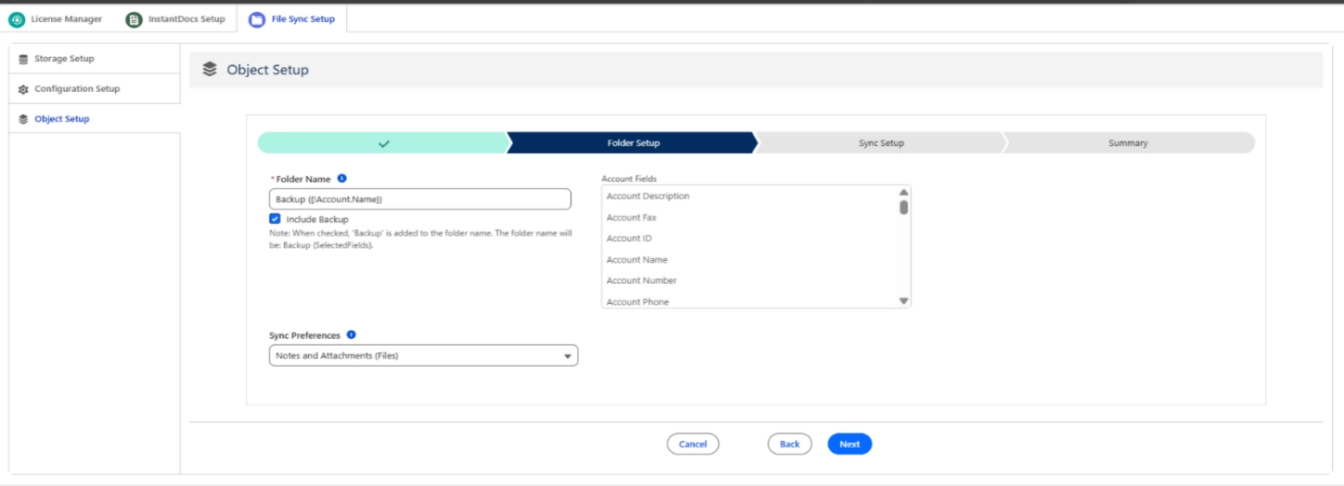
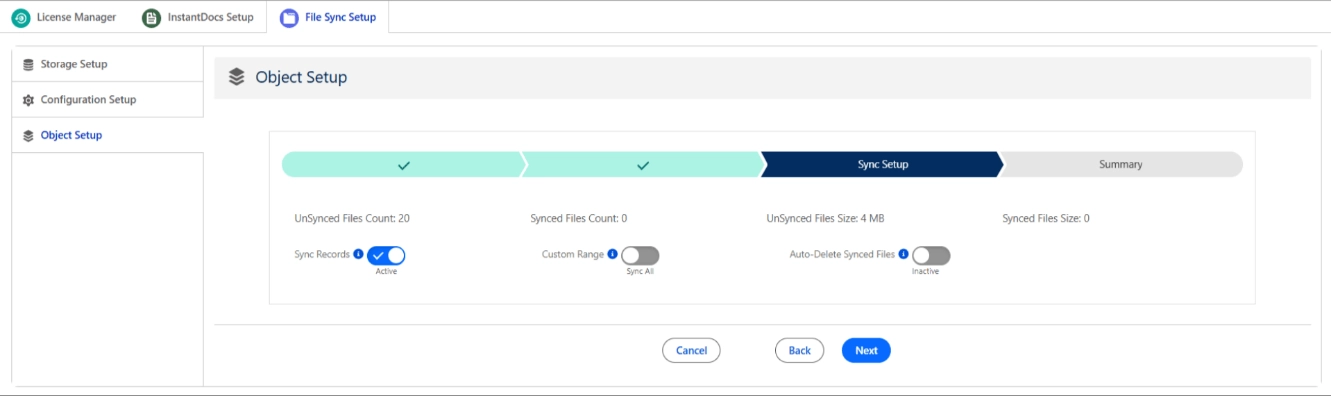
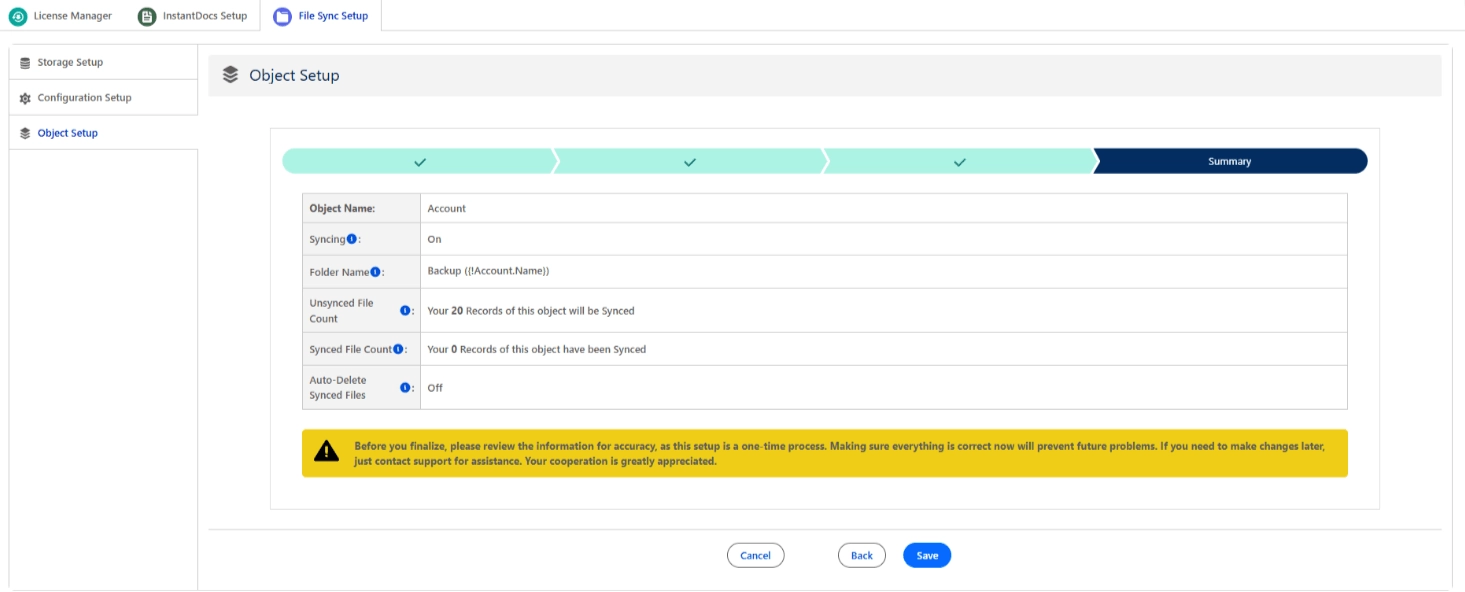
Follow these steps to configure a Salesforce object for file synchronization with your cloud drive:
- Sync Records — Toggle to initiate the syncing process for existing records.
- Custom Range — Sync All Records or select a specific date range.
- Delete Synced Files — If enabled, the following file types will automatically be deleted from Salesforce once synced: Attachments (classic Salesforce Attachments), Notes and Attachments, and Files (Salesforce Files / ContentDocument). Only the records synced in the current operation will be deleted.
16. Salesforce and Its Storage Challenges
Salesforce is a leading CRM platform utilized globally by businesses to manage customer relationships, streamline sales processes, and enhance productivity. Despite its powerful capabilities, Salesforce faces significant limitations in file storage management. Businesses often struggle with limited and costly storage, inefficient synchronization of files, and complex file management procedures. These limitations frequently result in scattered document storage, increased costs, reduced productivity, and diminished collaboration capabilities.
16.1 Understanding Salesforce Storage Challenges
Salesforce categorizes storage into Data Storage, File Storage, and Big Objects, each serving distinct purposes. However, organizations quickly encounter storage constraints as their data and file requirements grow:
- Limited and Expensive File Storage: Salesforce provides limited file storage space, and exceeding these limits incurs substantial additional monthly fees, impacting operational budgets significantly.
- Inefficient File Management: Without a centralized approach, files scattered across multiple external drives complicate accessibility and document retrieval.
- Complex and Time-consuming Syncing: Manual file synchronization processes lead to data inconsistencies and increased workloads, reducing overall productivity.
- Performance Issues: Excessive files stored within Salesforce slow down the CRM, negatively affecting performance and user experience.