

1. Introduction & Overview
The 360 InstantDocs Word Add-In is a Microsoft Word sidebar that connects directly to your Salesforce organization. It allows you to build smart document templates — Word files that automatically populate with real Salesforce data when a document is generated.
Instead of manually updating every quote, contract, or proposal, you place merge tags (placeholders like {Account.Name} or {Amount}) into your Word document. When a user generates a document from Salesforce, those tags are automatically replaced with live data from the selected record.
Who this guide is for: This guide is written for anyone who wants to create or edit document templates — no technical knowledge required. Every step is explained from scratch.
Related Documentation:
- 360 InstantDocs Installation & Setup Guide — For administrators: installing the package, configuring OAuth, assigning permissions, and initial setup.
- 360 InstantDocs Feature & User Guide — For all users: generating documents from Salesforce records, bulk generation, template management, and more.
How It Works
Login
Browse Available Templates
Build Template
Preview
Publish
Full Microsoft Word Features Supported
Your templates are real .docx Word files. You have complete freedom to use all standard Word features:
- Headers and footers with page numbers
- Tables with custom borders, shading, and merged cells
- Fonts, colors, bold, italic, underline, strikethrough
- Bullet lists, numbered lists, multi-level lists
- Images, shapes, text boxes, and SmartArt
- Page breaks, section breaks, columns
- Styles, themes, and document templates
- Mail-merge-style layouts
The add-in simply helps you insert dynamic Salesforce placeholders (merge tags). Everything else in the document behaves exactly like a normal Word file.

Figure 1: The 360 InstantDocs add-in panel open alongside a Word document
2. Getting Started
Prerequisites
- A Salesforce account (Production or Sandbox)
- Microsoft Word for Desktop (Windows or Mac) or Word Online (Microsoft 365 in a browser)
- 360 InstantDocs managed package installed and authorized in your Salesforce org — if not already done, your Salesforce administrator must:
- Install the 360 InstantDocs managed package from the Salesforce AppExchange into your org (Production or Sandbox).
- Open the App Launcher, navigate to the 360 InstantDocs app, and click the Smart Docs Setup tab.
- Select License Details from the left sidebar and click “Authorize & Sync with Server” to complete the OAuth authorization. Once done, the license status will show Active.
- The 360 InstantDocs add-in installed in Word (contact your administrator if not yet installed)
How to Open the Add-In

Figure 2: Opening the add-in from Word’s Insert tab → Add-ins
2.1 Signing In
When you first open the add-in, you will see the login screen with two buttons:
| Button | What it connects to | When to use |
|---|---|---|
| Sign in to Production | Your live Salesforce org (real data, real customers) | When building templates for actual use |
| Sign in to Sandbox | Your test/sandbox Salesforce org (safe to experiment) | When building and testing templates before go-live |

Figure 3: The login screen — choose Production or Sandbox
3. Template Listing Page
After signing in, you will see the Template Listing page — a list of all document templates saved in your Salesforce org.

Figure 4: The Template Listing page
Searching Templates
Type in the search box at the top of the list. The list filters in real-time as you type. Click the × (clear) button to reset the search.

Figure 5: Searching templates on the Template Listing page
Sorting Columns
Click any column header to sort the list:
- Name — sort alphabetically by template name
- Object — group by the Salesforce object (Opportunity, Account, etc.)
- Status — sort by Active vs Draft
- Last Modified — sort by most recently edited
Click the same column header again to reverse the sort order.
Status Indicators
| Indicator | Meaning |
|---|---|
| Active (green dot) | Template is live and available to users for document generation |
| Draft (gray dot) | Template is still being built — not yet available to users |
Creating a New Template
Click the New button in the top-right corner of the listing. A new blank template will open and the add-in will move to the CREATE tab.
Opening an Existing Template
Click any row in the list to open that template. The template file will open in Word and the add-in will load the template’s settings.
4. Building a Template — The CREATE Tab
When creating or editing a template, the add-in shows a 3-step wizard at the top of the panel:
In the CREATE tab, you:
- Select a Primary Object — Select the object whose fields you want to merge into the template
- Select an Action — what type of content to insert (Field, Conditions, View, or Image)
- Configure the details and click Insert or Copy to place the tag in Word
- Repeat steps 2–3 for every piece of dynamic content in your template

Figure 6: The CREATE tab — 3-step wizard and Object & Action selection
4.1 Selecting a Primary Object
The Primary Object is the type of Salesforce record your document is based on. For example:
- Quote — for sales quote documents
- Opportunity — for proposals and deal summaries
- Account — for account profiles and reports
- Contact — for contact sheets or letters
- Order — for order confirmations

Figure 7: Selecting a Primary Object from the dropdown
4.2 Selecting an Action
After selecting an Object, choose an Action from the Action dropdown. The Action determines what type of content the add-in will help you insert:
| Action | What it inserts | Example use case |
|---|---|---|
| Field | A single field value from the record | Opportunity name, amount, close date |
| Conditions | Text that shows or hides based on a rule | Show “Approved” section only if approved |
| View | A list of related child records (table, loop, or grid) | All line items on an Opportunity |
| Image | A dynamic image from the record | Company logo, product photo |
5. Action: Field
What it does: Inserts a single field value from a Salesforce record into your Word document. When a document is generated, the tag is automatically replaced with the actual value from the record.
Example: You place the tag {Account.Name} in your template. When a user generates a document from an Opportunity where the Account is “Acme Corporation”, the tag becomes Acme Corporation in the final document.
5.1 Understanding Field Types
When you open the “Select Field” dropdown, fields are grouped by type. Each type has a small icon to help you identify it:
| Icon | Field Type | Examples |
|---|---|---|
| Aa | Text / String | Account Name, Status, Description, Subject |
| # | Number / Currency / Percent | Amount, Discount %, Quantity, Annual Revenue |
| 📅 | Date / Date-Time | Close Date, Created Date, Expiration Date |
| ✓ | Checkbox (True/False) | Is Active, Closed Won, Has Attachment |
| 🔗 | Lookup / Reference (drillable) | Account (on Opportunity), Owner, Campaign, Quote |
| 🌎 | Global Variables | TODAY, Running User (you), Running Org (your company) |
5.2 Drilling into Reference (Lookup) Fields
Reference fields (🔗 icon) link to another Salesforce object. For example, an Opportunity has a reference to an Account. You can click the › arrow next to a reference field to “drill in” and see that related object’s fields. Maximum depth: 5 levels
Example: Getting the Account Owner’s Email from an Opportunity
{Account.Owner.Email}More Drilling Examples
| Path | Result Tag | What it shows |
|---|---|---|
| Quote → Account → Name | {Account.Name} | The account’s company name |
| Quote → Owner → Email | {Owner.Email} | The quote owner’s email |
| Quote → Account → Owner → Manager → Department | {Account.Owner.Manager.Department} | Manager’s department (4 levels deep) |
| Opportunity → Account → BillingCity | {Account.BillingCity} | The account’s billing city |

Figure 8: The field selector showing field types with icons

Figure 9: Drilling into a reference field — click the › arrow to navigate deeper
5.3 Global Variables
Global Variables are available in the 🌎 Globe group in the field selector. These values are automatically calculated each time a document is generated — they do not come from the Salesforce record.
Date Literals
| Tag | What it inserts | Real-world use case |
|---|---|---|
{TODAY} | Today’s date | “Generated on: {TODAY | formatDate:’MM/DD/YYYY’}” — auto-stamps the current date on every document |
{YESTERDAY} | Yesterday’s date | Daily sales reports: “Activity as of {YESTERDAY | formatDate:’MM/DD/YYYY’}” |
{TOMORROW} | Tomorrow’s date | Urgent deadlines: “Response required by {TOMORROW | formatDate:’MMMM DD, YYYY’}” |
{THIS_WEEK} | Monday of the current week | Weekly status reports: “Week of {THIS_WEEK | formatDate:’MMM DD’}” |
{THIS_MONTH} | 1st day of the current month | Monthly invoices: “Invoice period: {THIS_MONTH | formatDate:’MMMM YYYY’}” |
{THIS_QUARTER} | 1st day of the current fiscal quarter | Quarterly reviews: “Period starting {THIS_QUARTER | formatDate:’MM/DD/YYYY’}” |
{THIS_YEAR} | January 1st of the current year | Annual reports: “Year-to-date from {THIS_YEAR | formatDate:’MM/DD/YYYY’}” |
{CURRENT_YEAR} | Just the 4-digit year number | Copyright footers: “© {CURRENT_YEAR} {Organization.Name}” |
{CURRENT_MONTH} | Month as a number (1–12) | Custom date labels |
{CURRENT_DAY} | Day of month as a number | Custom date labels |
Running User — The Person Generating the Document
These tags automatically resolve to the details of whoever is generating the document at the time. This means different users will see their own name and contact info in generated documents.
| Tag | What it inserts | Example use |
|---|---|---|
{User.FirstName} | First name of the generating user | Personalized “Prepared by” footer |
{User.LastName} | Last name | Same |
{User.Email} | Email address | Questions? Contact {User.Email} |
{User.Title} | Job title(e.g. , Account Executive) | Show the rep’s role below their name |
{User.Department} | Department name | From the {User.Department} team |
{User.Phone} | Direct phone number | Call your rep: {User.Phone} |
Prepared by: {User.FirstName} {User.LastName}
  Title: {User.Title} | Department: {User.Department}
  Email: {User.Email} | Phone: {User.Phone}
Every time a different sales rep generates this template, their own contact information appears automatically.
Running Org — Your Salesforce Organization
These tags reflect your organization’s Salesforce settings.
| Tag | What it inserts | Example use |
|---|---|---|
{Organization.Name} | Your company/organization name | Letterheads, copyright footers |
{Organization.InstanceName} | Salesforce instance identifier | Internal reference only |
Example-Consistent letterhead across all templates:
{Organization.Name}
  Confidential — © {CURRENT_YEAR} {Organization.Name}. All rights reserved.
5.4 Step-by-Step: Inserting a Field
5.5 Field Formatting Options
Number, Currency & Percent Fields
When you select a numeric field, formatting options appear below the field selector.
- Decimal Places (0–10): How many digits to show after the decimal point.
- Number Format: US (10,000.5), European (10.000,5), International (10 000,5), Indian (1,00,000).
- Currency Symbol: $ (USD), € (Euro), £ (Pound), ¥ (Yen/Yuan), ₹ (Rupee).
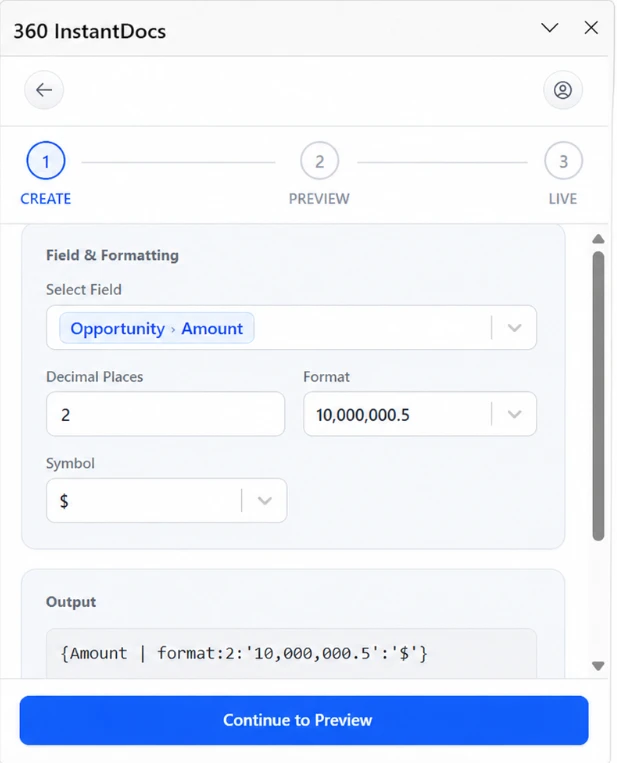
Figure 10: Number formatting options
Number Tag Syntax — toFixed vs format
The add-in generates one of two filters depending on what you choose. You can also type these directly:
toFixed:N— Example:{TotalPrice | toFixed:2}— controls decimal places only. Use this when you want to keep your org’s default number formatting and just override the decimal precision.format:decimals:'pattern'— Example:{Amount | format:0:'10,000,000.5'}— full number format (decimal places + thousands/decimal separators). Use this when you need a specific regional pattern regardless of org defaults.format:decimals:'pattern':'symbol'— same as above, with a currency symbol prepended. Example:{Amount | format:2:'10,000,000.5':'$'}→ $1,234,567.89
Pattern values match the Number Format dropdown choices: '10,000.5' (US), '10.000,5' (European), '10 000,5' (International), '1,00,000' (Indian).
toFixed when you only care about decimal places and want the org’s default number formatting. Pick format when you need a specific separator pattern or currency symbol.Date & Date Time Fields
When you select a Date or DateTime field, formatting options appear. Both Date and DateTime fields support every date format below; DateTime fields additionally let you append a time format.
| Format | Example Output |
|---|---|
| MM/DD/YYYY | 12/31/2024 |
| DD/MM/YYYY | 31/12/2024 |
| YYYY/MM/DD | 2024/12/31 |
| MMMM DD, YYYY | December 31, 2024 |
| MMM DD, YYYY | Dec 31, 2024 |
| DD MMMM YYYY | 31 December 2024 |
Time Format (DateTime fields only — append to any date format above when a time component is needed): hh:mm A (03:45 PM), HH:mm (15:45), hh:mm:ss A (03:45:09 PM), HH:mm:ss (15:45:09)
If a DateTime field doesn’t need a time component, just pick a date format and “None” in time format — it will render as a plain date.
Add Days / Subtract Days: Offsets the date by a set number of days from the field’s value. Both accept positive or negative integers.
- Add days (future):
addDays:30→ 30 days after the field value (e.g., Close Date + 30 days) - Subtract days (past):
subtractDays:7→ 7 days before the field value (e.g., one week before the contract end) - Both filters accept negative numbers too —
addDays:-7is equivalent tosubtractDays:7.
Use case: Payment due date = {InvoiceDate | addDays:30}. Expiry reminder = {ContractEndDate | subtractDays:14}.

Figure 11: Date formatting options
Tag Examples
{Name}
  {Account.Name}
  {Account.Owner.Email}
  {CloseDate | formatDate:'MMMM DD, YYYY'}
  {Amount | format:2:'10,000,000.5':'$'}
  {TotalPrice | toFixed:2}
  {CloseDate | addDays:30 | formatDate:'MM/DD/YYYY'}
  {ContractEndDate | subtractDays:14 | formatDate:'MM/DD/YYYY'}
  {TODAY | formatDate:'MM/DD/YYYY'}
  {User.FirstName} {User.LastName}
  © {CURRENT_YEAR} {Organization.Name}
6. Action: Conditions
What it does: Shows or hides a block of text in the document based on a rule you define. Think of it as: “if this condition is true, then show this content.”
Example: Only show a “Terms & Conditions” section if the customer is an Enterprise client. For standard clients, that section simply doesn’t appear.
6.1 If Block vs. If/Else Statement
Type 1 — If Block
Content is shown only when the condition is TRUE. If the condition is FALSE, nothing is shown — the section is completely hidden and takes up no space in the document.
Best for: Large optional blocks of content — entire paragraphs, multi-line clauses, full sections.
- Show a full “Terms & Conditions” section only for Enterprise tier customers
- Show a “California Residents” legal clause only when Billing State = “CA”
- Show an “Installation Instructions” block only when Product Type = “Hardware”
- Show a “Payment Plan Details” section only when a payment plan was selected
- Show a “Warranty Information” section only for physical products
Type 2 — If/Else Statement
Shows Content A when the condition is TRUE, or Content B when it is FALSE. Something always appears — it just changes based on the data.
Best for: Short inline labels, single words, or one-line phrases that need two versions.
- Amount > $10,000 → show “Premium Client” else show “Standard Client”
- Is Active → show “Active Account” else show “Inactive Account”
- Stage = “Closed Won” → show “✓ Closed” else show “○ Open”
- Discount > 0 → show “Discounted Pricing Applied” else show “Standard Pricing”
How this renders in the template: The add-in’s If/Else Statement produces an inline ternary like {Amount > 10000 ? "Premium Client" : "Standard Client"}. The TRUE and FALSE values can be either literal text (quoted) or Salesforce field names (unquoted) — for example {IsActive ? active_label__c : inactive_label__c}. If you need block-level alternate content (multiple lines or paragraphs in the FALSE branch), type it into Word manually as an inverted-section pair: take the {#Condition}...{/} If Block and add a second block immediately after it with # replaced by ^ — {^Condition}...{/}. That second block is what renders when the condition is false.
6.2 Nested Conditions
You can place a condition inside another condition to build complex logic. This is done by typing tags directly into your Word document (not available via the add-in UI buttons).
Pattern 1 — If Block inside an If Block
Show inner content only when BOTH the outer AND inner conditions are true:
{#Region == "North America"}
North American Standard Terms Apply.
{#CustomerType == "Enterprise"}
Enterprise SLA: 4-hour guaranteed response time, 24/7 support.
{/}
{/}
Result: All North American customers see the first line. Only North American Enterprise customers also see the SLA line.
Pattern 2 — If/Else Statement inside an If Block
Show a label that changes, but only within a larger conditional section:
{#Status == "Active"}
This account is currently active.
Account tier: {Amount > 50000 ? "Premium" : "Standard"}
{/}
Pattern 3 — Nested If/Else Block (Multiple Tiers)
Show different content for three or more tiers:
{#Amount > 100000}
Platinum Client — Dedicated Account Manager Assigned
{/}
{^Amount > 100000}
{#Amount > 50000}
Gold Client — Priority Support Included
{/}
{^Amount > 50000}
Standard Client — Self-Service Portal Access
{/}
{/}
Result: Platinum for >$100k, Gold for $50k–$100k, Standard for everything else.
How to add nested conditions: Build the outer condition first using the add-in, then position your cursor inside that block in Word and type or Insert the inner condition. Make sure every {#...} opening tag has a matching {/...} closing tag. Use the Preview tab to test all combinations.
6.3 Operators & Multiple Conditions
Comparison Operators
| Operator | Meaning | Example |
|---|---|---|
| == | Equals exactly | Status == “Approved” |
| != | Does not equal | Status != “Draft” |
| > | Greater than | Amount > 10000 |
| < | Less than | Discount < 5 |
| >= | Greater than or equal to | Score >= 80 |
| <= | Less than or equal to | Days <= 30 |
| contains | Field value contains this text | Name contains “Corp” |
| startsWith | Field value starts with this text | Email startsWith “info@” |
| endsWith | Field value ends with this text | Email endsWith “@gmail.com” |
Click “Add Condition” in the add-in to add more condition rows. Connect them with AND (&&) — ALL conditions must be true for the content to show, or OR (||) — if ANY one condition is true, the content shows.
6.4 Step-by-Step: Building a Condition

Figure 12: Setting up an If Block condition

Figure 13: If/Else statement with Content and Alternate Content
6.5 Real-Life Examples
Example 1 — If Block: Finance Approval Notice
{#ApprovalStatus == "Approved"}
  This quote has been reviewed and approved by the Finance department. All pricing and terms are final.
  {/}
Example 2 — If/Else Block: Deal Tier Label
{#Amount > 50000}
  ENTERPRISE DEAL — VP Approval Required
  {/}
  {^Amount > 50000}
  STANDARD DEAL — Standard Terms Apply
  {/}
Example 3 — Multiple Conditions (AND): Priority Customer Notice
{#Status == "Active" && Type == "New Customer"}
  ⭐ Priority New Customer — Please attach the Onboarding Checklist.
  {/}
Example 4 — Multiple Conditions (OR): Payment Processing Note
{#PaymentMethod == "Check" || PaymentMethod == "Wire Transfer"}
  Please allow 5–7 business days for payment processing.
  {/}
6.6 Custom Conditions — Direct Document Editing (Advanced)
This is the same inline If/Else Statement syntax described in 6.1 — the same format the add-in’s If/Else Statement button generates for you. You only need to type it by hand when the UI button doesn’t cover what you need: for example, using a Salesforce field name (unquoted) as the TRUE or FALSE value instead of literal text, combining comparison operators the button doesn’t expose, or placing the condition inside a nested block.
Syntax: {field operator value ? "text if true" : "text if false"}
{StageName == "Closed Won" ? "Deal Closed — Begin Onboarding" : "Deal In Progress"}
{Amount > 10000 ? "High Value Account" : "Standard Account"}
{IsActive ? "Active Customer" : "Former Customer"}
{Discount > 0 ? "Discounted Pricing Applied" : "Standard Pricing"}

Figure 14: Inline If/Else condition typed directly in a Word document
7. Action: View
What it does: Inserts a repeating block that lists all related child records from Salesforce into your document. For example, all the products on a quote, all contacts at an account, or all tasks on an opportunity.
7.1 Three Layout Types
| Layout | What it looks like | Best for | Real-world example |
|---|---|---|---|
| Table | Rows and columns — like a spreadsheet | Structured data where comparison across columns is useful | Opportunity Line Items (Product | Qty | Unit Price | Total) |
| Loops | Each record is a repeated block of formatted text | Narrative or labeled fields — one “card” per record | Contact directory (Name, Title, Email, Phone) |
| Grid | Records in multiple columns side-by-side (2–4 per row) | Compact visual display of many items | Product catalog (Name + Price in cards, 3 per row) |
7.2 Complete Step-by-Step: Creating a View
Step 1: Select View Type
From the View Type dropdown, choose Table, Loops, or Grid.

Figure 15: Choosing a View Type
Step 2: Select Child Relationship
This is the related list (child object) connected to your primary object. Examples:
- Primary Object = Quote → QuoteLineItems, Contacts, Attachments
- Primary Object = Account → Contacts, Opportunities, Cases, Orders
- Primary Object = Opportunity → OpportunityLineItems, Tasks, Events, Notes

Figure 16: Selecting the child relationship using the field dropdown
Step 3: (Optional) Using Parent Fields Inside a Loop
Inside a loop, you can reference fields from the parent record. Use dot notation: {Opportunity.Name} inside an OpportunityLineItems loop.

Figure 17: Accessing parent record fields inside a loop
Step 4: Add Fields to “Selected Fields”

Figure 18: Selecting fields using the dropdown and viewing them in the Selected Fields list
Step 5: Reorder Your Fields
Drag and drop a field in the Selected Fields list to your desired position. Each field displays a number indicating its current position.

Figure 19: Reordering Selected Fields by dragging and dropping
Step 6: Set Row Count (Row Limit)
Enter the maximum number of child records to include. Example: Enter 10 → only the first 10 records are shown. Leave blank or enter 0 for unlimited (all records).
Step 7–8: Set Sort Field & Sort Direction
ASC (Ascending): A → Z, 0 → 9, Oldest → Newest. DESC (Descending): Z → A, 9 → 0, Newest → Oldest.
Step 9: (Grid only) Set Grid Columns
Choose how many cards appear per row: 2, 3, or 4 columns.
Step 10: Insert or Copy
Click Insert to place the view block at your cursor in Word, or Copy to paste it manually.

Figure 20: The generated view tag and output options
7.2 Real-Life Examples
Example 1 — Table: Quote Line Items
| Setting | Value |
|---|---|
| View Type | Table |
| Child Relationship | QuoteLineItems |
| Selected Fields | Product Name, Description, Quantity, Unit Price, Total Price |
| Sort Field | Product Name |
| Sort Direction | ASC |
| Row Count | 50 |
Example 2 — Loops: Contact Directory
| Setting | Value |
|---|---|
| View Type | Loops |
| Child Relationship | Contacts |
| Selected Fields | First Name, Last Name, Title, Email, Phone |
| Sort Field | Last Name |
| Sort Direction | ASC |
| Row Count | 10 |
Example 3 — Grid: Product Brochure Catalog
| Setting | Value |
|---|---|
| View Type | Grid |
| Child Relationship | Products (or OpportunityLineItems) |
| Selected Fields | Product Name, Short Description, Price |
| Grid Columns | 3 |
7.3–7.4 Summarize / Aggregate & Calc (Advanced)
7.3 Summarize / Aggregate (Advanced — Direct Document Entry)
The system supports summing a numeric field across all child records. Type the tag directly into your Word document.
Syntax: {RelationshipName | sumBy:'FieldName'}
Total Amount: {OpportunityLineItems | sumBy:'TotalPrice'}
  Grand Total: {OpportunityLineItems | sumBy:'TotalPrice' | format:2:'10,000,000.5':'$'}
  Total Items Ordered: {OpportunityLineItems | sumBy:'Quantity'}
7.4 Calc — Expression Evaluator (Advanced — Direct Document Entry)
The calc filter is a powerful expression evaluator for arithmetic, comparisons, and logical operations. Syntax: {Input | calc:'expression'}
Arithmetic on Child Record Fields
{OpportunityLineItems | calc:'TotalPrice'}
  {OpportunityLineItems | calc:'UnitPrice * Quantity'}
  {OpportunityLineItems | calc:'(UnitPrice * Quantity) / 100' | toFixed:2}
  {OpportunityLineItems | calc:'TotalPrice - 10%' | toFixed:2}
Using Parent Record Values ($1, $2, …)
{OpportunityLineItems | calc:'TotalPrice - $1':Amount | toFixed:2}
  {OpportunityLineItems | calc:'TotalPrice - $1 + $2':Amount:Discount__c | toFixed:2}
Length — Count Records or Characters
{OpportunityLineItems | calc:'length'}
  {Name | calc:'length'}
Conditions — Show / Hide Content
{#OpportunityLineItems | calc:'length > 0'}
  This opportunity has {OpportunityLineItems | calc:'length'} line items.
  {/}
  {#OpportunityLineItems | calc:'length > 5'} Large order — qualifies for bulk discount.
  {/}
| Operator | Description | Example |
|---|---|---|
| + | Addition | calc:’TotalPrice + 100′ |
| – | Subtraction | calc:’TotalPrice – Discount’ |
| * | Multiplication | calc:’UnitPrice * Quantity’ |
| / | Division (0 returns 0) | calc:’TotalPrice / Quantity’ |
| N% | Percentage of left operand | calc:’TotalPrice – 10%’ |
| >, <, >=, <= | Comparison | calc:’length > 0′ |
| && | Logical AND | calc:’length > 0 && length < 100′ |
| || | Logical OR | calc:’length == 0 || length > 10′ |
8. Action: Image
What it does: Inserts a dynamic image from a Salesforce record into your document. The image is fetched and embedded automatically when the document is generated.
Common uses: Company or account logo in the document header; product photos in a catalog; user profile photos; signature images in contracts.
Step-by-Step: Inserting an Image

Figure 21: Image action — choose source type, enter URL or File Id, then set size
Image Tag Syntax
Image tags use the %Img(...) function with three arguments: the source (URL or File Id), width, and height in pixels.
{%Img('069dM00000OdBPBQA3', 300, 300)}
  {%Img('https://example.com/logo.png', 300, 300)}
  {%Img(ImageId__c, 300, 300)}
| Tag | What it inserts |
|---|---|
{%Img('069dM00000OdBPBQA3', 300, 300)} | File from Salesforce by ContentDocumentId, sized 300×300px |
{%Img('https://example.com/logo.png', 300, 300)} | Image fetched from a public URL |
{%Img(ImageId__c, 300, 300)} | Resolves the field value at runtime (field should contain a URL or File Id) |
Quoted vs unquoted source: Wrap a literal URL or File Id in single quotes. Use a bare field API name (no quotes) when the source value lives on the record.
{%Img(Account.LogoUrl__c, 200, 60)}
  {Organization.Name}
  Prepared by: {User.FirstName} {User.LastName} | {User.Title}
  Date: {TODAY | formatDate:'MMMM DD, YYYY'}
Supported image formats: PNG, JPEG/JPG, SVG
9. Copy vs. Insert — Which Should I Use?
After configuring any field, condition, view, or image in the add-in, you will see two buttons at the bottom: Copy and Insert.
| Copy | Insert | |
|---|---|---|
| What it does | Copies the generated tag to your clipboard | Places the tag directly at your cursor position in Word |
| Then what | Switch to Word, click where you want it, press Ctrl+V to paste | Nothing else needed — the tag is already placed |
| Best for | Placing a tag inside a Word table cell, or at a very specific location | When building the template sequentially from top to bottom |
| Confirmation | Button briefly shows “Copied ✓” | Button briefly shows “Inserted ✓” |
10. Preview Tab — Test Your Template (Step 2)
What it does: Renders your template with real Salesforce data so you can see exactly what the final generated document will look like — before you publish anything.
Step-by-Step: Using the Preview Tab

Figure 22: The Preview tab — search for and select a record

Figure 23: Preview result — template rendered with real data
Understanding Preview Results
| What you see | What it means | What to do |
|---|---|---|
| All fields show real values | Template is working correctly | Ready to publish! |
| Some fields are blank | That field is empty on the selected record | Try a different record that has data |
| An error message appears | A tag has a typo, deleted field, or syntax error | Go to CREATE tab → fix the tag |
| Wrong value displayed | You selected the wrong field in the add-in | Remove the tag, re-select the correct field |
| Condition always shows/hides | The condition logic may be inverted | Test with records where condition should be both true and false |
Best Practices for Previewing
- Test with at least 2–3 different records, including edge cases
- Test with a record that has empty optional fields
- For every condition, test with TRUE and FALSE records
- Use sandbox records with realistic test data
- Do not edit the document during preview — any changes will be lost
11. Live Tab — Publish Your Template (Step 3)
What it does: Saves your finished template to Salesforce and makes it available for users to generate documents.

Figure 24: The Live tab — publish your template
Fields Explained
| Field | Description | Example |
|---|---|---|
| Primary Object | (Read-only) The Salesforce object this template is for | Opportunity |
| Template Name | The internal name used to find this template in the listing | 2024 Sales Opportunity Template |
| Document Name | The filename for generated documents. Supports merge tags! | Opportunity_{Name} |
| Status | Draft = still building | Active = live and ready | Active |
| Document Type | Format of the generated file | Doc, PDF, or Any |
Status Options
| Status | What it means | When to use |
|---|---|---|
| Draft | Template is saved but NOT available to users for document generation | While you are still building or testing |
| Active | Template IS available to users for document generation | When fully tested and ready to use |
Document Type Options
| Type | What it generates |
|---|---|
| Doc | Always generates a Microsoft Word (.docx) file |
| Always generates a PDF file | |
| Any | User chooses between Word and PDF at the time of generation |
Smart Document Naming
The Document Name field supports merge tags — making every generated file uniquely named.
| Document Name you enter | Generated filename |
|---|---|
| Opportunity_{Name} | Opportunity_Green Farm Deals |
| {Account.Name}_Proposal | Acme Corporation_Proposal |
| Proposal_{TODAY | formatDate:’MM-DD-YYYY’} | Proposal_01-15-2024 |
Step-by-Step: Publishing Your Template
12. Tag Syntax Quick Reference
Basic Field Tags
| Tag | Example | Description |
|---|---|---|
{FieldName} | {Name} | Simple field value (case-insensitive) |
{Object.Field} | {Account.Name} | Nested lookup field (up to 5 levels) |
Formatting Tags
| Tag | Example | Description |
|---|---|---|
{Field | formatDate:'format'} | {CloseDate | formatDate:'MM/DD/YYYY'} | Format a Date or DateTime field |
{Field | toFixed:N} | {TotalPrice | toFixed:2} | Set decimal places only |
{Field | format:N:'pattern'} | {Amount | format:0:'10,000,000.5'} | Full number format with separators |
{Field | format:N:'pattern':'symbol'} | {Amount | format:2:'10,000,000.5':'$'} | Full number format with currency symbol |
{Field | addDays:N} | {CloseDate | addDays:30} | Offset date forward by N days |
{Field | subtractDays:N} | {ContractEndDate | subtractDays:14} | Offset date backward by N days |
{Rel | orderBy:'Field':'asc'|'desc'} | {#Contacts | orderBy:'LastName':'asc'} | Order rows in a view |
{Rel | limit:N} | {#OpportunityLineItems | limit:10} | Limit rows in a view |
Conditional Tags
| Tag | Description |
|---|---|
{#field == "val"}content{/} | If Block — show content when condition is true |
{#Cond}yes{/} {^Cond}no{/} | If/Else block — manual pattern with ^ for false branch |
{Condition ? "yes" : "no"} | Inline ternary — TRUE/FALSE values may be literal text or field names |
{#f1 == "v1" && f2 == "v2"}...{/} | Multiple conditions with AND |
{#f1 == "v1" || f2 == "v2"}...{/} | Multiple conditions with OR |
View / Loop Tags
| Tag | Example | Description |
|---|---|---|
{#Relationship}...{/Relationship} | {#OpportunityLineItems}...{/OpportunityLineItems} | Loop through child records |
{Rel|sumBy:'Field'} | {OpportunityLineItems|sumBy:'TotalPrice'} | Sum a numeric field across all child records |
{Rel|calc:'expression'} | {OpportunityLineItems|calc:'TotalPrice -10%'} | Evaluate an arithmetic expression |
{Rel|calc:'length'} | {OpportunityLineItems|calc:'length'} | Count child records |
Image Tags
| Tag | Description |
|---|---|
{%Img('SF File Id', W, H)} | Insert a Salesforce file by ContentDocumentId or ContentVersionId |
{%Img('url', W, H)} | Insert an image fetched from a public URL |
{%Img(FieldApiName, W, H)} | Resolve the source from a record field at runtime — no quotes around field name |
Global Variable Tags
| Tag | Description |
|---|---|
{TODAY} | Today’s date |
{YESTERDAY} | Yesterday’s date |
{THIS_WEEK} | Monday of the current week |
{THIS_MONTH} | 1st of the current month |
{THIS_QUARTER} | 1st of the current fiscal quarter |
{THIS_YEAR} | January 1st of the current year |
{CURRENT_YEAR} | Current year as a 4-digit number |
{User.FirstName} | Fields from the user generating the document |
{Organization.Name} | Your Salesforce organization name |
13. Tips & Best Practices
- Start in Sandbox: Always build and test templates in your Salesforce Sandbox before creating them in Production.
- Draft first, Active later: Keep Status = Draft while building. Only switch to Active once thoroughly previewed.
- Preview with multiple records: Test with at least 3 different records. Include records where optional fields are empty.
- Test both sides of every condition: Preview with TRUE and FALSE records for every If Block and If/Else.
- Use unique Document Names: Include merge tags like {Account.Name}_{Name} so generated files are easy to find.
- Cursor position for Insert: Always click inside the Word document before clicking Insert.
- Tags inside table cells: Use Copy → click inside the table cell → Ctrl+V for precise placement.
- Use Add Days for deadline calculations: {InvoiceDate|addDays:30} for payment due dates.
- Smart quote warning: Use straight quotes (“) not curly quotes. Press Ctrl+Z if Word autocorrects.
- Don’t forget headers and footers: You can place merge tags inside Word headers and footers too.
14. Troubleshooting
| Problem | Likely Cause | Solution |
|---|---|---|
| Error: “Field not found” | The field was renamed or deleted in Salesforce | Re-select the field in the add-in, or update the tag to match the current field API name |
| Preview shows blank where a value should be | That field is empty on the selected record | Try a different record that has data in that field |
| Insert button does nothing | No cursor position set in Word | Click inside the Word document to position your cursor, then click Insert again |
| Login fails or authentication error | OAuth or External Client App misconfiguration | Contact your Salesforce administrator |
| Template doesn’t appear in the listing | Wrong environment or template is Draft | Check you are signed into the correct environment. Set Status to Active |
| Smart quote error in tag | Word autocorrected quotes to curly/smart quotes | Replace curly quotes with straight quotes in the tag |
| Image shows as broken/missing | The image field is empty or invalid | Verify the field value exists and contains a valid image in Salesforce |
| Sum total shows 0 or wrong value | Wrong field API name in sumBy tag (case-sensitive) | Use the exact Salesforce API field name |
| Template saves but users cannot find it | Status is still set to Draft | Go to the Live tab, change Status to Active, and click Save again |
| View/Loop shows no records | The selected record has no child records | Test with a different record that has data in the related list |
| Condition always shows or always hides | Condition logic is inverted or wrong value | Check the field value in the actual Salesforce record |
| My preview edits disappeared | Edits made in Preview mode are not saved | Make changes in the CREATE tab, then re-preview |
© 2026 360 InstantDocs. All rights reserved.