

1. About This Guide
1.1 Overview
360 InstantDocs is a document generation application by 360 Degree Cloud Technologies, available on the Salesforce AppExchange. It creates documents (PDF, DOCX, PPTX, etc.) directly from Salesforce records and stores them under Files and Notes & Attachments on the record.
Once a document is generated by 360 InstantDocs, it often needs to be signed. This guide explains how to use three of the most popular eSignature apps to sign those generated documents:
- Dropbox Sign (formerly HelloSign) — by Dropbox
- DocuSign — industry-standard eSignature platform
- Conga Sign — by Conga, native to Salesforce
Each section below is written step-by-step with screenshots so that any user, technical or non-technical, can follow along.
1.2 Prerequisites
Before you begin, confirm the following are in place:
- 360 InstantDocs is installed and configured in your Salesforce org.
- The eSignature app you want to use (Dropbox Sign, DocuSign, or Conga Sign) is installed from the Salesforce AppExchange and connected to an active account.
- You have generated at least one document using 360 InstantDocs, and it is visible under Notes & Attachments or Files on the relevant record.
- Your user profile has permission to use both 360 InstantDocs and the chosen eSign application.
2. Dropbox Sign (HelloSign) Integration
Dropbox Sign, previously known as HelloSign, is an eSignature app owned by Dropbox. It integrates smoothly with Salesforce and works with documents generated by 360 InstantDocs.
2.1 Overview
When a document is generated by 360 InstantDocs, it is saved under the record’s Notes & Attachments and Files sections. Dropbox Sign can pick up these files directly, so there is no need to download and re-upload the document.
2.2 Locate the Generated Document
Open the Salesforce record (for example, an Account) where the 360 InstantDocs document was generated. Scroll to the Notes & Attachments section to confirm that the document is available.
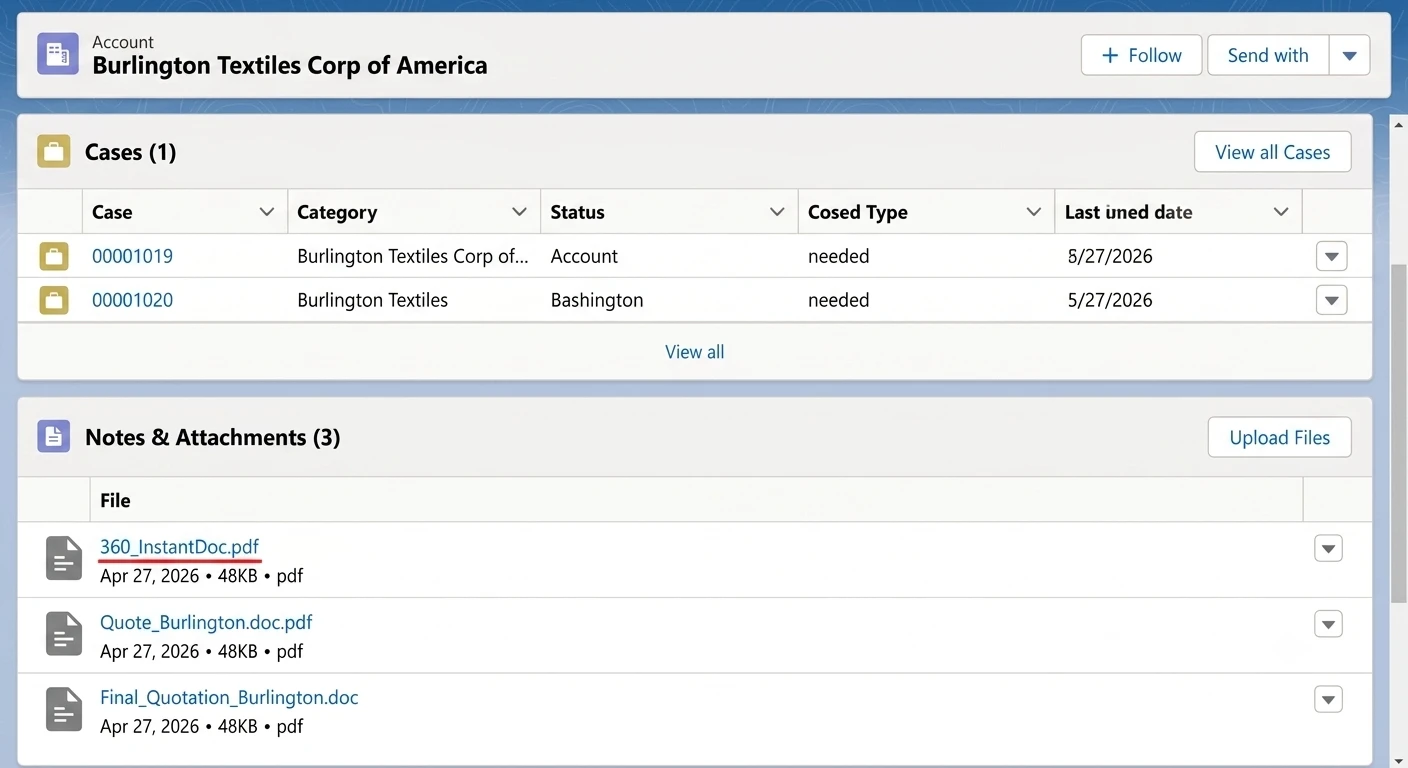
Figure 2.1 — Generated documents shown under Notes & Attachments on the Burlington Textiles Corp account.
2.3 Launch Dropbox Sign from the Record
From the same Salesforce record, click the Use Dropbox Sign button (usually located in the highlights / button bar at the top of the record page).
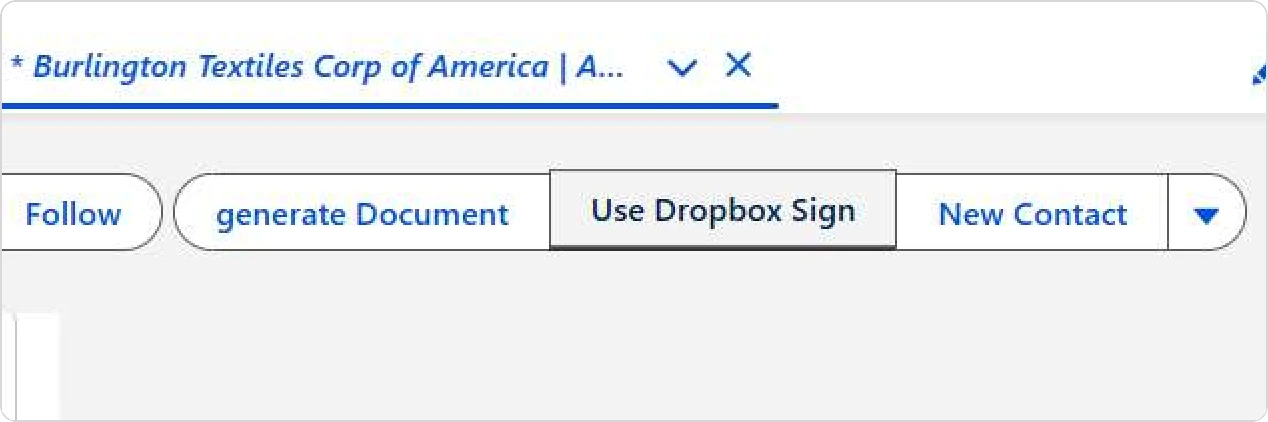
Figure 2.2 — “Use Dropbox Sign” button on the record page.
2.4 Choose How to Send
Dropbox Sign will open inside Salesforce and present two options:
- Create a template — for reusable signing workflows you plan to use repeatedly.
- Send a one time document — for a single signing request using the current record’s files.
For a one-off signature request on a 360 InstantDocs output, click Start under “Send a one time document”.
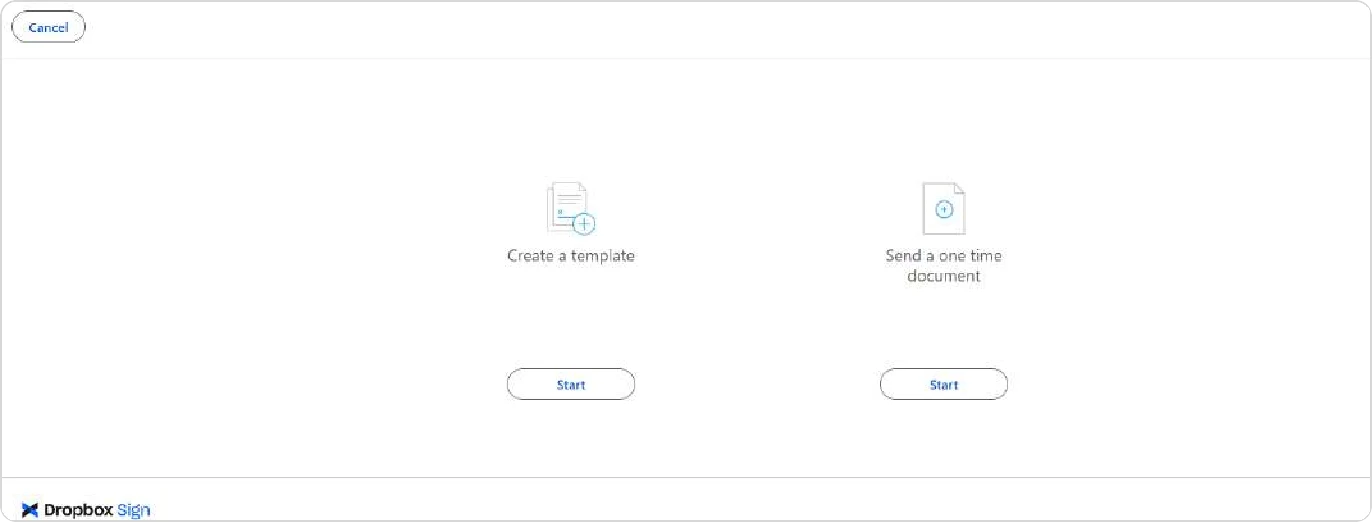
Figure 2.3 — Choose “Send a one time document” for 360 InstantDocs files.
2.5 Step 1 of 3 — Select Documents
Dropbox Sign will show all files attached to the record. You can either drag and drop a new file, or (recommended) tick the file that was generated by 360 InstantDocs under “Or Select Files On The Record”.
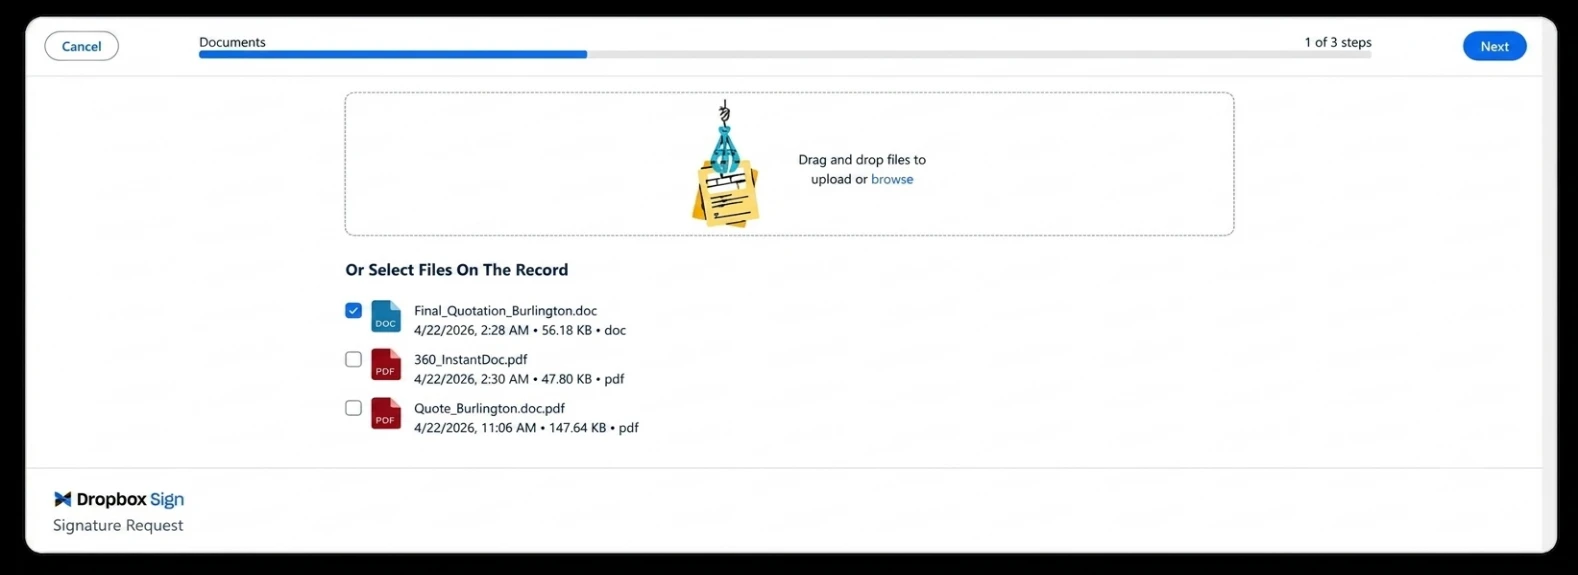
Figure 2.4 — Select the 360 InstantDocs file(s) you want to send for signature.
Once the file(s) are selected, click Next (top right).
2.6 Step 2 of 3 — Add Recipients
On the Recipients screen, add one or more signers. Each row allows you to:
- Type — choose how the signer is identified. Three options are available:
- Manual — type the signer’s name and email address directly.
- Contact — select an existing Salesforce Contact (the contact details auto-fill).
- User — select an internal Salesforce User of your org.
- Recipient — the signer’s name and email (auto-filled for Contact / User).
- Action — usually set to .
- Files — optionally assign specific files to specific signers.
If more than one person needs to sign, click Add Recipient to add additional rows.
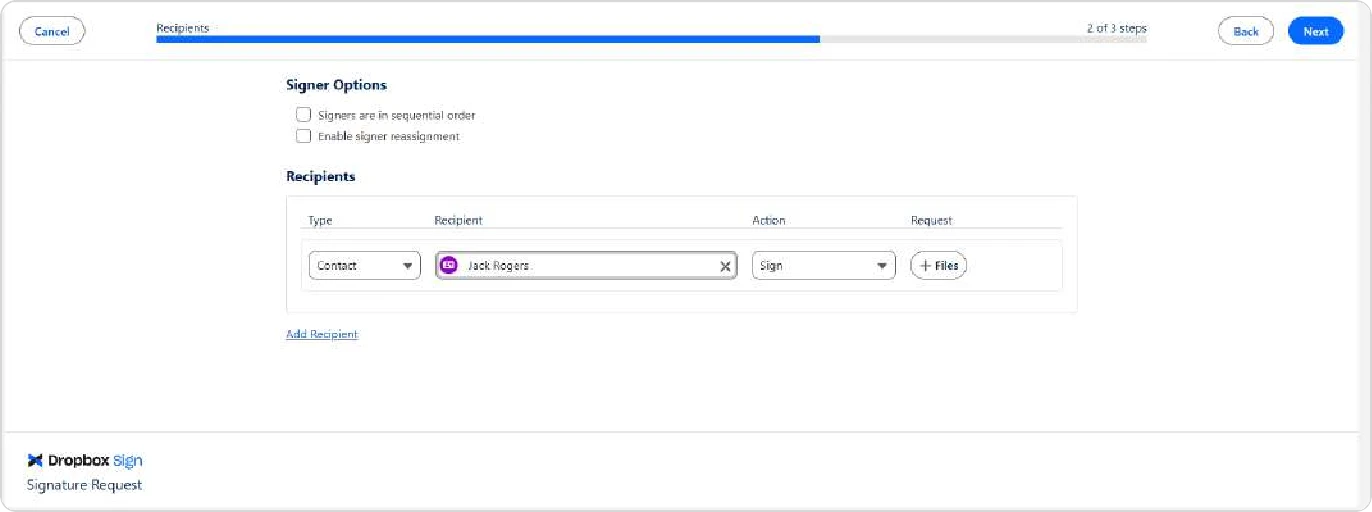
Figure 2.5 — Adding a recipient by selecting a Salesforce Contact (Jack Rogers).
Two useful options at the top:
- Signers are in sequential order — tick this if signers must sign in a specific order.
- Enable signer reassignment — allows a recipient to forward the request to someone else.
Click Next to proceed.
2.7 Step 3 of 3 — Prepare & Send
On the final step, Dropbox Sign opens a tagging editor where you can place fields directly on the document for each signer. Use the Signer dropdown on the left to switch between signers, then drag the fields each signer needs to complete:
- Signature fields — Signature, Initials.
- Auto-fill fields — Date signed, Full name, Email address, Company, and more.
Each placed field appears highlighted in light blue on the document. The right-hand panel lets you configure properties of the selected field (for example, whether the field is required, the field name, and formatting). When you are done, click Send for signature.
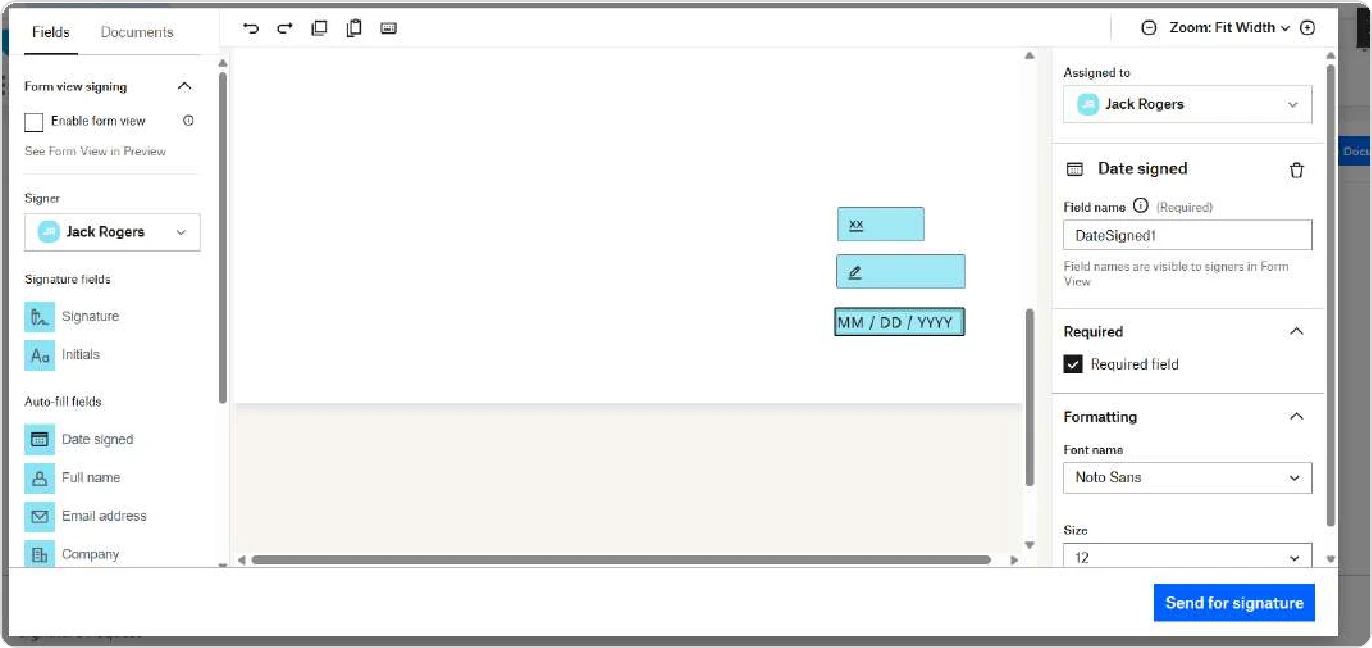
Figure 2.6 — Prepare & Send: place Signature, Initials, and Date Signed fields onto the document.
2.8 What the Signer Receives
Each recipient gets an email from Dropbox Sign with a “Review & sign” button. The email shows who requested the signature (the sender’s name) along with the message you entered, so signers know what they are being asked to do before they click through.
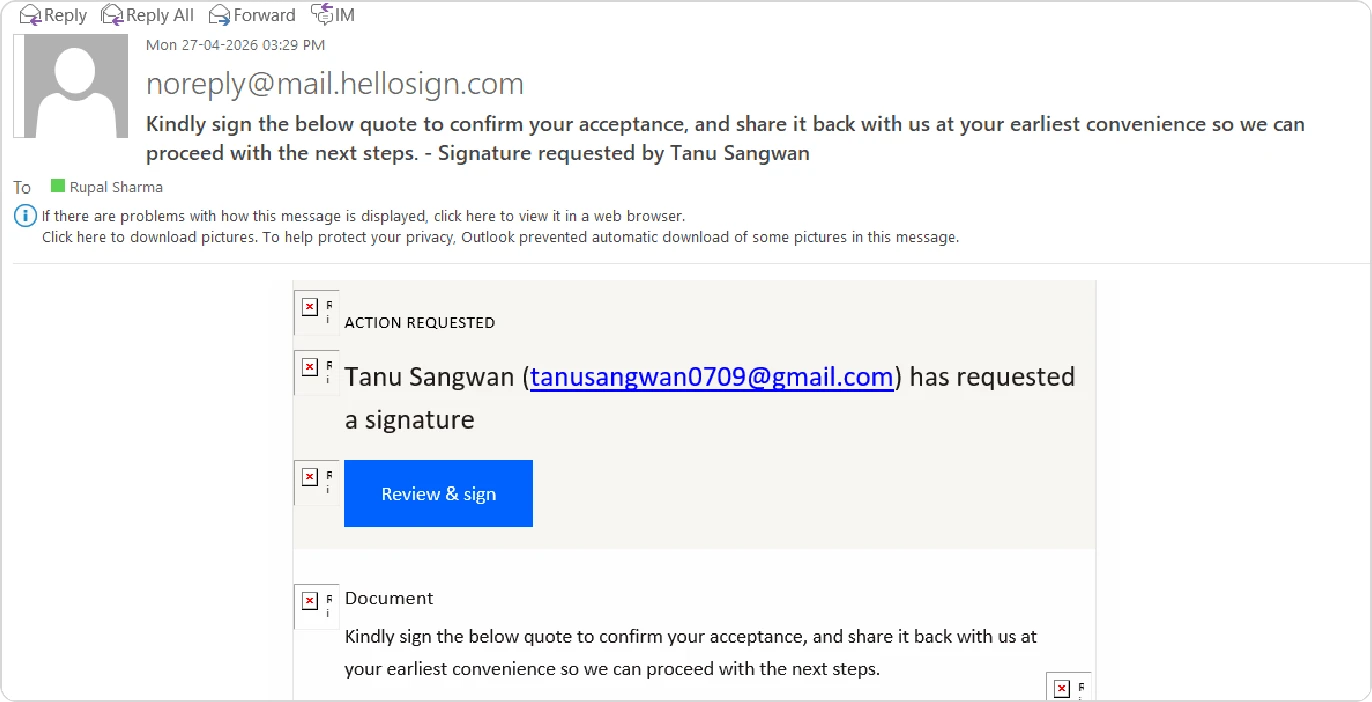
Figure 2.7 — Email the signer receives from Dropbox Sign with a “Review & sign” button.
Clicking Review & sign opens the document in a browser, where the signer fills in any fields you placed and applies their signature.
2.9 After Signing
Once all recipients have completed their signatures, Dropbox Sign automatically delivers the signed PDF back to Salesforce. The signed document appears under Notes & Attachments on the same record, alongside the original 360 InstantDocs files.
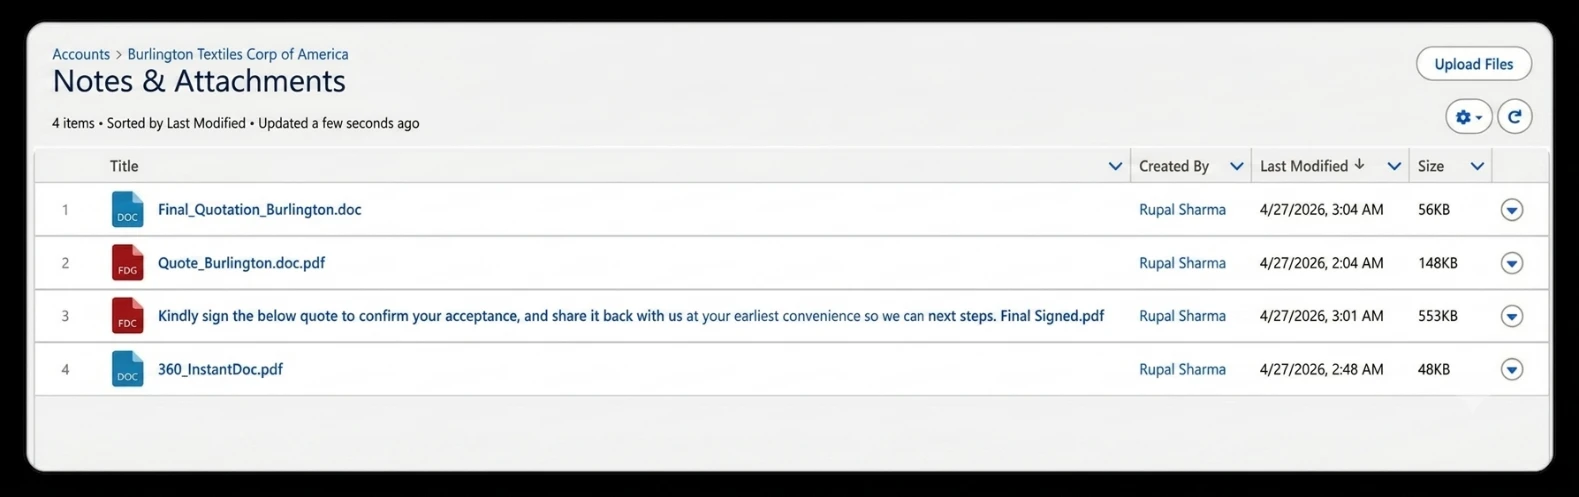
Figure 2.8 — The signed document is automatically returned to the record’s Notes & Attachments list.
Opening the signed PDF shows the applied signature(s) along with a unique Document ID provided by Dropbox Sign for audit and verification purposes.
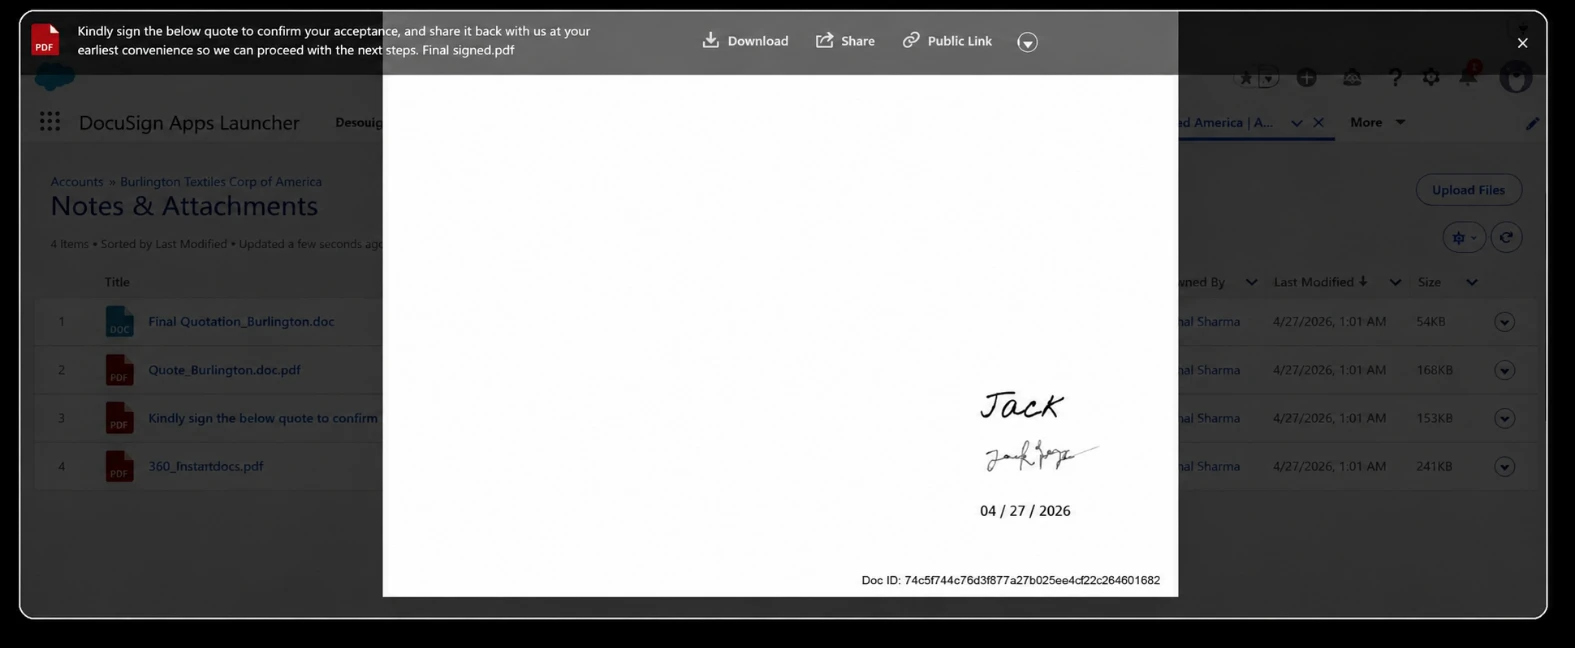
Figure 2.9 — The completed signed document showing the signature, signed date, and Doc ID footer.
2.10 Dropbox Sign — Quick Summary
3. DocuSign Integration
DocuSign is one of the most widely used eSignature platforms worldwide. Its Salesforce-native app (DocuSign Apps Launcher) integrates with records and allows you to send any file, including those generated by 360 InstantDocs, for signature.
3.1 Overview
The DocuSign Apps Launcher follows a three-step wizard similar to Dropbox Sign:
- Documents — pick the file(s) to send.
- Recipients — add the signer(s).
- Prepare & Send — tag fields and dispatch.
3.2 Launch “Send with DocuSign”
From the Salesforce record where the 360 InstantDocs document is attached, locate the document under Notes & Attachments first to confirm it is available.
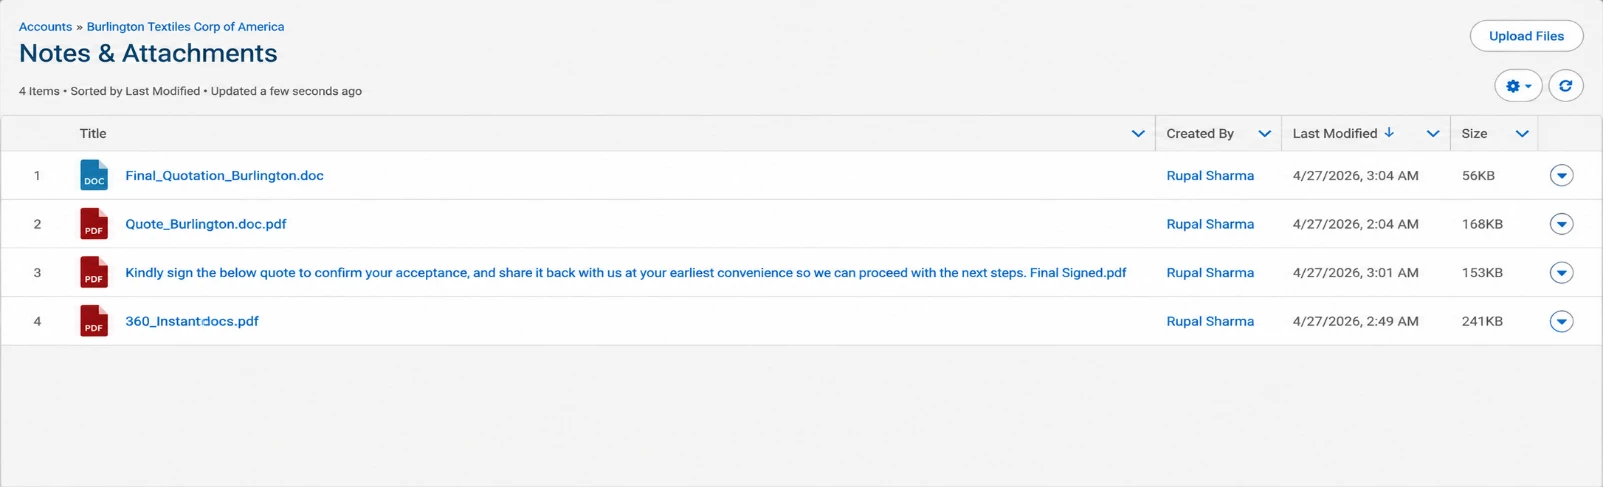
Figure 3.1 — Notes & Attachments list on the Burlington Textiles account, ready to be sent via DocuSign.
Then launch the DocuSign Apps Launcher (via the App Launcher or the DocuSign action button on the record) and choose Send with DocuSign.
3.3 Step 1 — Documents
On the Documents step, you will see a list of Selected Documents. To attach the 360 InstantDocs output, click Add from Salesforce and tick the relevant files from the record’s attachments. You can also use Select Template or Upload if needed.
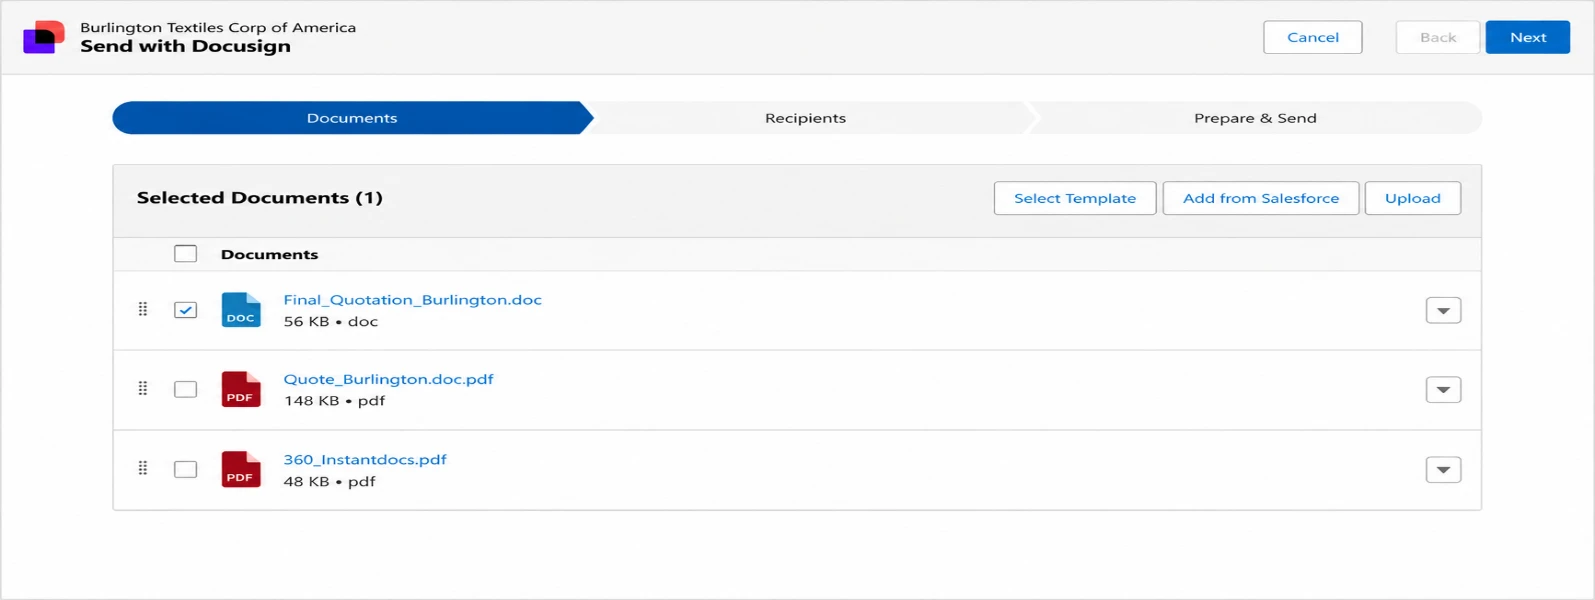
Figure 3.2 — Documents step in “Send with DocuSign” with the 360 InstantDocs file selected.
Once the documents are selected, click Next (top right).
3.4 Step 2 — Recipients
Click Add Recipient to open the recipient dialog. You can add recipients in three ways:
- From Salesforce — pick an existing User or Contact from your Salesforce org.
- By Name & Email — type in the recipient’s name and email manually.
- Signing Group — use a predefined DocuSign signing group.
For each recipient, choose the Action (e.g., “Needs to Sign”) and assign a Role such as Signer 1, Signer 2, etc. Optional links in the same dialog:
- Add Access Authentication — require an extra verification step (e.g., SMS, access code).
- Add Private Message — send a personal note to that recipient only.
After adding all recipients, the Recipients screen summarises who will sign, their roles, and the email subject that will be sent.
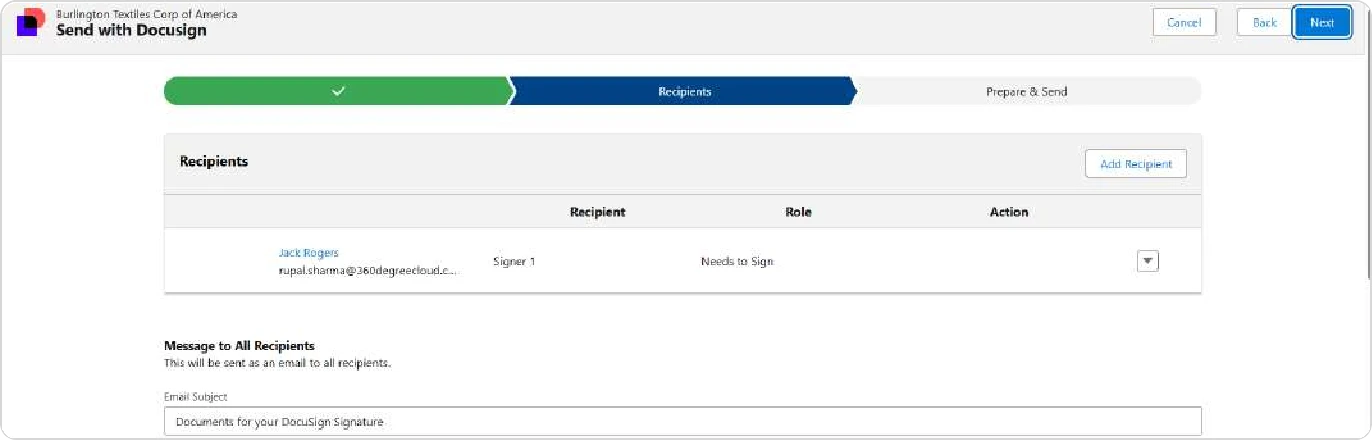
Figure 3.3 — Recipients summary showing the selected signer, role, and email subject.
Click Next to continue.
3.5 Step 3 — Prepare & Send
In the Prepare & Send step, DocuSign displays the document(s) with a Standard Fields panel on the left. Drag fields such as Signature, Initial, Stamp, Date Signed, Name, Email, Company, or Title onto the document where each recipient should act. Use the recipient dropdown at the top to switch between signers so that each person sees the fields assigned to them.
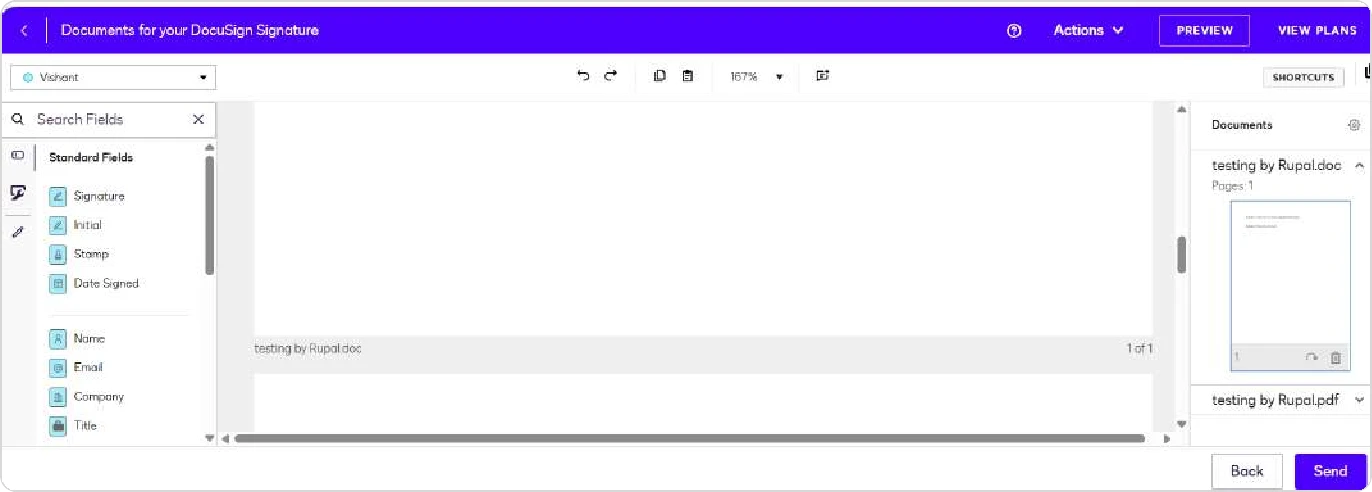
Figure 3.4 — Prepare & Send: drag Standard Fields onto the document for each recipient.
When the document is fully tagged, click Send (bottom right). DocuSign emails the recipients, and you will see a confirmation that the envelope was sent successfully.
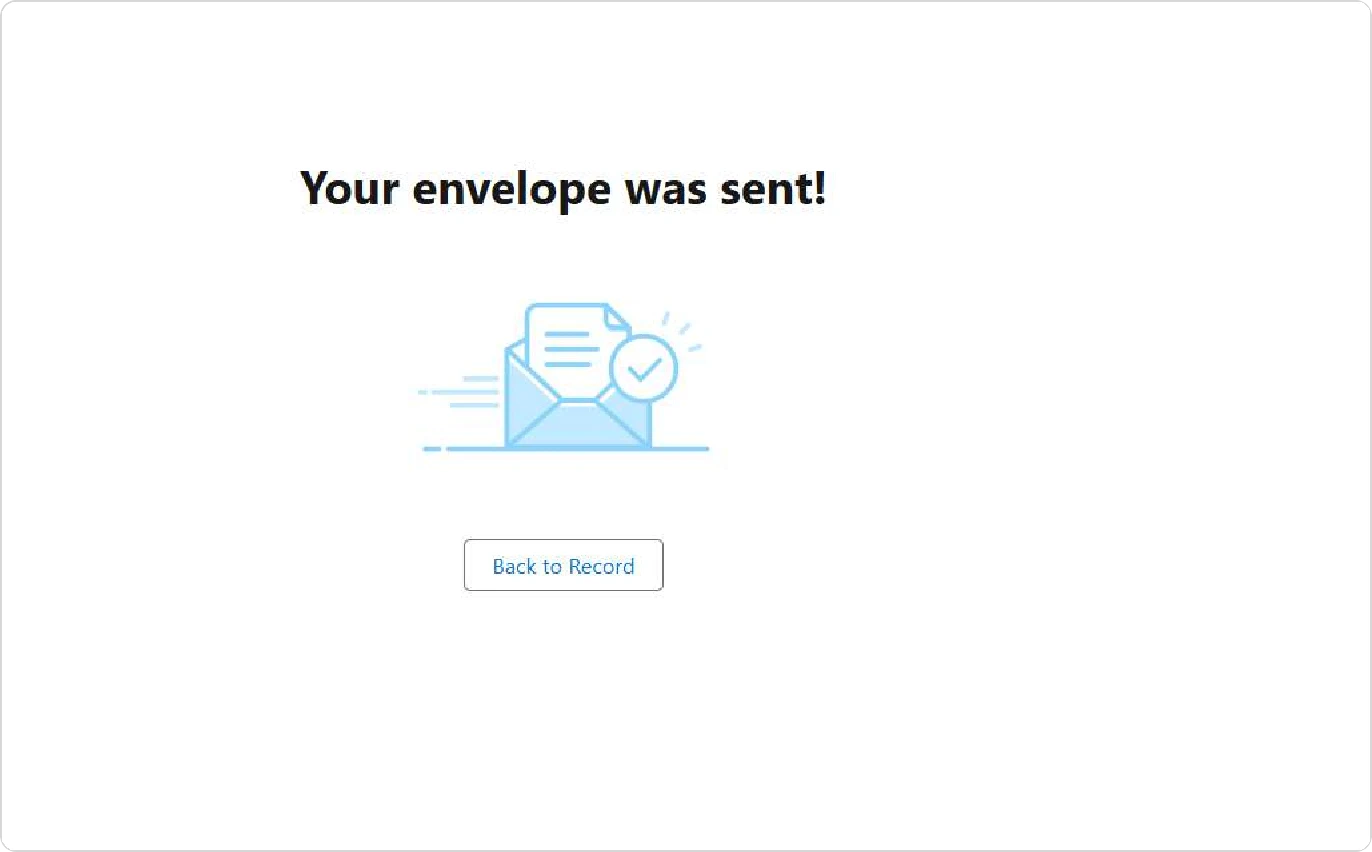
Figure 3.5 — Confirmation that the DocuSign envelope has been sent.
Click Back to Record to return to the Salesforce record.
3.6 What the Signer Receives
Each recipient receives an email from DocuSign (sent from an address such as
) with the subject you
set on the previous step. The email includes a Review Document button that opens the document in DocuSign’s signing experience.
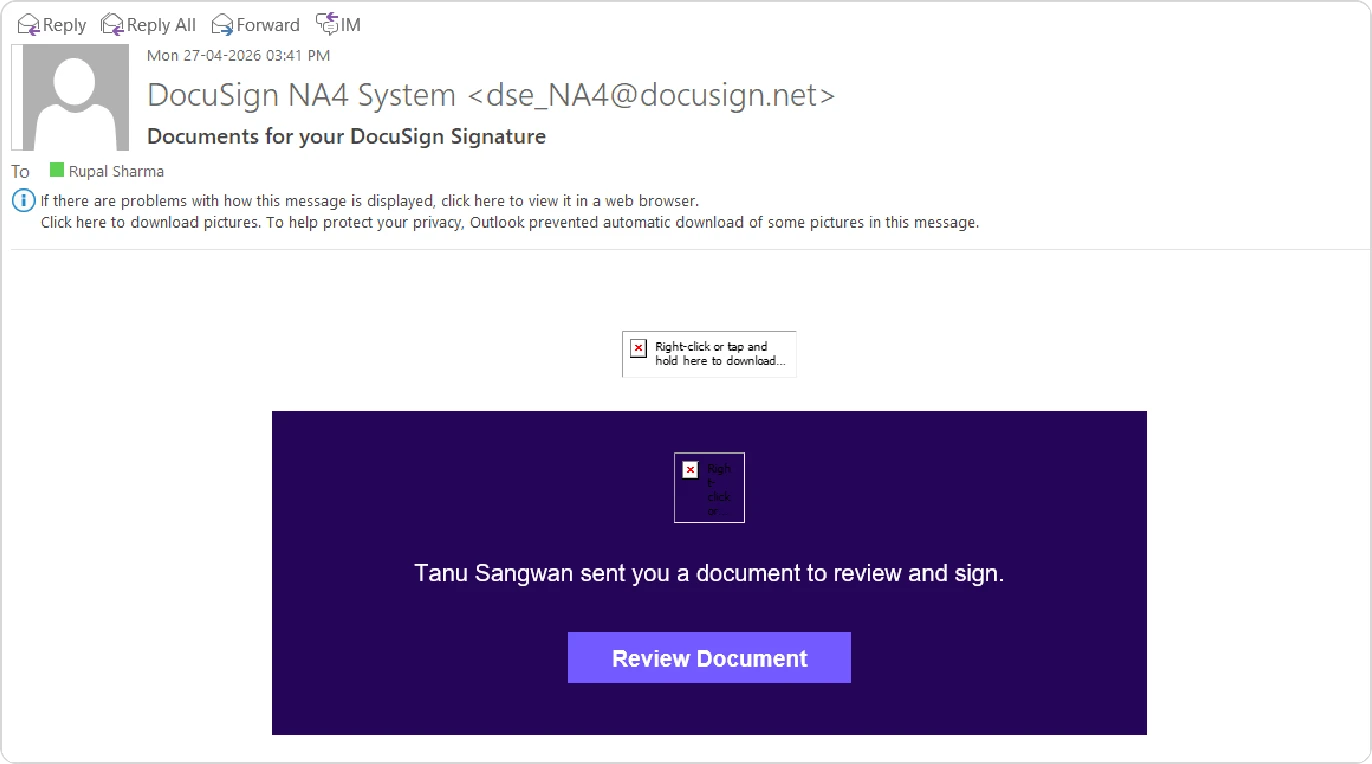
Figure 3.6 — Email the signer receives from DocuSign with a “Review Document” button.
When the signer clicks Review Document, they are guided through each field you placed and can apply their signature.
3.7 After Signing
Once all recipients have signed, DocuSign delivers the completed PDF back to Salesforce. The signed file appears under Notes & Attachments on the same record. Opening it shows the applied signature(s), the signing date, and a unique DocuSign Doc ID for audit verification.
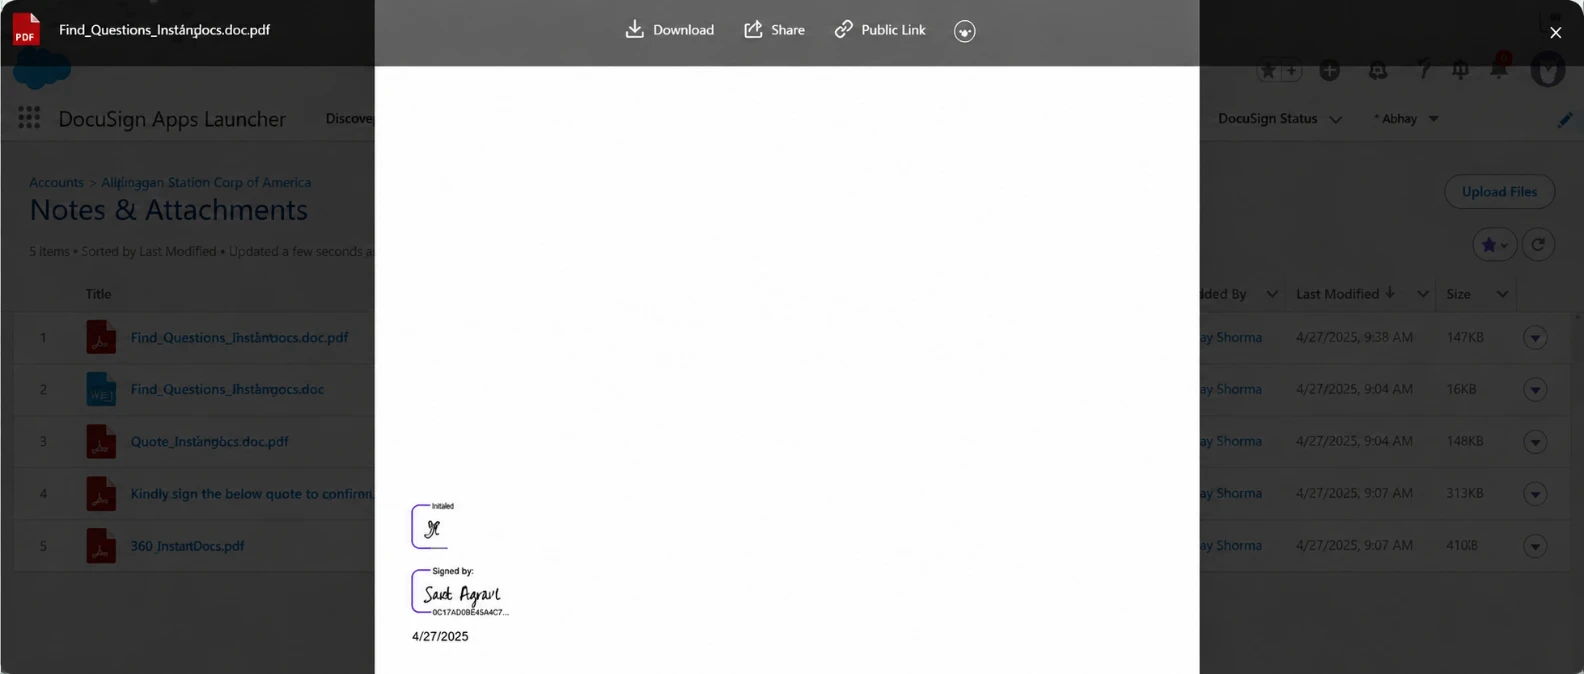
Figure 3.7 — Signed document returned to Notes & Attachments, showing the signer’s initials, signature, and signing date.
You can also track the envelope’s progress at any time via the DocuSign Envelopes and DocuSign Status tabs in the DocuSign Apps Launcher.
3.8 DocuSign — Quick Summary
4. Conga Sign Integration
Conga Sign is an eSignature solution built by Conga and is natively integrated with Salesforce. Like Dropbox Sign and DocuSign, it can sign documents generated by 360 InstantDocs directly from the record, without downloading and re-uploading files.
4.1 Overview
Conga Sign follows the same high-level pattern as the other eSignature tools:
- Identify the 360 InstantDocs document on the Salesforce record.
- Launch Conga Sign from the record.
- Select the document(s), add recipients, tag fields, and send.
- Track status and receive the signed PDF back on the record.
4.2 Locate the Generated Document
Open the Salesforce record (Account, Opportunity, Contract, or any custom object) where 360 InstantDocs has produced the document. Confirm that the file is visible under Files or Notes & Attachments on that record.
4.3 Launch Conga Sign from the Record
Click the Conga Sign button on the record page (this button is added during Conga Sign setup, either to the record highlights panel or to the page layout as a custom action). The Conga Sign Send for Signatures screen opens.
4.4 Step 1 — Select Documents
Conga Sign shows the available files from the record. Tick the 360 InstantDocs generated file you want signed. If needed, you can also:
- Upload a new document from your computer.
- Add files from other Salesforce records or related lists.
- Use a Conga Sign template for recurring signature workflows.
Once the right file is selected, click Next.
4.5 Step 2 — Add Recipients
On the Recipients step, add one or more signers. For each recipient you will typically provide:
- Name — full name of the signer.
- Email — email address where the signing request will be sent.
- Role — for example, Signer, Approver, or Carbon Copy (CC).
- Signing Order — if signers must sign in sequence, set the order; otherwise leave parallel.
Recipients can be pulled from Salesforce Users / Contacts / Leads, or added manually by typing a name and email.
4.6 Step 3 — Tag the Document
In the tagging view, Conga Sign displays the document with a field palette. Drag the fields each recipient needs to complete onto the correct spots:
- Signature
- Initials
- Date signed
- Name / Email / Title / Company
- Text, checkbox, or dropdown fields for data capture
Use the recipient selector at the top to switch between signers and assign fields to the correct person.
4.7 Step 4 — Review and Send
Optionally add an email subject and a message that each recipient will see. Review the recipient list, the attached document, and the placed fields. When everything looks correct, click Send. Conga Sign will email the signing link to the first recipient (or all recipients in parallel, depending on the signing order you chose).
4.8 After Signing
As each signer completes the document, Conga Sign updates the transaction status in Salesforce. Once all signers have signed, Conga Sign:
- Generates a final signed PDF with all signatures and an audit trail.
- Attaches the signed PDF back to the originating record under Files / Notes & Attachments.
- Creates a Conga Sign Transaction record that tracks the full signing history.
You can monitor in-flight signing requests from the Conga Sign Transactions tab or from the related list on the record.
4.9 Conga Sign — Quick Summary
5. Compatibility Summary
All three eSignature applications work with documents generated by 360 InstantDocs because 360 InstantDocs saves its output to the standard Salesforce Files and Notes & Attachments locations, which each eSign app can read.
5.1 At-a-glance Comparison
|
Feature
|
Dropbox Sign
|
DocuSign
|
Conga Sign
|
|---|---|---|---|
|
Native Salesforce app
|
Yes
|
Yes
|
Yes
|
|
Reads 360 InstantDocs files from record
|
Yes
|
Yes
|
Yes
|
|
Signed PDF returns to record
|
Yes
|
Yes
|
Yes
|
|
Sequential signing order
|
Yes
|
Yes
|
Yes
|
|
Templates for repeat workflows
|
Yes
|
Yes
|
Yes
|
|
Recipient from Salesforce User/Contact
|
Yes
|
Yes
|
Yes
|
|
Audit trail / Document ID
|
Yes
|
Yes
|
Yes
|
6. Common Issues & Troubleshooting
6.1 The eSign button does not appear on the record
- Confirm the eSign app is installed and licensed for the user.
- Check that the button or Lightning action has been added to the page layout for that object.
- Verify the user profile has access to the eSign app’s components.
6.2 360 InstantDocs file does not show up in the eSign document picker
- Confirm the document is visible in Files or Notes & Attachments on the record.
- Make sure 360 InstantDocs finished generating before launching the eSign app (avoid opening the eSign app during generation).
- Some eSign apps filter by file type — try generating in PDF format if a DOC/DOCX is not listed.
6.3 Recipient did not receive the email
- Double-check the email address typed in the recipient field.
- Ask the recipient to check spam / junk folders.
- Confirm in the eSign app’s Envelope / Transaction record that the email status shows “Sent” rather than “Failed”.
6.4 Signed PDF does not come back to the record
- Check the envelope / transaction status — it must show “Completed” before the file is returned.
- Verify the eSign app’s “write-back” or “return to Salesforce” setting is enabled.
- Confirm the integration user has permission to create Files / Attachments on that object.
6.5 Who to contact
|
Issue Area
|
Support Contact
|
|---|---|
|
360 InstantDocs (document generation, templates, field mapping)
|
360 Degree Cloud Technologies support
|
|
Dropbox Sign (sending, signing, account)
|
Dropbox Sign support
|
|
DocuSign (envelope, template, account)
|
DocuSign support
|
|
Conga Sign (transaction, signing, account)
|
Conga support
|
7. Glossary
| Term | Definition |
|---|---|
| 360 InstantDocs | A Salesforce AppExchange document generation app by 360 Degree Cloud Technologies that creates PDFs, DOCX, PPTX, and other files from Salesforce data. |
| AppExchange | Salesforce’s marketplace for third-party applications. |
| Dropbox Sign | eSignature app by Dropbox, formerly known as HelloSign. |
| DocuSign | Leading eSignature platform; its Salesforce app is called DocuSign Apps Launcher. |
| Conga Sign | eSignature app by Conga, native to Salesforce. |
| Envelope (DocuSign) | A DocuSign term for the package of documents, recipients, and fields sent for signature. |
| Transaction (Conga Sign) | The Conga Sign equivalent of an envelope: one signing request and its history. |
| Recipient / Signer | The person who receives and signs the document. |
| Signing Order | Whether signers sign in sequence (one after another) or in parallel (all at once). |
| Audit Trail / Document ID | A unique identifier and log stored by the eSign provider to prove who signed what and when. |
360 InstantDocs — eSignature Integration Guide • Version 1.0
© 2026 360 Degree Cloud Technologies. All rights reserved.