

1. Introduction
1.1 About 360 InstantDocs
360 InstantDocs is a powerful Salesforce-native document generation solution that lets you create professional documents — SOWs, contracts, proposals, invoices, and more — directly from your Salesforce data. By using reusable templates with dynamic merge fields, InstantDocs eliminates manual copy-paste work, ensures consistency across documents, and dramatically reduces document turnaround time.
InstantDocs integrates seamlessly with Salesforce Lightning Experience and includes a Microsoft Word Add-In for visual template design. Documents can be generated in DOCX or PDF format, attached to records, and optionally emailed to recipients — all without leaving Salesforce.
1.2 Key Features
- Single Document Generation — Generate documents from any Salesforce record via Quick Actions or URL Buttons
- Bulk Document Generation — Generate documents for hundreds of records at once from Reports or List Views
- Microsoft Word Add-In — Design and edit templates visually in Microsoft Word with a dedicated sidebar for inserting Salesforce merge fields
- Email Integration — Send generated documents via email directly from the generation wizard with configurable From, To, CC, and BCC fields
- Custom Related List — Display document generation history on any record page
- Flow & Apex Integration — Trigger document generation from Salesforce Flows or Apex code for automated workflows
- Error Logging — Built-in error log tracking for troubleshooting and auditing
- 360 File Sync — Sync Salesforce files to external cloud storage (Google Drive, OneDrive, SharePoint, AWS S3, SFTP)
1.3 Document Conventions
This guide uses the following visual conventions:
2. Prerequisites
2.1 Salesforce Edition Requirements
360 InstantDocs is compatible with the following Salesforce editions:
| Edition | Supported | Notes |
|---|---|---|
| Enterprise Edition | Yes | Full support |
| Performance Edition | Yes | Full support |
| Unlimited Edition | Yes | Full support |
| Developer Edition | Yes | For development and testing |
| Professional Edition | Yes | Full support |
| Essentials Edition | No | Limited API and customization support |
2.2 Browser Requirements
360 InstantDocs runs within Salesforce Lightning Experience. Supported browsers include:
- Google Chrome (latest version) — Recommended
- Microsoft Edge (Chromium-based, latest version)
- Mozilla Firefox (latest version)
- Apple Safari (latest version, macOS only)
3. Package Installation
3.1 Installing from AppExchange
Follow these steps to install 360 InstantDocs in your Salesforce org:
3.2 Choosing Installation Options
On the installation options page, you will be asked who should have access to the package:
- Install for Admins Only (Recommended) — Only System Administrators will see the app initially. You can grant access to other users later via permission sets.
- Install for All Users — All users in the org will have immediate access.
- Install for Specific Profiles — Choose which profiles should have access.

Figure 1: Installation options page showing “Install for Admins Only” selected, and the “Approve Third-Party Access” checkbox checked
3.3 Verifying Installation

Figure 2: Setup → Installed Packages showing 360 InstantDocs with Status “Installed” and version 1.0

Figure 3: App Launcher search results showing the 360 InstantDocs app with its icon
4. Post-Installation Setup
After installing the package, complete the following steps in order to fully configure 360 InstantDocs. Each step builds on the previous one.
4.1 Step 1: License Activation & Sync
Now that the package is installed, you can activate and sync your 360 InstantDocs license.

Figure 4: 360 InstantDocs Setup → License Manager in its inactive state, showing the “Authorize & Sync with Server” button
After successful authorization, the License Manager will display:
- License Status — Active (with a green status badge) or Trial
- Last Synced — The date and time of the last successful sync
- License Settings — A grid of tiles showing credits, expiration, and features enabled

Figure 5: License Manager after successful authorization, showing Trial status, sync timestamp, InstantDocs Credits, and FileSync Credits
4.2 Step 2: Permission Set Assignment
360 InstantDocs includes two permission sets that control access to the application:
| Permission Set | Purpose | Assign To |
|---|---|---|
| 360 InstantDocs Admin | Full administrative access: configure the application, manage templates, manage buttons, view error logs, and generate documents. | Salesforce Administrators and InstantDocs power users |
| 360 InstantDocs User | Standard user access: generate documents from records, use bulk generation, and view generated documents. | Sales reps, managers, and all other end users who need to generate documents |
Assigning Permission Sets via InstantDocs Setup

Figure 6: InstantDocs Setup → Permission Set Assignment panel showing users with Admin/User checkboxes and the “Update” button
4.3 Step 3: Template Sharing Rules for End Users
The 360 InstantDocs User permission set grants Read access to the x360dc__Template__c object but does not include “View All” permission. This means end users can only see templates that are explicitly shared with them. You must create Sharing Rules on the x360dc__Template__c object to grant visibility to end users.
Step 4a: Create a Public Group for InstantDocs Users
Step 4b: Create a Sharing Rule on x360dc__Template__c
Recommended Sharing Rule Configurations
| Scenario | Rule Type | Criteria / Owner | Share With | Access Level |
|---|---|---|---|---|
| All active templates visible to all users | Criteria-based | IsActive__c = TRUE | Public Group: All InstantDocs Users | Read Only |
| Templates shared by department | Owner-based | Owned by specific Admin Role | Role: Sales / Support / etc. | Read Only |
| Specific templates for specific teams | Criteria-based | Standard/Custom Field (e.g., Name = “Sales Template”) | Public Group: Sales Team | Read Only |
4.4 Step 4: Object Configuration
Before users can generate documents, you must specify which Salesforce objects should be available for document generation in InstantDocs.
Left side: Available Objects — all Salesforce objects in your org
Right side: Selected Objects — objects currently enabled for InstantDocs
Use the search fields above each list to filter objects by name. Move the objects you need (e.g., Account, Contact, Opportunity, Quote, Contract, Case, Lead, and any custom objects) to the Selected side.
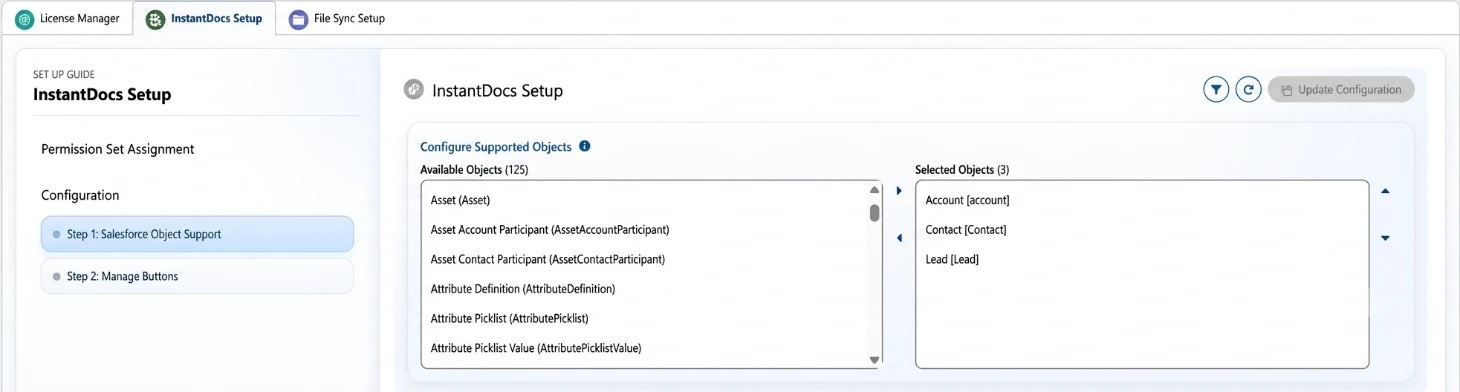
Figure 7: Object Configuration dual listbox with Available Objects on the left and Selected Objects (Account, Contact, Opportunity, Quote) on the right
4.5 Step 5: Microsoft Word Add-In Installation
The 360 InstantDocs Word Add-In allows users to design and edit templates visually in Microsoft Word, with a dedicated sidebar for browsing Salesforce fields and inserting merge tokens.

Figure 8: Microsoft Word with the 360 InstantDocs Add-In visible in the My Add-ins panel. Click “Add” to install it
5. Verification Checklist
After completing all setup steps, use this checklist to verify that 360 InstantDocs is fully configured and ready for use:
6. Troubleshooting Common Installation Issues
| Issue | Likely Cause | Resolution |
|---|---|---|
| 360 InstantDocs app not visible in App Launcher | Permission set not assigned or user not logged out/in after assignment | Assign 360 InstantDocs Admin or 360 InstantDocs User permission set to the user. Have them log out and log back in. |
| License shows “Inactive” after clicking “Authorize & Sync with Server” | OAuth popup was blocked by the browser, or authorization was not completed | Disable popup blockers for your Salesforce domain. Try the authorization again. Ensure you complete the full OAuth flow in the popup. |
| “Record Id is missing in the button configuration” error when clicking a URL button | The c__recordId parameter is missing or the merge field is incorrect | Verify the URL includes c__recordId={!Object.Id} with the correct object merge field (e.g., {!Opportunity.Id}). |
| “Execution mode is missing” error | The c__mode parameter is not included in the button URL | Add &c__mode=auto or &c__mode=view to the button URL. |
| “Template Id is missing” error | The c__templateId parameter is missing when mode is set to auto | Add &c__templateId=YOUR_TEMPLATE_ID to the URL, or set c__mode=view to let users select a template. |
| No templates appear in the template selection dropdown | Templates are not active, not mapped to the correct object, the object is not enabled in Object Configuration, or Sharing Rules are not configured | 1) Check that the template’s IsActive checkbox is checked. 2) Verify the template’s SObject_Name matches the record’s object. 3) Ensure the object is enabled in InstantDocs Setup → Configuration → Object Support. 4) Verify Sharing Rules on Template__c are configured to grant the end user visibility to template records. |
| Word Add-In cannot connect to Salesforce | OAuth policies not configured, or user not assigned to a permitted permission set | Ensure the user’s permission set is assigned. Verify OAuth External Client App configuration in Salesforce Setup. |
| Document generation fails with a server error | Remote Site Setting is missing, or the document generation server is unreachable | Verify the x360InstantDocs Remote Site Setting exists in Setup → Remote Site Settings and is active. Check the Error Log tab for detailed error messages. |
| Quick Action not visible on record page | Action not added to the page layout | Edit the object’s page layout and add the Quick Action to the “Salesforce Mobile and Lightning Experience Actions” section. |
| Bulk generation button not visible on list view | Button not added to the list view search layout | In Object Manager, edit the Search Layouts / List View Button Layout and add the button to the Selected Buttons list. |
7. Important Notes for Upgrading to InstantDocs v1.24 or Later
Steps to Update the App Name and Logo

Figure 9: Lightning Experience App Manager — search for “360 File Sync” in the list and click Edit

Figure 10: App Details & Branding screen — update the App Name and Image under the App Branding section
© 2026 360 Degree Cloud Technologies. All rights reserved.