360 degree cloud technologies pvt. ltd.
Flag_of_the_United_States

US

  • Flag_of_the_United_States

    US

    +1 309 316 7929
  • Flag_of_the_United_Kingdom

    UK

    +44 789 703 1106
  • Flag_of_Australia_converted

    AU

    +61 4800 94870
360 degree cloud technologies pvt. ltd.

Let's learn what Heroku and Heroku Connect is

Salesforce and Heroku are two of the most potent platforms actively used by businesses.
Connecting Salesforce to Heroku allows you to get Salesforce CRM data to update the Sales Cloud automatically. The integration saves time and ensures your sales teams always have the needed data from the application in Salesforce, thus improving their productivity.
Users have so far discovered many ways to move data in and out of Salesforce, but it’s not worth it if the process is challenging, time-consuming, and expensive. That’s where bringing Salesforce and Heroku together works.
We have helped many companies leverage Heroku Connect to achieve this with minimal effort.
In this article, we’ll brief you about Heroku and Heroku Connect and its features and how its bi-directional synchronization with Salesforce could be helpful.
Also, we’ll guide you through the steps to integrate Salesforce with Heroku using Heroku Connect. This will help you access your data stored in Heroku Postgres Database within Salesforce.

What is Heroku?

Heroku is a Platform as a Service widely relied upon among developers, allowing hassle-free application deployment, scaling, and management.
The platform supports multiple programming languages such as Python, Java, PHP, Ruby, Node.js, Scala, and Clojure. Heroku uses virtual containers called Dynos to run applications.
Charges of Heroku are based on computing resources like RAM and virtual machines allocated for its use. It helps developers achieve swift application development, making it a convenient platform for use.
Being PaaS, Heroku provides a fully managed service, can automatically scale up / down servers, and takes care of the infrastructure. Heroku can be easily integrated with your Salesforce platform using Heroku Connect.

What is Heroku Connect?

Heroku Connect is an add-on for Heroku that helps users to sync selected Salesforce data with a Heroku Postgres database.
In essence, Heroku Connect is a data integration feature built strictly for Salesforce. Heroku Connect allows users to access a Postgres database called ‘Heroku Postgres’ for storing data.
Heroku Connect replicates the data stored in Salesforce, thus reflecting the changes made in Postgres into Salesforce. Similarly, all changes made in Salesforce get reflected in Postgres. This kind of bi-directional synchronization is the main advantage of using Heroku Connect.
The platform can be advantageous for time-sensitive use cases, helping developers improve customer experience in the app using the data in Salesforce. One of the best use cases is with apps that need to pull data directly from Salesforce and are required to stay updated frequently.

How Heroku Connect Works

For Heroku Connect to work, you must create a user-specified subset of the objects and fields from a Salesforce deployment into corresponding tables in a Postgres database. This mapping is done declaratively using a point-and-click UI. An initial read of Salesforce data populates it.
Some of the Heroku Connect features are:
Layer 5 copy 11 1
Access Salesforce data via SQL: Heroku Connect allows you to use SQL’s full power for all your data management and development tasks.
Layer 5 copy 11 1
Performance and scalability: Heroku Connect allows Postgres to act as an API cache as all data is stored in the database. It thus helps to quickly respond to read requests without requiring calls back to Salesforce.
Layer 5 copy 11 1
Optimized Force.com API interactions: Heroku Connect uses many best practices to interact with the Force.com API. Heroku Connect automatically picks the most efficient API strategy based on the system’s state at any time and how much data is required to be changed or moved.
Layer 5 copy 11 1
Set it and forget it: Once a user configures the Salesforce data they want to synchronize into Postgres, the Heroku Connect service will run without additional administration, programming, or scheduling.

Integrating Salesforce with Heroku using Heroku Connect

Heroku Connect is highly used to conduct Heroku Salesforce Integration efficiently. You can develop applications to share your data with Salesforce with Heroku Connect.
It also helps to collaborate data in your Heroku Postgres Database with accounts, contacts, etc., in the Salesforce Database.
Let’s move further with steps to implement the Heroku Salesforce Integration:

Step 1: Create a new Heroku application

Start with signing in to your Heroku account.
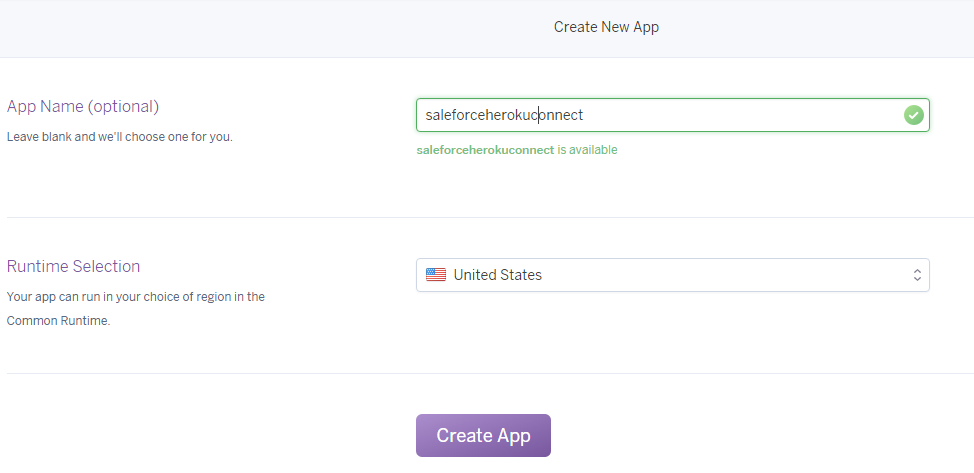
Navigate to the Heroku app creation page to find and click Create New App. You have to set a suitable name and region for your application. Then click Create App.
Create App.
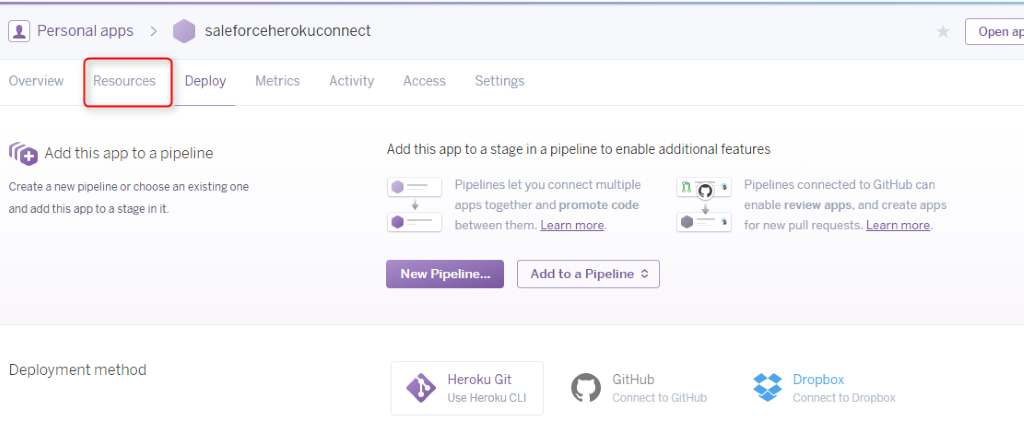
Navigate to the Heroku app

Step 2: Implement the Add-ons for Heroku

After creating a new application, you’ll be navigated back to the Heroku Dashboard.
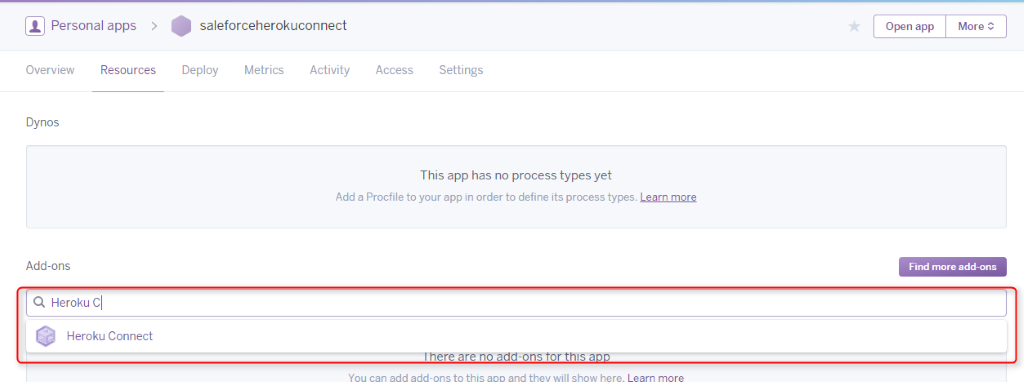
Now you have to navigate to the top menu and select Resources.
add Heroku Connect to your application.
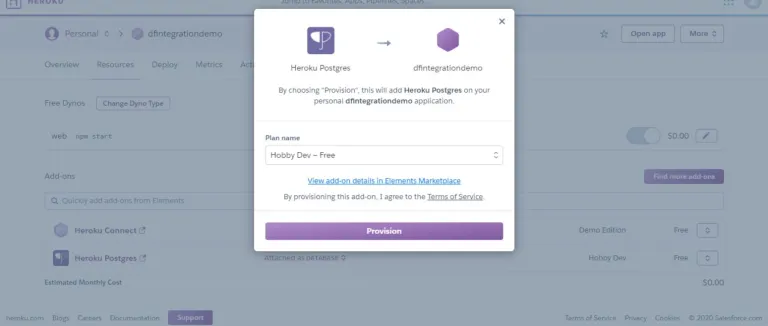
In the Add-ons search box, look for Heroku Connect. Then select provision to add Heroku Connect to your application.
Heroku Connect to your application.
You must repeat the same process for another add-on, “Heroku Postgres.” Then use the plan “Hobby Dev Free” for provisioning it.
Heroku Connect
With this step, you can add both Heroku Connect and Heroku Postgres Database to your newly created application.

Step 3: Follow and Perform the Heroku Connect Salesforce Process

Work on initiating the Heroku Salesforce Integration process as the required add-ons are available in your application.
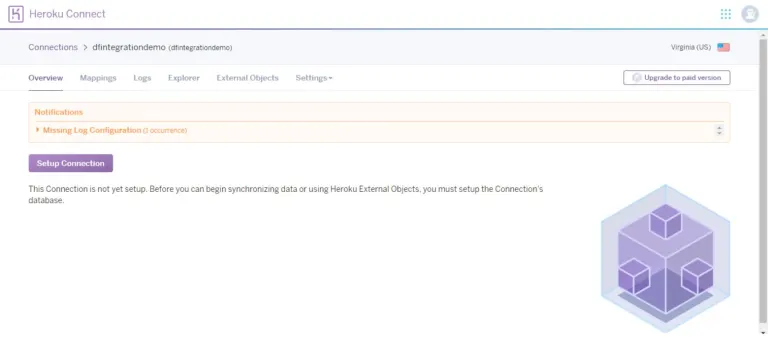
Click Heroku Connect Resource, and you’ll reach a new page. Click Setup Connection to set up your Heroku Salesforce connection.
Heroku Salesforce integration.
Decide a relevant name for your schema. Click “Next” to continue with the Salesforce connect Heroku process.
Then you have to go to “Environment” and select production from its dropdown menu.
Select your API Version and click “Authorize,” as shown in the image below. Log in using credentials. This will begin your Heroku Salesforce integration.
click Authorize

Step 4: Create Mapping

Now your Heroku Salesforce Integration is in place. This enables you to map the desired Salesforce object with Heroku.
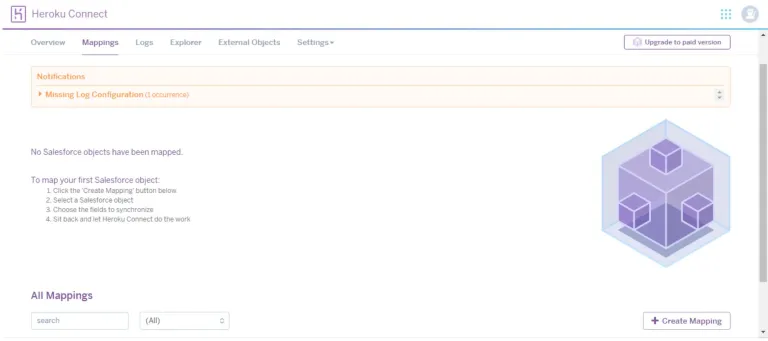
Log into your Heroku application. Go to “Resources.” Open Heroku Connect add-ons and select “Create Mapping. “
Select the object you want to map, and pick the required fields to synchronize with your Heroku application.
Heroku Connect mapping
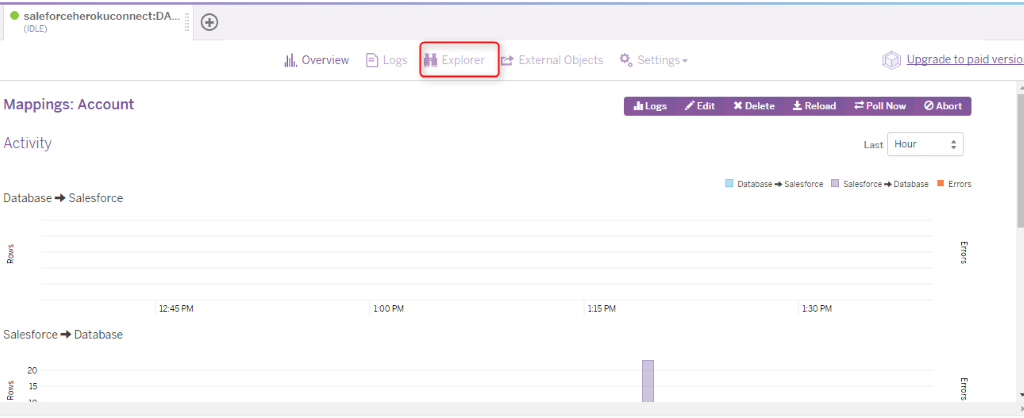
Once you’ve done it all, data from the Salesforce object will automatically synchronize with the Heroku application. You can also monitor the Salesforce data with the “Explorer” option at the top menu on the Heroku dashboard.
image 525
That’s it! The Heroku Salesforce Integration is ready for use.
Using Heroku Connect, you can even directly use the PDF for
Steps to integrate Salesforce with Heroku. → 

Wrapping Up

From data replication to data proxies, many reasons will persuade you to integrate Heroku with Salesforce, and using Heroku Connect is the best way to do so.
The given PDF will guide you through the steps to integrate Salesforce and Heroku using Heroku Connect, but if you need any help, get in touch with our certified Salesforce experts for the best assistance.

Need help implementing this?

Leave your details here and consulting expert will get back to you and hold your hand through this


+1

Loading......


Captacha

refresher